A mini manual sewing machine will definitely not take up extra space! Review of the best mini cars in a convenient price range. Mini sewing machine Manual sewing machine instructions
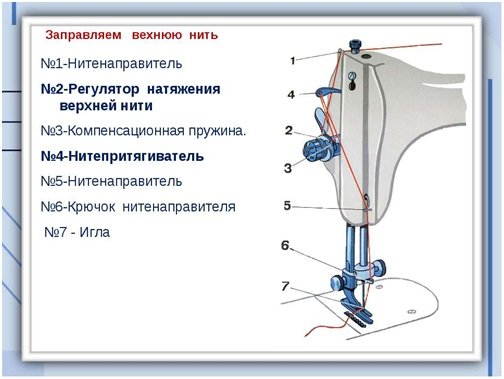
Let's move on to the tension regulator, which is a small wheel with a set of numbers. Thanks to this device, you can control the tension of the thread during operation. If the tension is strong, the needle will deviate slightly to the side. If the tension is insufficient, the thread will gather and tangle on the reverse side of the fabric being processed.

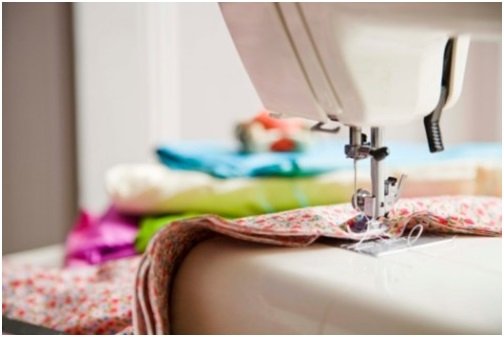
Let's start looking for the needle holder screw that securely holds the needle during operation. Usually it is located under the sleeve of the machine.

Next, you should find a foot that looks like small skis. Thanks to the foot, the fabric is securely attached to the machine and moves in a given direction. 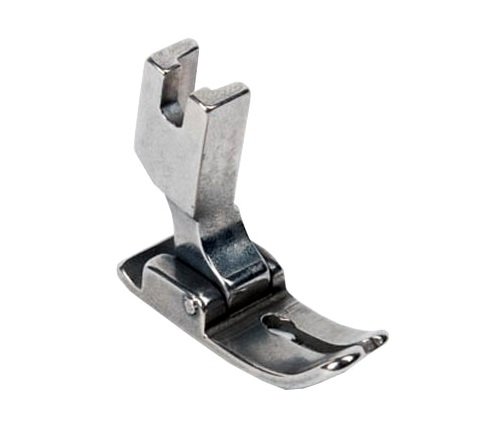 Using a special lever located behind or to the right of the needle, you can raise and lower the presser foot onto the fabric.
At the bottom sewing machine there is a small bobbin that feeds the second thread to the needle. You can find it under the metal plate under the needle. The bobbin is released using a lever or button. It is needed to thread the second thread.

So we figured out the simple structure of a sewing machine. Now you need to learn in detail how to properly use a sewing machine.
Setting up the sewing machine before starting work
The machine must be placed on a flat, stable surface so that the needle is on your left side. First, you'll need to check a few basic settings. No network connection required yet.
- Insert the needle into the machine: The flat side of the needle should face backwards and has a groove on the front to hold the thread while sewing. Insert the needle into the machine and tighten the special screw to hold it in place.
- Installing the coil. All machines use upper and lower thread. The threads in the spool must be placed on the upper spool seat, then the thread passes through the thread guide to the foot and is finally inserted into the needle. The lower thread must be placed inside the bobbin at the bottom of the machine: the thread is wound from the main spool using a thread take-up onto the bobbin. To wind the thread, you need to start the winding mechanism; when the process is completed, it will automatically turn off. The bobbin, ready for use, should be placed in the space under the needle, and the tip of the thread should be left outside.

- Connect the pedal and place it in a location convenient for you.
- Now you can turn on the device and try to make a few lines.
Learning to sew on a sewing machine
Before you start sewing on a new machine for the first time, you need to adjust the speed and learn how to start and stop the device.
- First you need to put the electric machine to idle.
- Try to set the device in motion by lightly pressing the ballast pedal with your foot.
- Increase the sewing speed by pressing the pedal harder.
- If you remove your foot from the pedal, the machine will stop working.
It is best to repeat the above steps 2-3 more times.
Now you can start working directly.
- We prepare the fabric: fold it in half, stitch it on our hands, and then use chalk to draw various broken and curved lines.
- We put the machine in workplace and fill it up.
- Sew the fabric along the marked lines.
If you succeeded, congratulations! Now you can try to sew something more serious.
In order for equipment to serve properly for many years, it needs to be looked after and used correctly. Here are the basic rules for caring for an electric sewing machine:
- The machine should be stored in a cool, dry place. Dampness spoils the mechanism.
- Hide the device from dust, which causes the oil to harden and run poorly.
- If the machine has not been used for a long time, it must be thoroughly cleaned of dust and dirt, and then the rubbing parts must be treated with oil.
- After a long period of “downtime”, you must definitely change the needle with a new one, as it may become rusty and begin to tear the thread.
Video instructions
Using the machine is easy if you follow the instructions and our recommendations. To more accurately understand the threading process, watch the video instructions.
What you will learn from the video:
- Removing the bobbin case from under the bottom panel of the machine for threading.
- Winding thread onto a bobbin.
- Installing the bobbin into the bobbin case.
- Installing the bobbin case into the bottom of the sewing machine.
- Threading the upper thread through the first thread guide, thread tensioner, second thread guide to the needle.
- Pulling out the lower thread and preparing for work.
The old mechanical sewing machine broke down, and I wanted to replace it with a new, electric one from China. And without knowing it, I took “the one from the TV store on the sofa” for review.
Read the review to see what came of it.
At first I wanted to take the most sophisticated one with 7 types of stitches, but the manager replied that it was not available and offered the simplest one. Following the proverb “from a thin sheep there is at least a tuft of wool” - he agreed.
I boasted to my brother about my upcoming purchase, and then for the first time I heard about an advertisement for a car from the Telemagazine. This sounded quite alarming to me.
Sent quite quickly. After 20 days I received the parcel by Dutch post.
The box is quite ordinary. A little wrinkled on the way.
Dimensions 23x21x13.5 cm. 

The kit includes: a spare needle, a needle threader, two empty bobbins and two with thread - black and white. 
The machine also comes with extensive instructions in English. 


It is possible to control it using a foot pedal.
The pedal itself is quite small, length 88 mm, width 57 mm.
The cable length is 150 cm, the plug is very similar to an ordinary 3.5 mm minijack.

Powered by either four AA batteries or mains power.
Power adapter with European plug.
Cable length 110 cm.

Declared characteristics.

Both adapters are connected to the corresponding ports on the rear of the machine.

The photo above immediately shows my first disappointment. We take the cars out of the box and it’s immediately clear that they are cheap. Flimsy plastic. Gaps between parts, etc.
The length of the machine is approximately 19 cm, the height is also 19 cm. It weighs only 640 g without batteries.


Width 97 mm.


At the bottom there is a compartment for batteries.


Now let's get acquainted with the controls of the machine.
Power button.

To the left of it is the operating speed switch, Low-High, respectively.

The flywheel is located on top of the rear part.

In the middle there is a peg for winding thread onto a bobbin.
The pin is put on the pin, and the reel is put on this retractable rod.


Then, having thrown the thread through your finger or pencil, you need to run the machine idle and you can wind the thread.
There is a bobbin holder on the front.

From it the thread goes to the upper thread tension regulator.

On the back of the machine there is a lever for lifting the presser foot. Made of plastic and quite thin, there are serious doubts about its reliability.

At the top of the front of the machine there is a small light bulb.

And also a small blade for cutting thread.

The hole in the needle plate is small, oval in shape.

The bottom bobbin is hidden under the semi-transparent cover.

It is held in the recess by a weak magnet.

I was unable to disassemble the machine, since the screws are located at the bottom of deep “wells” and I needed a long screwdriver.
After receiving and inspecting the machine, I decided to read the instructions, but I didn’t want to translate it from English.
I started searching for information on the Internet.
I couldn't find any instructions in Russian. But I discovered that this machine is sold under many different names - Tailor, Sinbo, Irit, Fanghua FHSM-203, etc. And almost all reviews from users were negative.
Then I went to Youtube in search of instructions. The program “Smashing a sewing machine from a TV store - Advice from Everything will be good - Issue 407” left no stone unturned in hopes for high-quality sewing. And the last nail in the coffin is the video “ROSTOV. The whole truth about Mini Sewing Machines” from a repairman for these products.
The information that everything inside is plastic and cannot be repaired was frankly not encouraging.
But still, the opinion of strangers is one thing, and your own is another.
Let's check the machine in action.
I don’t see the point of inserting batteries inside, so I connected it to the network. Used to control the pedal. It’s quite normal, but it’s too small – I literally had to thumb press your feet.
The backlight is not very good.

Let's start with a simple thin fabric. I found an old sleeve from a cotton shirt.

Looks good. Only the seam pulls the fabric, you need to adjust the thread tension.
Face.

Reverse

Stitched fine.

I tried stitching the cuff. The machine stopped and the thread flew out of the needle.
Now a piece knitted T-shirt. Look at the lighting at the same time.

WITH front side just a loose seam. Please note that the fabric does not stretch.

But the opposite is a complete failure.


It is necessary to adjust the tension of the lower thread, but the device does not have such an option. Absent.
And finally - a control shot. Two layers of thick denim.

The front seam is small and looks good.

Nose reverse side the thread is simply straight, it cannot even be called a seam.

Thus, the machine can sew, but it needs adjustment, and this is not possible. Thin fabric pulls. When sewing on thick fabric, there are problems with the bottom thread, and sometimes the machine just stops and cannot sew.
As they called it in the program - a machine for handkerchiefs.
It could be recommended for very undemanding users, if not for the price. For this money, the machine will not be suitable either for handkerchiefs or for pampering a child.
Once again, goods from TV stores have shown their unsuitability for use. Avoid them.
That's all.
Thank you for your attention.
Update. It turned out that my top pin and thread were installed the other way around.
I turned it over and tried to adjust the thread tension. It only got worse. Now the thread keeps flying out of the needle. The machine doesn't sew.
The product was provided for writing a review by the store. The review was published in accordance with clause 18 of the Site Rules.
I'm planning to buy +9 Add to favorites I liked the review +67 +99Good afternoon
I love creativity, I often sew small crafts, and also sew for household needs, I decided to try out, I’m not afraid to say - a miracle of technology - a manual sewing machine, I had it called Portable Needlework Cordless Home Sewing Machine Quick Table Mini Handheld Manual Single Stitch Fabric Clothes Sewing Machine, but this is the same machine from Aliexpress, so there may be slightly different names due to different sellers
I didn’t believe that the machine would sew at all, ask why I ordered it then, honestly, out of interest. The car took quite a long time, but I didn’t need it that much, so I didn’t languish in anticipation.
It came in a box, the needle was intact - this is the first thing you need to check, sometimes they break on the road, open the box carefully so that a piece of the needle does not fall.

My needle was intact, most often the machine arrives ready for sewing, but you still need to make sure everything is in place correctly.
- In the box there is a little thing to quickly insert the thread, as well as a stick for a wider bobbin.

Let's begin by inserting the thread and starting sewing.
- First, check that all the threads are on the bobbin, and not in the opening between the bobbin and the stick on which the bobbin stands. When winding the thread, make sure that you do it exactly on the bobbin, and not in the gap between;
- We pass the thread into the plastic protrusion as in the photo;

- Next comes the thread tensioner, it can be adjusted and sometimes you can’t sew, because the thread is either too tight or, on the contrary, weak, but there is no single answer, you need to try to carefully adjust the tension, but that’s not about it yet, we don’t adjust anything until we try sew, DO NOT MAKE A LOOP WITH A THREAD, you don’t need to make a whole revolution around the tensioner, the thread, for you to understand, should roll downhill and then it goes into an invisible at first glance - loop - hook, as in the photo, we thread it through this hole as in photo:

- This is the hook under the tensioner:

Each sewing machine has its own instructions that are different from other brands of machines, but most economy class machines with an oscillating hook (like the Chaika sewing machine): Brother, Jaguar, Singer, Veritas, Janome, Husqvarna and other brands have almost the same device.
Operating rules, threading, switching operations, installing the bobbin case, lubrication and maintenance, etc. The instructions for such sewing machines are almost the same.

Main parts of a sewing machine:
1. Stitch type selection knob. Using this handle, you set the required type of stitch: straight, darning, zigzag or shifting the needle for sewing on a zipper, making a buttonhole, etc.
2. Buttonhole fine adjustment screw. Not every machine has such an adjustment. It is designed to equalize the frequency (density) of the zigzag stitch when making a loop. That is, in one of the directions the zigzag will be less frequent, so before making a loop, check it on a scrap of the same fabric. And if necessary, make adjustments.
3. Thread take-up lever.
4. Removable table with storage compartment for accessories.
5. Disc adjuster for upper thread tension.

6. Key for moving fabric in the opposite direction.
7. Device for cutting thread. A very convenient device, but it requires some getting used to. Usually they rarely use it, they simply forget about it when cutting the thread with scissors.
8. Presser foot adapter assembly.
9. Screw for securing the presser foot adapter.
10. Presser foot.
11. Needle plate.
12. Shuttle knot.
13. Bobbin case.
14. Combs (rail) of the fabric conveyor.
15. Sewing needle.
16. Needle clamp screw.

17. Shuttle cover.
18. Rod for installing the coil.
19. Bobbin winding device.
20. Flywheel.
21. Pedal connection socket.
22. Presser foot lever.
23. Power switch and backlight bulbs.
24. Built-in carrying handle.
25. Thread guide, thread tension regulator when winding on a bobbin.
Sewing machine accessories

1. Buttonhole foot. A special foot that is convenient for making buttonholes. The size of the loop depends on the size of the button inserted into it. In inexpensive models of sewing machines, buttonhole sewing is done in 4 steps.
2. Foot for sewing in a zipper.
3. Foot for sewing on buttons.
4. Set of needles.
5. Double needle.
6. Bobbins.
7. Darning plate. This plate replaces the lever lowering the toast. The plate is simply placed over the rack, hiding the teeth so that the fabric does not move forward when the machine is running.
8. Screwdriver
9. Additional spool pin. This rod is necessary when using a double needle, its purpose is to install a second spool of thread.
The accessories listed above are stored in a specially designed case inside the extension table. These accessories are designed to make most sewing tasks easier.
Needle installation instructions

Before installing the needle, be sure to turn off the sewing machine from the mains. This must be done especially for inexperienced, just beginning seamstresses.
1. Unplug the power cord from the electrical outlet.
2. Raise the needle bar to its highest position.
3. Lower the presser foot.
4. If the needle is already installed, remove it by loosening the needle clamp screw by hand or a screwdriver and pulling the needle down.
5. Insert a new needle, with the flat side facing the back of the machine, pushing it as high as possible until it stops.
6. Tighten the needle clamp screw.

1. For high-quality sewing, the sewing needle must be straight and sharp.
2. To check the straightness of the needle, place it flat side down on a flat surface as shown in the figure.
3. If the needle is bent or dull, replace it. Never try to straighten or sharpen it. The metal from which the needle is made is not intended for this.
See DIY Sewing Machine Repair.

Depending on the type of work you do, you may need to replace the presser foot. Turn the power switch to position "O".
2. Release the presser foot by lifting the lever on the back of the presser foot adapter assembly.
3. Place the presser foot on the needle plate so that the cross bar of the presser foot is under the groove at the bottom of the presser foot adapter.
4. Lower the presser foot lever and lock the presser foot into the adapter. If the presser foot is in correct position, its rod will snap into the adapter.
Reverse motion of the sewing machine. Setting

To sew in the reverse direction, press the reverse sewing key all the way and hold it in this position while lightly pressing the pedal. To sew in the forward direction, release the key. Reverse stitching is used to secure and reinforce seams. It is possible to use reverse feed to make decorative stitches and darn clothes.

1. Place the spool of thread on the spool pin and guide the thread around the thread tension dial while winding the bobbin.
2. Pass the end of the thread through the hole in the bobbin from the inside.
3. Place the bobbin on the bobbin winder shaft and slide the shaft to the right. Rotate the bobbin clockwise by hand until the spring on the shaft fits into the slot on the bobbin.
4. While holding the end of the thread, gently press the pedal until a few turns of thread are wound around the bobbin. Then stop the car.
5. Trim the excess thread above the bobbin and, while pressing the pedal, continue winding the thread onto the bobbin. Note: When the bobbin is full of thread, the machine stops automatically.
6. After stopping the machine, cut the thread between the bobbin and bobbin, slide the shaft to the left and remove the wound bobbin from the shaft. Note: When the bobbin winder shaft is pushed toward the pinch roller, the needle bar does not move, but the handwheel continues to rotate. Therefore, do not touch the handwheel while winding the bobbin.
Threading the bobbin thread into the bobbin case

Turn the power switch to the "O" position.
1. Raise the needle to its highest position by turning the handwheel toward you (counterclockwise), then raise the presser foot lever.
2. Open the bobbin cover behind the attachment table at the front of the machine, remove the bobbin case by pulling its latch towards you and removing it from the hook.
3. Unwind approximately 10 cm of thread from the fully wound bobbin and insert the bobbin into the bobbin case. Pass the unwound end of the thread through the slot, then down and to the left until the thread fits into the hole under the tension adjustment spring.
4. Hold the bobbin case by the latch, insert it all the way into the hook, and then release the latch. Make sure that the pin of the bobbin case fits into the groove provided for it in the upper part of the hook. Note: If you insert the bobbin case into the machine incorrectly, it will fall out of the hook immediately after you start sewing.

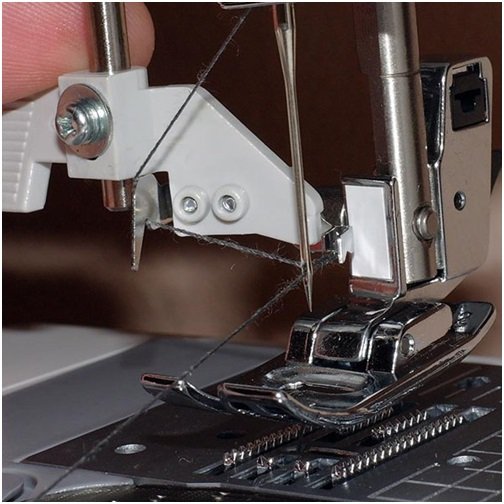
1. Raise the presser foot lever using the appropriate lever, and turn the handwheel toward you (counterclockwise) to raise the thread take-up lever to its highest position.
2. Pull up the spool pin and place the spool of thread on it.
3. Pass the thread through both thread guides: first through the rear and then through the front.
4. Pull the thread down and around the upper thread tension dial from right to left until the thread catches the limit spring. Hold the thread and pull it between the tension discs.
5. Guide the thread to the back of the thread take-up lever and then around it from right to left. Pass the thread through the slit, pulling it towards you until it hits the thread take-up eyelet.
6. Lower the thread down and pass it behind the thread guide.
7. Thread the thread into the eye of the needle from front to back and pull out about 5 cm of thread. Note: If the thread is not threaded correctly, it may break, skip stitches, or wrinkle the fabric.
If your sewing machine does not have instructions and you do not know how to use it, you can use this simplified and universal guide. These instructions are suitable for any economy-class sewing machine with an oscillating hook that performs a minimum set of operations.
The user must study the basic principles of operation of a sewing machine before mastering the basics of tailoring. Depending on the type and features of the device, some details of use may differ. A manual sewing machine is a machine that has been around for many years, but not everyone knows how to use it correctly.
Preparing a sewing machine for work consists of several stages:
- study the instructions for the device;
- needle installation;
- threading;
- selecting the desired sewing mode.
Even in the process of choosing a suitable device, it is worth asking whether there are instructions for the sewing machine model you like in Russian. The presence of such a document in the kit is especially important for those who have never dealt with such devices. This also applies to purchasing a used car through message boards. As a last resort, before purchasing, you should take care to search for instructions on the Internet.
Of course, if you purchase a model of an old-style manual sewing machine, for example, “ Podolsk" or "Singer"", it is unlikely that you will be able to get original rules of use for it. Sometimes this is not required, since such devices are easy to set up and operate. It is easy to refill and maintain. Such devices are reliable, which is why they are still valued. Another advantage of old hand sewing machines is Possibility of sewing thick fabrics- this is beyond the capabilities of most modern household models.
Needle installation
Only after studying the safety rules when working on sewing machine, you can start using it directly. The first thing to do is to install the needle correctly. This applies to all models, be it manual or foot operated.
The thickness of the needle is selected depending on the material that will be used for sewing. It is best to purchase a set of needles along with the sewing machine - this will allow you to work with fabrics different types and thickness.

Sometimes such sets provide comments on needle numbers and what fabrics they are suitable for.
To install the needle, you must perform the following steps.
- Put needle holder to the highest position by turning the flywheel.
- The sewing machine needle has a special structure, after studying which you can easily install it correctly. The flat side of the flask is inserted outward, and the long groove is inserted inward (to the base of the sleeve).
- The needle is inserted all the way into the holder provided for it and secured with a screw.
Correct needle placement is very important. Otherwise, loops will not be created during operation, which will lead to omissions.
How to thread a sewing machine
Refilling modern devices is easy: as a rule, all steps are shown in the instructions. schematic drawings. The body of modern devices has digital markings or arrows to help with threading. But if the document and drawings are missing, then you will have to cope on your own.

Upper threading instructions
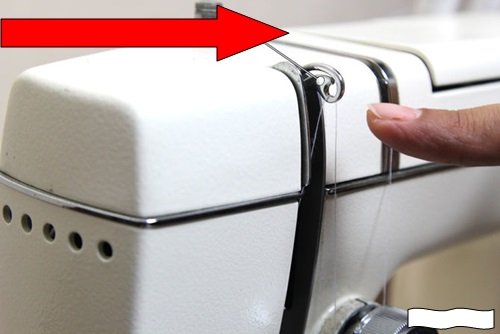
You should always start from the top. Having grabbed the end of the thread, it is threaded through a small window on the back panel of the device, taken to the tension regulator, threaded through the corresponding loops and brought out onto the needle.
If threading is incorrect, there is a risk of thread chafing during sewing or malfunction of the unit.
Also carried out in accordance with certain rules. Regardless of the type and model, threading the hook (installing the bobbin) is done in such a way that the thread comes out clockwise. When threading, you should pay special attention to the thickness of the thread (its number) - it should be the same. The rules for operating a sewing machine require that you wind the thread onto the bobbin from the same spool that will be installed for the upper thread.

Instructions for threading the bobbin thread
How to thread a sewing machine
To pull out the bobbin thread:
- take the end of the upper thread (without pulling it), which is already inserted into the needle;
- lower the needle into the needle plate using the handwheel;
- the needle will grab the shuttle thread, all that remains is to pull it out.
Mode selection
Before work, you should study the location of the mode switches, thread tension, and reverse. Modern models provide a graphic representation of the types of stitches on the body of the device (straight stitch, zigzag, overcasting, etc.); on older machines, the choice of stitches is not so large. For reverse(to secure the thread at the end of work) all models provide a small lever.
After all the preparatory measures, the material is placed under the foot, which is then lowered onto it, and you can start sewing directly.
Mini sewing machines
The modern market for sewing equipment is quite diverse. Today, manufacturers produce miniature manual sewing machines that fit in the hand. Their main advantages:
- compact dimensions;
- absence of complex threading mechanisms;
- ease of operation;
- stitch length can be adjusted.

The features and rules for using a compact manual sewing machine are very simple. Simply insert one thread, select the stitch length, and you can start sewing right away. They can be easily take with you on the road. They are suitable for making urgent clothing repairs or adjusting the length of curtains without removing them from the curtain.
General rules for operating hand sewing machines
Operation of a manual sewing machine must be carried out with strict compliance safety regulations.
- It is permissible to rotate the flywheel in only one direction - on yourself. Rotating in the opposite direction will cause the bobbin thread to become tangled.
- When the machine is not being used, the clamping foot must be in the raised position.
- You cannot work on a machine without fabric. This will cause the lower teeth of the foot to become dull.
- During operation, tensioning of the material is not allowed; you only need to adjust its direction. The machine does all the movement itself.
- During work shuttle cover on the body must be closed.
- While working, do not bring your fingers close to the needle or try to adjust the thread of a working device.
- Do not sew on pins holding the thread together - this will cause the needle to break.
Learning how to operate a sewing machine is not difficult. The main thing is to act according to the instructions and strictly follow safety precautions.


Popular
- Why do children develop aggressive behavior?
- Useful properties of Vaseline that you didn’t know about What is Vaseline and why is it needed?
- The right choice of hand cream against cracks and dryness
- How to prepare facial milk at home and use it correctly?
- Crochet toys with descriptions and patterns for beginners, patterns, professional amigurumi knitting
- Calculation of old age pension, or counting your pension yourself
- How I brought my husband back to the family
- DIY hairstyles for shoulder-length hair
- Uterine tone during pregnancy: symptoms, increased cervical tone Prevention of uterine hypertonicity
- Fashionable New Year's hairstyles for girls