Pattern for a knitted scarf with openwork. How to knit a headscarf with knitting needles with a raised border
Knitting needles with a raised border
Knitting needles with a raised border
If you don't have much knitting experience, this is a great opportunity to practice. Shaped yarn will hide all errors.
 How to knit a headscarf with knitting needles
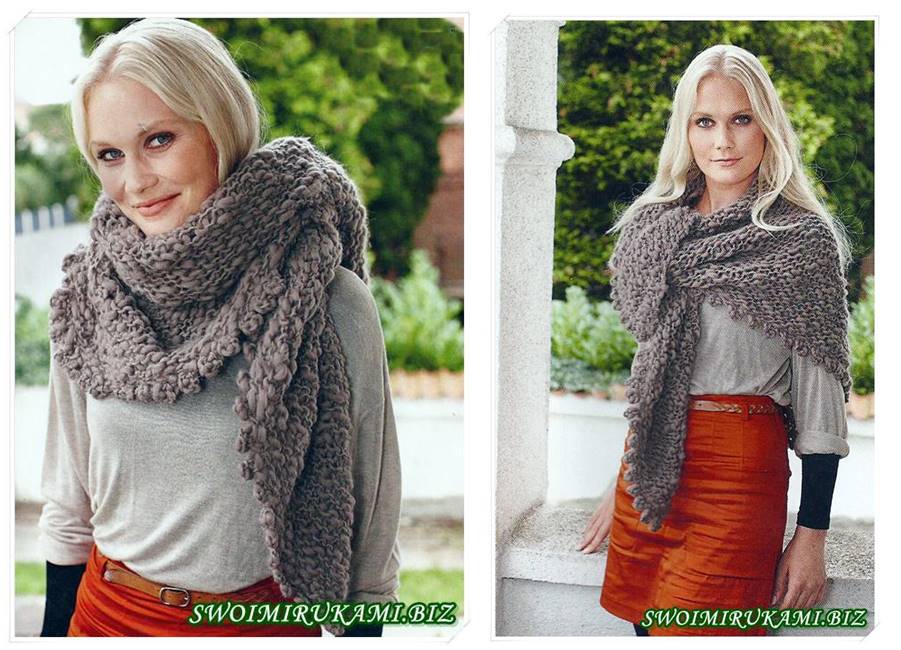
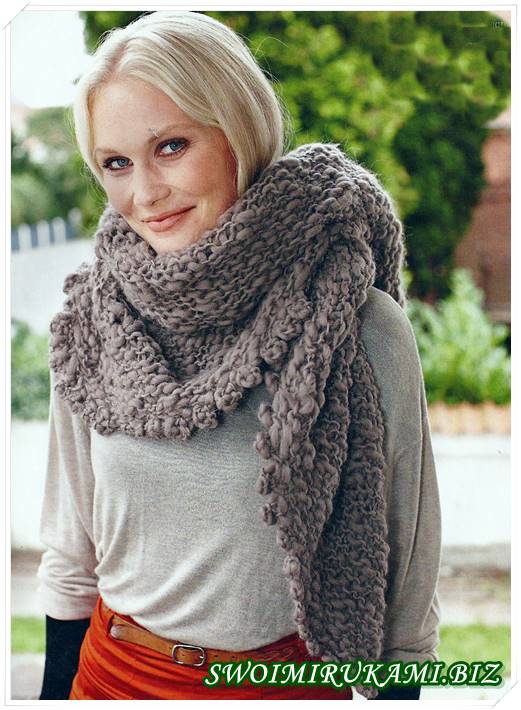
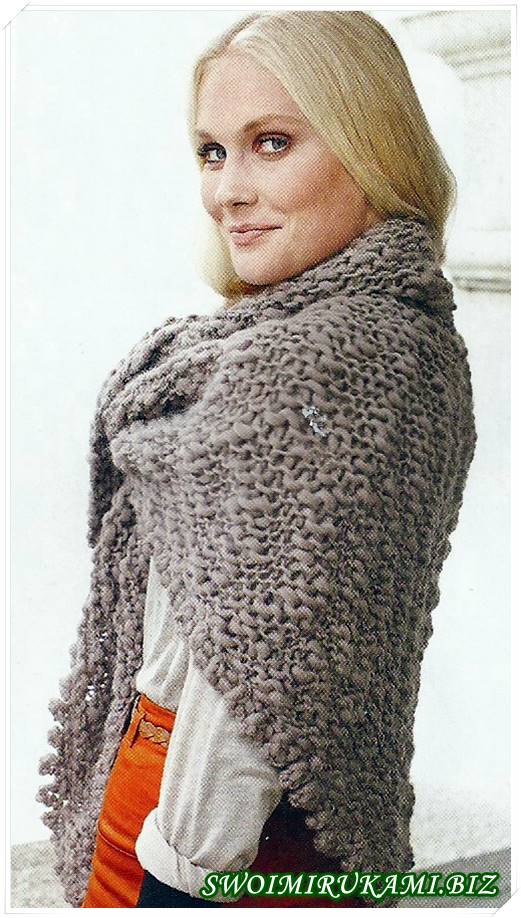
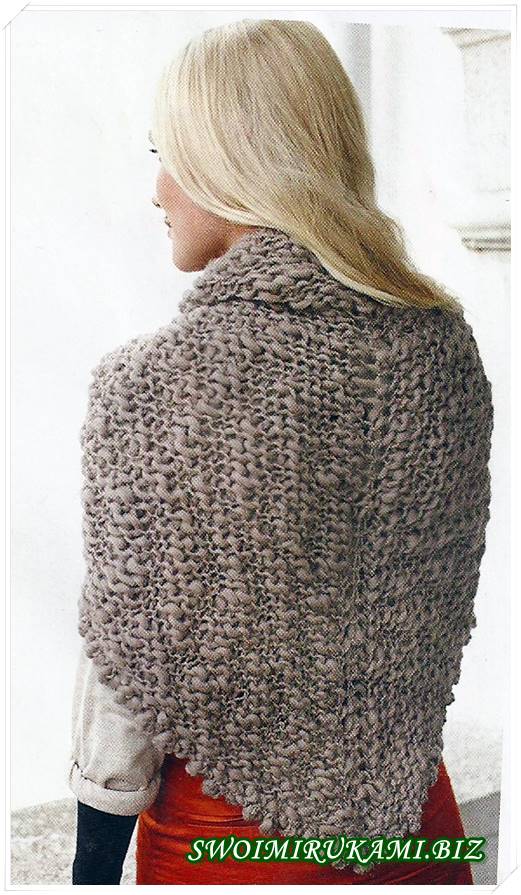
 This warm scarf is knitted on very thick needles from bulky fancy yarn - the work will be a breeze! Design: Sanne Fjalland
You will need: fancy yarn (80% sheep wool, 20% alpaca wool: 100 g\90 m) - 4 skeins of light brown: circular knitting needles No. 15 (80 cm) hook No. 9
Product size: width at the top edge - approx. 160 cm, length from top edge to the bottom corner - approx. 80 cm.
Important:
The scarf is knitted from the bottom corner on very thick needles in garter stitch. The work begins with 3 stitches; to expand in the middle and inside the knitted fabric, loops are increased. Finished product decorated with a raised crocheted border.
Increase 1 st: pick up the stretch between two loops with the left knitting needle and knit without crossing, + a hole is formed in the knitted fabric.
How to knit a headscarf with knitting needles, job description
Cast on 3 stitches and knit them = 1st row. In the 2nd r. (front side of the work) mark the middle loop with a marker-clip. Next knit as follows.
2nd r.(= front row): k1, increase 1, k1. (= middle marked stitch), 1 increase, k1.
3rd r and all subsequent purl rows: knit all stitches.
4th r (= front row): 1 person, 1 increase, 1 person, 1 increase, 1 person. (= middle marked stitch), 1 inc, k1, 1 inc, k1, 1 inc, k1.
Increase loops until the width of the product along the top edge reaches 160 cm, and the length from the middle of the top edge to the bottom corner is approx. 80 cm.
Finish the work with a purl row, knit it with knit stitches and at the same time bind off the loops.
How to knit a headscarf with knitting needles, embossed border and photo
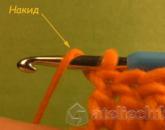
Crochet the sides of the scarf. To do this, attach the thread in a half-column to one of the side corners of the scarf.
Then * knit 6 ch, 1 connection. Art. back to the 1st ch (= 1 picot), skip a section equal to the width of the picot, and make 1 joint st* over the edge, repeat from * to * until the second side corner of the scarf. Break the thread and fasten.
 .
.
 .
.
 Elegant two-piece: openwork jacket and a top with a knitted border
 Mesh pullover with border
 Striped pullover with jacquard border. Description, diagrams
 Original cape and armbands. Description and diagrams
 Red knitted jacket made from Kross yarn
If you have a desire to learn something new and useful, you can do handicrafts. This is especially true in winter time when you want to be at home, warm and comfortable. We suggest you make yourself some elegant thing with your own hands. For example, how to knit a scarf with knitting needles? It’s never too late to learn how to knit, because, having mastered this entertaining and interesting type of needlework, you can update your wardrobe with beautiful and stylish items of excellent quality on your own. At the peak of fashion now again is a knitted scarf, which can become a very stylish addition to your fashionable look. A knitted scarf is suitable for both a little girl and a young woman, and will be simply irreplaceable if you knit such a thing for your grandmother.
You can knit such an interesting thing in several ways - crocheting, knitting, macrame. Depending on the selected tools and threads, the pattern is also selected to suit your taste. You can knit it with knitting needles, since this technique, in my opinion, is the most convenient to perform. If you want an openwork headdress, choose openwork patterns for knitting and soft, thin threads. If the function of the scarf is not only to complement your style, but also to protect against cold and wind, choose threads that are denser, but not coarse, and a pattern without holes. When knitting a scarf with knitting needles, I recommend using knitting needles No. 2 or No. 2.5, you will look at the thickness of the thread. The scarf can be knitted using the methods suggested here.
Method of decreasing loops
Why do I recommend this method? But because it is quite understandable even for beginners, and you can knit the product in a matter of hours. The most important thing here is to do correct calculations the initial number of loops and after these calculations, decide on the pattern. Choose it depending on your skills and experience. It is advisable to take the pattern in which you have already practiced before. But even if you knit a scarf using ordinary stocking stitch, the product will turn out beautiful and modern. For this type of knitting, I highly recommend choosing bright threads.
- To correctly calculate the loops of the first row, take the trouble to measure how many loops will fit into a centimeter of such knitting. You can specially knit a test piece and then measure it with a ruler, or you can cast on 20 loops and measure this chain. It will be about 8 cm.
- Now calculate how many loops you need to cast on for your product, to do this, measure one of the sides of the future scarf and multiply by two, then you should multiply again by the number of loops per 1 cm, do not forget to add two edge loops, this will give you the number of loops required for the work.
- When casting on the first row, divide the number of stitches in half using a contrasting color thread. This is necessary to ensure that your knitting ends up looking even. Knit three loops in the center of the product together, use an additional knitting needle for this.
- To knit a scarf correctly, decrease at the end of each row, knitting the last two stitches together.
- So, we knit until there are three loops left on the knitting needle. We fasten these loops with thread and do not forget to secure it later. The scarf can be decorated with rhinestones, fringe, embroidery, if desired.
The second way to knit a scarf
This method is the exact opposite of the first, since if the loops there are decreased, then the loops are gained here. Knitting a scarf this way is also not difficult.
To do this, cast on three loops on a knitting needle and add a loop at the beginning of each row and at the end. To prevent the edge of the scarf from looking stretched, add at the beginning of the row, but after removing it right knitting needle edge loop, and at the end of the row, increase before the edge loop. If you knit a scarf this way, be careful and control the increase so that the upper corner of the product is preserved.
When the scarf has acquired the desired size, we finish knitting. For this, in last row close all the loops at once. To make the scarf more openwork, you can sew openwork lace or beautiful braid along its edges. In both the first and second ways, it is possible to knit a scarf with knitting needles and even warm threads, the main thing is not to forget that the thicker the thread used, the more knitting needles you choose.
From down or mohair yarn with knitting needles No. 5.
We put 5 loops on the knitting needle. Mark the center with colored thread. We add loops at the beginning and end of the row from the gap between the loops to the right and left of the central loop.
Figure 169. Scarf with fringe
- 1st row - knit, 1 knit from the space between the loops, 1 knit, 1 yarn over, 1 knit, 1 yarn over, 1 knit, 1 knit from the space between the loops, 1 knit;
- 2nd row - all facial loops;
- 3rd row and all odd rows (along the edges and in the center) - add 4 loops; repeat 1st, 2nd and 3rd rows 64 times (more depending on the height of the product).
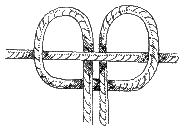
Figure 170. Pulling thread to form fringe
To knit a scarf, we knit a sample.
Sample mating
We put 17 loops on the knitting needles (including edge loops) and knit:- Rows 1-8 in blue wool, stockinette stitch;
- 9, 10th rows - garter stitch made of cornflower blue wool;
- 11th row - 3 knit stitches with blue wool, 1 cornflower blue loop is removed unknitted, etc. to the end of the row;
- 12th row - the removed “cornflower blue” loops are removed again unknitted, leaving the thread on the wrong side of the work, all “blue” knitted loops are knitted purlwise;
- 13th row - repeat the pattern from the 1st row.
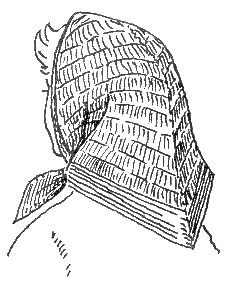
Figure 171. General view headscarves
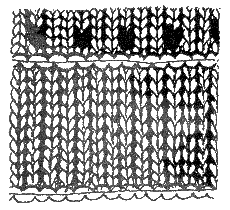
Figure 172. Knitting pattern
Knitting a scarf
First, we cast on 301 loops. We knit 12 rows in garter stitch. 1 row of garter stitch is considered to be 2 rows knitted with knit stitches. These 12 rows form the border of the scarf. We make the corner of the scarf by decreasing the loops in 3 places (along the edges and in the middle). We knit 2 loops together at the beginning and end of each knit row. We knit 3 loops together front side(see Figure 52 in the article).
You can knit 3 loops together in different ways. The most common option is the following: mark 3 middle loops that we will knit together. We knit to them with facial loops. Then we swap the loops so that the 3rd loop is in place of the 2nd. To do this, remove all 3 loops on the right knitting needle, insert the left knitting needle into the 2nd loop before work (Figure 173), pull the right knitting needle out of the 3rd and 2nd loops and remove the 3rd loop onto it (Figure 174). Return the 3rd and 1st loops to the left needle (Figure 175). Knit 3 loops together with the front ones behind the front walls (Figure 176).
On the wrong side, the loop obtained from knitting 3 loops together is removed unknitted onto the right knitting needle, placing the thread on top of this loop. The loops are lowered throughout the knitting of the entire scarf. When there are 10-12 loops left on the knitting needle, they are secured (see “Securing loops” in the article).

Figure 173.
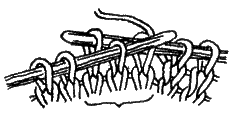
Figure 174.
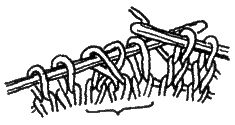
Figure 175.
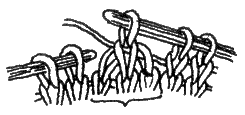
Figure 176
3. A scarf made of oblique stripes tied with a rope
The pattern is based on alternating oblique stripes diverging at right angles, connected with rope and stocking knitting (Figure 177). Moving loops (increasing or decreasing loops when knitting) is done in the middle of the scarf and only in the purl rows. All front rows are knitted with facial loops.
Figure 177. Appearance headscarves
We cast on 3 loops on the knitting needles and knit with a rope, adding 1 loop at the beginning of each front and back row until the end of the work. Having knitted 41 loops with a rope, we begin moving the loops in the middle of the scarf along the wrong side. Next we knit according to the pattern (Figure 178).
We finish the scarf with 10 rows of “rope”.
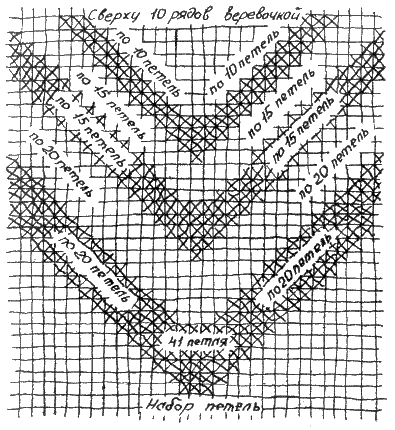
Figure 178. Scheme of movement of loops in a scarf
4. Scarf with openwork rings
Material: 60 g blue wool. Knitting needles No. 2.5. A sample of knitting a scarf is shown in Figure 180.Cast on 3 loops on the knitting needles and knit from the right corner with a “string”, adding only in the odd row, i.e. at the beginning of the front row, 1 loop at a time until 19 loops appear on the knitting needle, after which they begin to insert openwork strip, alternating it with a stocking strip (see diagram, Figure 181).
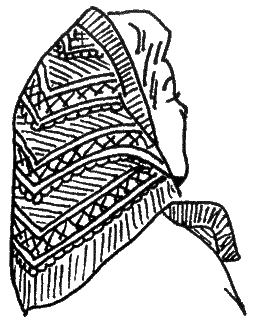
Figure 179. General view of a scarf with openwork
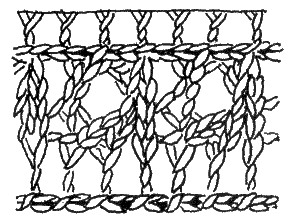
Figure 180. Knitting sample
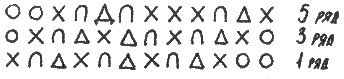
Figure 181. Knitting pattern
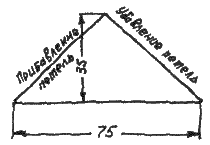
Figure 182. Drawing of a scarf
The diagram shows only odd (front) rows; purl rows (even) are knitted purl loops. After the 6th row, repeat knitting from the 1st row. When shifting the openwork to the right side, you should start it from the 1st row, placing loops from right to left, and when shifting to the left side, start from left to right. For the sample it is more convenient to cast on 18 loops.
For example, here is the beginning of knitting a scarf:
- From the 1st to the 34th row, knit with a “rope”, adding 1st loop at the beginning of each odd row,
- 35th row (front) - 10 knit stitches(including the edge stitch and one added throughout the work), 2 stitches together, 1 yarn over, 8 knit stitches;
- 36th row (purl) - knit 8, purl 2, knit 10;
- 37th row - 10 knit, 2 together, 1 yarn over, 9 knit;
- 38th row - knit 8, purl 3, knit 10;
- 39th row - 10 knit, 2 together, 1 yarn over, 10 knit;
- 40th row - knit 8, purl 4, knit 10;
- 41st row - 10 knit, 2 together, 1 yarn over, 1 knit, 2 together, 1 yarn over, 8 knit;
- 42nd row - knit 8, purl 5, knit 10;
- 43rd row - 10 knit, 2 together, 1 yarn over, 1 knit, 1 yarn over, 2 together, 9 knit;
- 44th row - knit 8, purl 6, knit 10;
- 45th row - 10 knit, 2 together, 1 yarn over, 3 knit, 1 yarn over, 2 together, 8 knit;
- 46th row - knit 8, purl 7, knit 10;
- 47th row - 10 knit, 2 together, 1 yarn over, 1 knit, 2 together, 1 yarn over, 1 knit, 2 together, 1 yarn over, 8 knit;
- 49th row - 10 knit, 2 together, 1 yarn over, 1 knit, 1 yarn over, 2 together, 1 knit, 2 together, 1 yarn over, 9 knit;
- 50th row - knit 8, purl 9, knit 10;
- 51st row - 10 knit, 2 together, 1 yarn over, 3 knit, 1 yarn over, 3 together, 1 yarn over, 10 knit;
- 52nd row - knit 8, purl 10, knit 10;
- 53rd row - 10 knit, 2 together, 1 yarn over, 1 knit, 2 together, 1 yarn over, 1 knit, 2 together, 1 yarn over, 11 knit;
- 54th row - knit 8, purl 11, knit 10;
- 55th row - 10 knit, 2 together, 1 yarn over, 1 knit, 1 yarn over, 2 together, 1 knit, 2 together, 1 yarn over, 2 together, 1 yarn over, 12 knit;
- 56th row - knit 8, purl 12, knit 10;
- 57th row - knit 10, 2 together, 1 yarn over, knit 3, 1 yarn over, 3 together, 1 yarn over, knit 13

Popular
- Making charming baskets from newspaper tubes using a cardboard box
- Kiss tattoo for men. Kiss tattoo. The meaning of tattoos for men
- The safety of plastic toys
- Winter safety shoes: men's and women's, insulated
- Increased protein in urine: possible causes and treatment Quantitative methods of assessment
- We knit booties with knitting needles: elegant and casual patterns, patterns with descriptions and recommendations
- How is World Heart Day celebrated?
- Knitted children's pullover with cat applique
- You need to know this: how to get a ticket to kindergarten - step-by-step instructions for parents
- Birthday card for grandma from her grandson or granddaughter