Origami shirt with paper tie. DIY paper tie - step-by-step instructions, tips, photo ideas How to make paper ties step by step
Not only on February 23, but also on any other holidays you can surprise your male friends and relatives an interesting postcard made with your own hands. In addition, knowing how to make a paper shirt with your own hands, you can wrap a gift beautifully and tastefully.
Content:
Simple shirt from A4
To make this craft, take paper where the size of one side should be 2 times larger than the other. The leaf shape can be a rectangle (that is, a square cut into 2 parts). A banknote can be used as a material. When performing further steps, know that the front side (that is, the one that faces you), after performing certain actions, will be on the cuffs and collar.
Advice! If you decide to use paper money, then keep in mind that you need to make a small fold on the bill, because if you don’t do this, you won’t get the desired ratio.
Work progress:

The gift version of the paper shirt is ready.
How to make a shirt out of paper
To amaze your loved ones with original flat-type gift packaging, place the gift in a paper shirt made using the origami technique. The prepared holiday card will also fit there.
What materials will be needed?
Put it on workplace a sheet of either regular A4 paper or special paper for scrapbooking.

Now you can carefully put the prepared gift inside the shirt: a wallet, a disk, money, etc.
If the gift has three-dimensional shapes, then print or draw the template presented below.

After cutting out the template, glue the indicated parts to the left and top. Place the gift in the resulting blank and pack it. Glue on a collar, bow tie, tie, buttons and other elements of your choice.

Paper shirt-card
Making a paper shirt-postcard is not difficult, you just need to be patient, a sheet of scrapbooking paper, small buttons (3 pcs.), thread with a needle or glue, a sheet of plain A4 paper, a sheet of colored paper in the chosen color, a mailing envelope for postcards.

Use the following tips to make a card:

Video instructions
Carefully watched videos will help you understand the intricacies in more detail. paper crafts and make the chosen model in the best possible way.
1. Postcard suit:
2. Origami Shirt:
3. Shirt made from banknotes:
Murtazina Karina Maratovna 6 years old, student of MBDOU kindergarten No. 3 p. Kandra, "Preschool educational institution in the village of Bishkuraevo", RB Tuymazinsky district.
Supervisor: Khamidullina Aigul Suleymanovna, teacher of MBDOU kindergarten No. 3, village. Kandra "Preschool educational institution in the village of Bishkuraevo", RB Tuymazinsky district.
Description: This master class will be useful preschool teachers, teachers primary classes, parents. Work done with older children to school age and primary school age.
Purpose: DIY greeting card options for February 23rd.
Target: Manufacturing greeting card by the hands of a child.
Task:
- Contribute to the development of artistic taste and creative initiative;
- Improve design and application skills and abilities;
- Foster accuracy and independence;
- Learn to use scissors and glue carefully and correctly;
- Create a joyful mood in preparation for the upcoming holiday;
- Cultivate the desire to bring joy to your family by making a pleasant surprise with your own hands.
The holiday "Day of Defenders of the Fatherland - February 23" is approaching. I would like to please our men: dads, grandfathers, brothers original postcard made with your own hands. We offer more options for greeting cards.
Greeting card for February 23 "Shirt and tie"
First of all, repeat the safety rules:
1. Prepare the workplace for work. There should be nothing superfluous on the table, only tools and materials for work.
2. While working, be attentive and not distracted.
3. The scissors should lie with their closed ends facing away from you.
4. Pass the scissors to each other, rings first.
5.After finishing work, put tools and materials in special cabinets designated for this purpose.
6. Put the workplace in order.
Master class with step by step photos greeting card for February 23 "Shirt and tie"
For work we will need the following materials and tools:- colored double-sided paper in light colors (yellow, blue, light green, etc.), white is also possible for a shirt; for a tie, the color can be brighter at your discretion;
-glue stick;
-scissors;
-ruler and simple pencil.

Step 1:
We take a sheet of paper, divide it in half vertically, set aside one part for another postcard, and bend the other piece in half to make a “book”:


Step 2:
Using a ruler and a simple pencil (along the fold), measure the height and width of the cuff (dimensions are shown in the photo):


Step 3:
Using scissors, cut to the notches. Bend the edges of the collar towards the middle:


Step 4:
We prepare blanks for a tie and buttons (on green paper). The dimensions are indicated in the photograph.
Cut using scissors.


Step 5:
We glue the tie to the shirt and the buttons to the collar. To prevent the corners of the shirt collar from rising, they can also be glued to the shirt.


Step 6:
Our "Shirt and Tie" card is ready! You can sign it if you wish.


I offer another type of greeting card "Shirt with a bow tie". Where the color of the shirt can also be any other color at your discretion, desire and imagination.

For children of primary school age, you can complicate the task. I offer another type of greeting card “Military jacket”.

I wish you good luck! Thank you for your attention!
Origami tie is one of the most popular paper origami. If you don't know how to make an origami tie, then on this page you will find everything you need to assemble this simple paper figure.
Making an origami tie is not difficult at all. And the second photo is a great example of this. Just follow the assembly diagram below and the origami tie will come out on its own. If you have photos of origami that you would like to share, send them to us by email: This email address is being protected from spambots. You must have JavaScript enabled to view it.

Assembly diagram
Below is a diagram of how to assemble an origami tie from the famous Japanese origami master Fumiaki Shingu. If you strictly follow the instructions, then assembling the origami tie will not take much time, and the result will be the same as in the picture. After doing what is described in the diagram several times, you will understand how to make an origami tie quickly and without looking at the diagram.

Video master class
Assembling an origami tie may seem like a daunting task for beginners. Therefore, we advise you to enter the query “origami tie video” on the largest video hosting site on the Internet, YouTube. There you will find many different videos about an origami tie, which clearly show the steps to assemble a tie. We hope that after watching the assembly master class video, you will have no more questions about how to make an origami tie.
This video once again proves that making an origami tie is not at all difficult:
If you want a special origami tie, then watch this video:
Symbolism
A tie is often a symbol of lack of freedom, power and alienation. It has long been used in many cultures and social circles to denote membership in certain groups. IN modern world the tie has become a symbol men's fashion and etiquette.
How nice it is for dad or brother or loved one young man Get a DIY postcard for Defender of the Fatherland Day! It will be even nicer if there are no banal carnations, airplanes and tanks there. In this article we propose to do postcard using origami technique. This shirt and tie will please every man's self-esteem. After all, these attributes indicate that your man is respected and in demand.
To make such a shirt using the origami technique you will need:
- rectangular sheet of paper for shirt
- rectangular sheet of paper for tie
- PVA glue
Try to first fold a shirt from a sheet of plain paper, so to speak, a training version, so that if something doesn’t work out, you won’t accidentally ruin it colored paper. And one more thing: it is better if the color of the tie is contrasting with the color of the shirt.
So let's get started:
1. Fold the rectangle in half along the long side. Then unfold and fold the edges of the paper towards the middle.

2. Making sleeves - turn over a sheet of paper front side up and bend the upper corners to the middle of the fold line, then bend them again.

3. Place the sheet face down again and fold the corners again to the fold lines you just made. You just don’t need to bend these small corners anymore.

4. Now fold the top of the sheet with the corners folded where the edge intersects with the fold lines of the corners.


5. Fold the two ribs towards the center of the shirt and form the sleeves, holding with the finger of one hand.


6. Form a collar from the other end of the folded rectangle. Fold the bottom edge of the paper so that the collar is half the length of the sleeve.

7. Turn the folded sheet over and form the corners of the collar.

8. Aligning the edge with the sleeves and collar, fold the resulting sheet, straighten the corners of the collar and best result secure with glue. The shirt is ready, you can decorate it with buttons, a corner of a handkerchief and a tie.

A tie is an important part of a business wardrobe, a sign of good taste and “importance” of its owner. A good tie costs a lot, so the question of how to sew one with your own hands is always relevant.
This article is intended for persons over 18 years of age
Have you already turned 18?
Making an elegant tie with your own hands: basic tricks
Before you begin the step-by-step production of this popular accessory, you need to decide what exactly you want to get in the end. There are quite a few variations on the theme of a tie, and each type comes with its own master class on how to make it. The most common accessory options are the classic “noose” and an elegant bow tie. But this is not the entire list, because there is a narrow herring tie, a brooch tie, a bolo, a lavalier, a Windsor, and a neckerchief. By the way, many contradictions arise with the latter type of accessory, because the word “tie” itself has French roots and when translated into Russian sounds like “neck scarf”.
Patterning a tie is a simple matter, because it can be done even without special tools and templates at hand. How? - you ask. Yes, it’s very simple - just undo an old unnecessary tie along the seam. It will be the same pattern that you can transfer to the selected fabric.
When preparing, it is important not to forget about the “understudy” fabric. It is needed so that your future product keeps its shape and does not wrinkle with every touch. For the “understudy” role, you can choose regular lining fabric or fleece - these are the most inexpensive and accessible options. You can also buy self-adhesive fabric - friezeline. In order to attach it to the fabric, you just need to apply it to the wrong side of your workpiece with a shiny layer and carefully walk over it with a hot iron. Just a few movements and your product will achieve the desired rigidity.
Sewing a tie is also a very simple process, accessible to even the most inexperienced needlewoman. At the same time, it doesn’t matter at all whether we sew an accessory on sewing machine or with a hand seam, the main thing is to know how to fold it beautifully and secure it (and the rest is a matter of technique).
Another important question when sewing a tie (as, in fact, when designing any product) is how to properly prevent unwanted “shrinkage” of the fabric? In order to have an idea of how the sewing material will react to washing and ironing in the future, all these processes should be carried out before cutting it. At this stage, you should know exactly what to prepare for in the future and what you should pay special attention to.
A tie is an everyday wardrobe item; this is very important to consider when choosing what fabric to make this accessory from. The most practical products are considered to be made from cotton, linen, silk and satin - these are the fabrics you should choose (for holiday options There are no restrictions in the choice of materials).
Universal accessory: a little history
As mentioned earlier, the word “tie” is of French origin, but it was the British who made the accessory itself world famous. It is from them light hand it has become a very important “status” detail of a business wardrobe. This men's accessory has long ceased to be just an accessory - it is also an indicator of the status and social position of its owner. Even today, neckerchiefs have a fairly wide price range - from several hundred rubles to a couple of thousand dollars.
The popularity of the adult tie was soon repeated by its children's counterpart. Wealthy families sought to buy it for the boy, so that from childhood he would get used to a rather inconvenient but necessary accessory.
After the sexual revolution, which took place in the middle of the last century, women's ties also appeared. Contrary to popular belief, it did not give its owner masculine features. On the contrary, a woman with a “noose” around her neck is always stylish, sexy and a little daring.
Thus, the tie gradually became part of everyday life for almost the entire population of the world. No one now sees anything reprehensible in tying a ribbon for a girl in the form of a tie or an elegant bow tie.
Among all the variety of children's ties that are usually worn to school, I would like to highlight the option with a zipper. Its feature is convenience, because you don’t need to tie it (tighten or loosen the zipper and that’s it). Therefore, if you want to make a convenient school accessory, pay attention to this model. As for the colors of children's ties, these can be either strict blue or black options, or more cheerful colors (from Harry Potter, for example).
How to make a tie out of paper?
If you need to make this popular accessory very urgently or you need it for some kind of competition, then plain paper can be the ideal material. The simplest option is a bow tie made from a napkin. It is enough for him to simply take a regular napkin, fold it like an accordion and fasten it in the middle.

Products made in the origami style are no less popular. Just a few correct movements - and an elegant tie is in your hands ( detailed instructions you can easily find how to do this on the Internet).

You can also make a herring tie from regular cardboard and elastic. Draw the silhouette of the future product, cut it out, attach an elastic band and... Done!
How to make a tie from ribbon?
Making a fashionable product from a satin ribbon is not only very simple, but also inexpensive, and the result is simply excellent. The uniqueness of this material is that it looks equally beautiful in any version, be it a classic noose, butterfly, brooch or “herring”. Whatever you choose, the product is made from satin ribbon will look very decent. You can also make a cute tie from scraps of satin fabric. However, when sewing a product from this material, do not forget to process the edges - without this manipulation they may “crumble”.
In addition to quite “human” options, ribbon also makes excellent bottle decorations. Cute felt or satin ties can be used to decorate champagne at a wedding or “masculine” drinks at a corporate party. By the way, when preparing a birthday cake for your beloved man (brother, friend, boss), you can also decorate it with a cute mastic tie. It will look incredibly stylish and will definitely please the hero of the occasion.

How to sew a bow tie?
A “butterfly” or bow is a classic form of tie, without which it is impossible to imagine an evening version of a business suit (and not only). It's very simple to make - take a small rectangle of fabric and pull it in the middle. This way you will get a bowtie that can be worn with an elastic band or simply pinned to your shirt with a safety pin. This is the easiest way to make a bow, but far from the only one.

You can use both simple sewing and more complex techniques such as kazanshi and origami. The first option is to compose a whole composition from individual flaps, the second is to obtain the desired result by repeatedly folding the fabric. The Internet is replete with various lessons correct use these techniques.
On the World Wide Web you can also find a pattern for a classic “butterfly”, which you need to tie yourself (similar to a pioneer tie). Many of us know firsthand how to make a beautiful, correct knot for such an accessory - once upon a time, a red piece of fabric was the real pride of a Soviet child.
If you want to stand out from the crowd, try a bolo tie. This unusual product made of a thin cord, which is fastened with a large brooch. Bolo can be a great addition to both everyday look, and for the holiday - it all depends on the outfit you choose.
The tie will also suit New Year's suit. For a corporate event, for example, you don’t have to wear a boring office look. For such an occasion, both funny clown models and elegant ones would be equally appropriate. neckerchiefs flight attendants, and slightly provocative dudes.

Popular
- Presentation on the topic “when did clothes appear?” This knowledge may be useful in
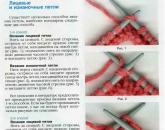
- Master class on knitting polypropylene bags Crochet polypropylene
- Irregular contractions Abdominal prolapse before childbirth
- Why do children develop aggressive behavior?
- Useful properties of Vaseline that you didn’t know about What is Vaseline and why is it needed?
- The right choice of hand cream against cracks and dryness
- How to prepare facial milk at home and use it correctly?
- Crochet toys with descriptions and patterns for beginners, patterns, professional amigurumi knitting
- Calculation of old age pension, or counting your pension yourself
- How I brought my husband back to the family