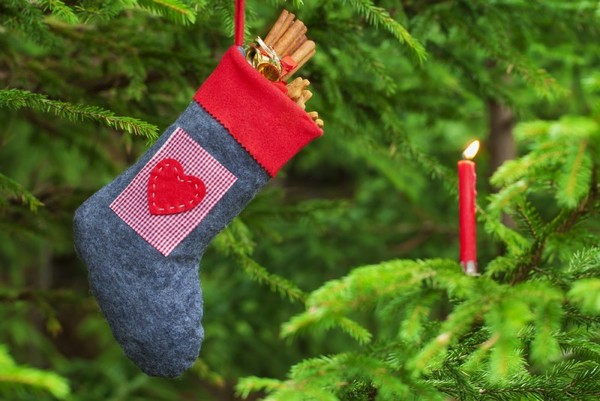
New Year's boot made of felt patterns. New Year's boots for gifts
New Year's boot for gifts
New Year's boot: basics
A New Year's boot cannot be considered solely a container for sweets and gifts. In the West, it is an essential element of Christmas home decor. Every year, housewives sew beautiful boots with their own hands for each family member and hang them throughout the house.
The boot can be made from a variety of fabrics. The most popular are tweed, felt, fleece, and fur. Less in demand, but also used are satin, cotton, and knitwear. Particularly original products are sewn from leather, suede or knitted by hand.
A New Year's boot must be decorated. Various sparkles, beads, and beads are perfect for decoration. Also use ready-made compositions, small toys, lace, shiny ribbons, appliques, etc. Designing a boot is a very creative activity. You can involve all family members in it, but this process will bring special joy to children.
The design of the boot depends entirely on your imagination. For example, the product can be made using the patchwork technique or sewn from satin ribbons. The boot is a great alternative to the usual New Year's packaging
Boot sizes vary greatly. For example, from several small products you can create an interesting garland to decorate a large Christmas tree or a room wall (for example, in a nursery). Medium-sized sock boots will look great as individual jewelry. For gifts and large quantity For sweets, the product should be large. There are many ready-made patterns New Year's boots. On average, the width of the boot varies between 15–20 cm.
New Year's personalized boot
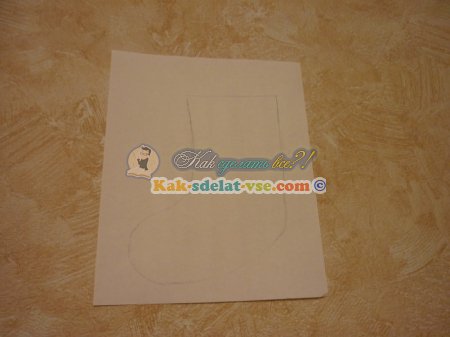
Personalized boots are a great way to make a person stand out. This product is especially relevant in a family with several children: no one will confuse the gifts. To create a boot, prepare: - thick fabric (felt, tweed); - fabric with New Year's drawings; - fabric for finishing the top; - padding polyester; - paper; - scissors; - chalk/white pencil.
On a piece of paper/newspaper, draw a sketch of your future New Year's boot. Immediately take into account the seam allowance (approx. 1 cm). Cut out the pattern from paper. Fold the thick fabric in half with the wrong side facing out. Pin the pattern so that the back side of the future boot lies evenly along the fold. Trace the shoe out of paper and cut out the base of the product.
Take fabric with New Year's or children's drawings. They must be large to make it easy to work. Old tablecloths or cloth napkins are perfect for this purpose. Carefully cut out a large image (for example, it could be Santa Claus, a gift, a balloon, a cartoon king or princess, etc.).
Attach the applique to the boot shaft and baste, leaving a small gap. Use it to add volume to the picture: fill it with padding polyester. Sew the image to the boot.
If you don’t plan to sew on more appliqués, simply complement the product with simple embroidery: embroider sketchy white snowflakes or stars throughout the entire space. You can also use sequins or beads for decoration, randomly scattering them around the boot. Select a location to embroider the child's name. Write it down with chalk/marker/pencil. Embroider using a machine or by hand.
Decorate the top of the boot with fabric in a contrasting color. Determine the width of the trim on the front side (about 3-5 cm) and cut a rectangle twice as wide. Sew the top, folding it to the wrong side.
Place the boot pieces right sides together. Sew around the perimeter, leaving the top of the product untouched. Sew on a hanging loop if desired.
You can also create a name and decor using a volumetric outline. Be sure to wait until the material is completely dry so as not to smear anything. Please note: the decoration of the boot is done only on one side
What can you use to make a New Year's boot for a gift?
Homemade New Year's boots are not always made from specially purchased fabrics and accessories. Professional needlewomen use various unnecessary things, leftover fabrics, and accessories for such crafts. The main task is to think through the colors and correctly combine the base and design.
For example, denim products are very popular. This material is distinguished by its density, ease of decoration and plasticity. To create a New Year's boot, old jeans or a frayed shirt are suitable. At the same time, denim is very unpretentious in terms of finishing: you can easily choose the design and accessories that match the color. Especially relevant for jeans will be bright cotton fabrics, satin or lace ribbons, mesh from a dance tutu, etc.
Products made from old sweaters also look beautiful. Very attractive boots are made from clothes with Norwegian patterns. These boots for gifts will create a warm, cozy atmosphere and become original interior details. Please note: due to the patterns, New Year's boots will not require appliqués or embroidery. Your only task when sewing is to carefully process the edges so that the product does not unravel. For example, they can be overlocked with an overlocker or glued with transparent glue.
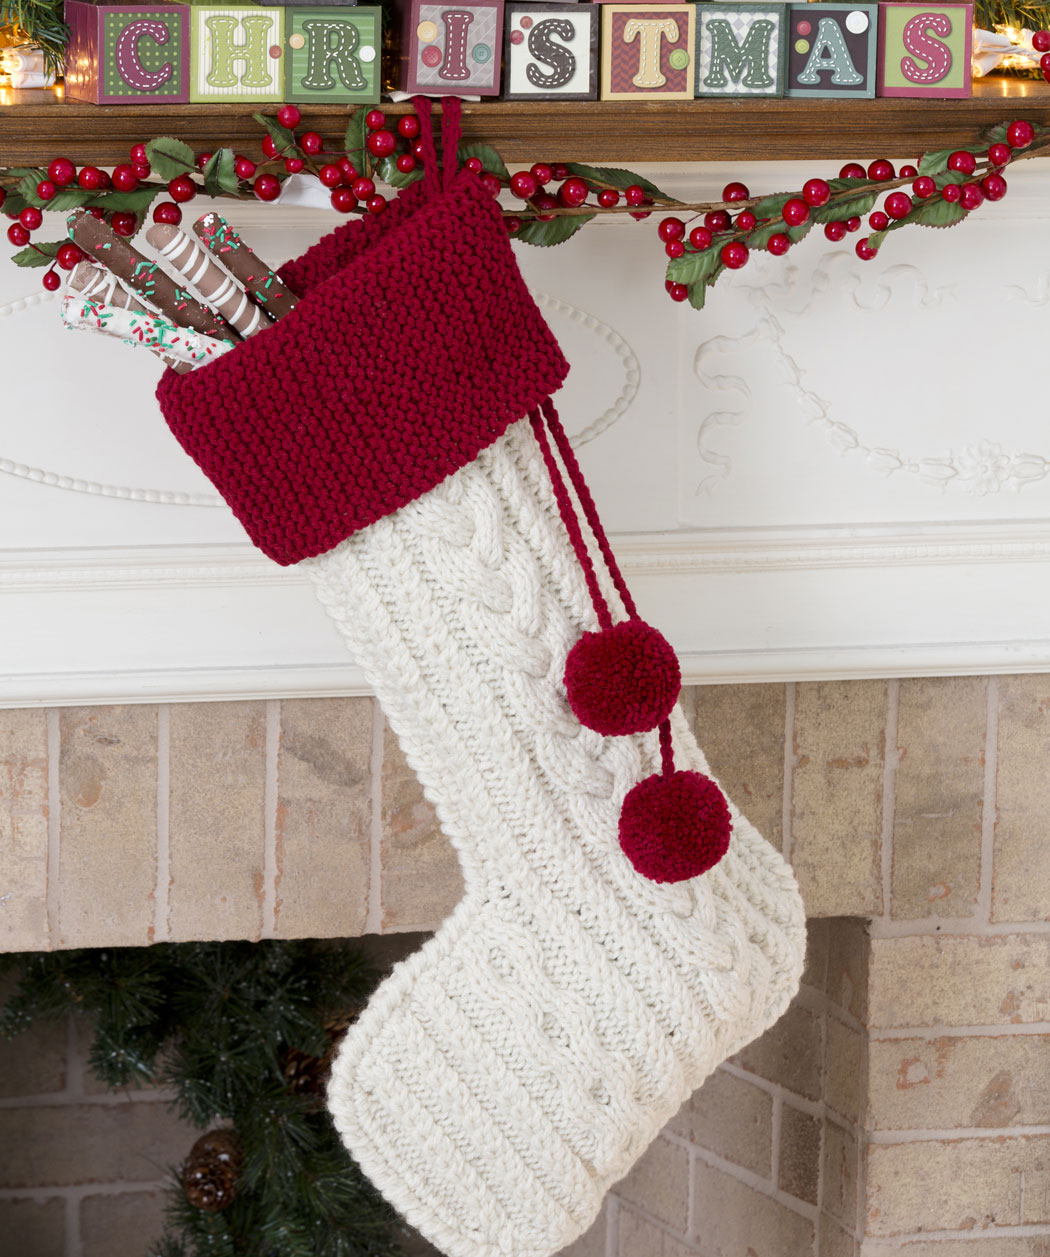
Hand-knitted boots are also gaining popularity. Most often they are crocheted, which allows you to create a beautiful openwork product. Spectacular additions This boot will have a white fur trim along the top and large thread pompoms.
Soon New Year It's 2017 and many children believe that Santa Claus brings them gifts. And for a gift you need a beautiful boot. So let's make a New Year's boot with our own hands for the children or together with them!
How to make a New Year's boot for gifts with your own hands?
Materials and tools:
Thin satin ribbon blue;
A 4 sheet of paper and a pencil;
White fleece (or padding polyester);
Thread, needle and scissors;
Tailor's pins;
Fabric for lining;
Candle or lighter;
Blue lace;
Pink marker;
Beautiful fabric;
Note: You can draw a sketch by hand, or you can take an ordinary sock and trace it. Add 3 - 4 cm on all sides. The larger the boot, the more space there will be inside, and therefore the more it will fit, for example, candy.
Lining fabric- it will be inside the boot, so you can take absolutely any fabric, not necessarily plain, but also with a pattern. It is best to stitch the boot by hand, as rounded shapes look angular on a sewing machine. Be sure to make a loop so that the boot can not only be placed, but also hung.
1. We take sheet A 4 and draw a sketch of the future New Year's boot with a pencil.
2. Let's cut it out.

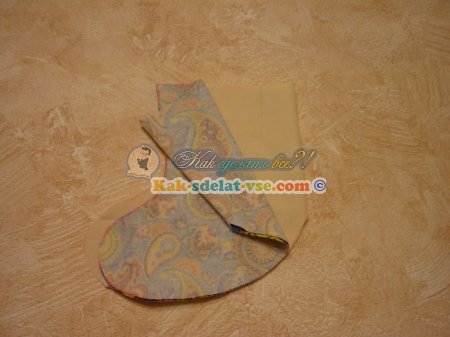
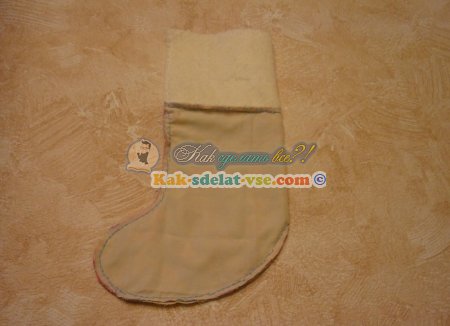
3. Take a nice piece of fabric and fold it with the wrong side up. Fold the fabric on the right side. Place the sketch on the fabric and secure it with tailor's pins.
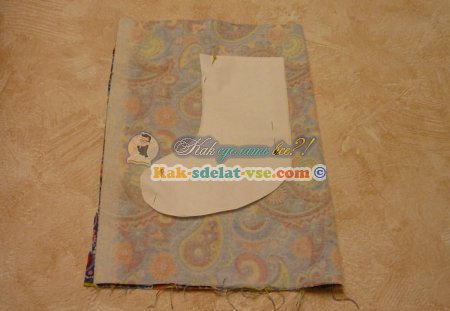
4. Usually 1-2 cm are deviated from the sketch on all sides (this segment is for sewing the fabric). In this case, we increase the right side and the boot will be larger. We outline the sketch with a pink marker so that we can see where to cut.
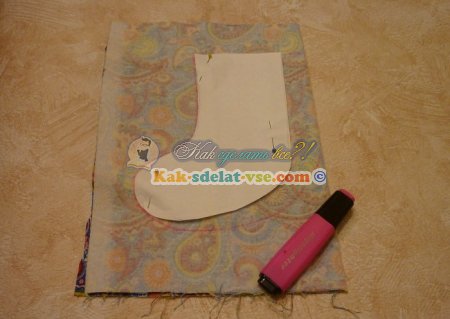
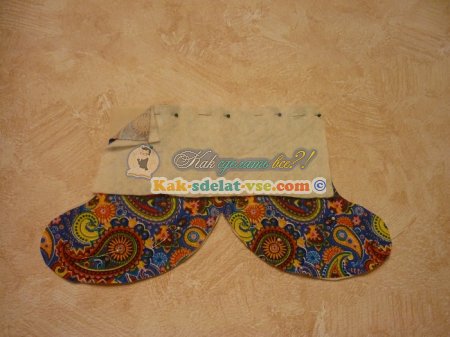
5. Cut out using a marker. We cut the same boot from the lining fabric. We bend the lining fabric and attach the finished boot to tailor's pins. Cut it out.
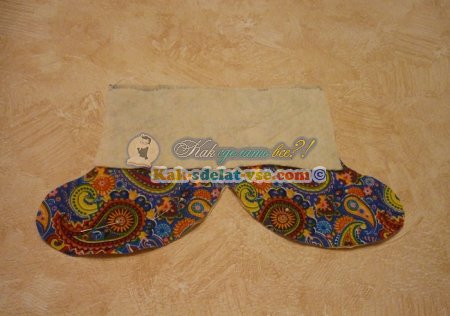
6. Unfold the lining and regular fabric. We fasten with pins. We pin white fleece to the top with tailor's pins.
7. We stitch it.
8. We fold the boot with the beautiful fabric inside. We pin it with pins. Sew down to fleece fabric.
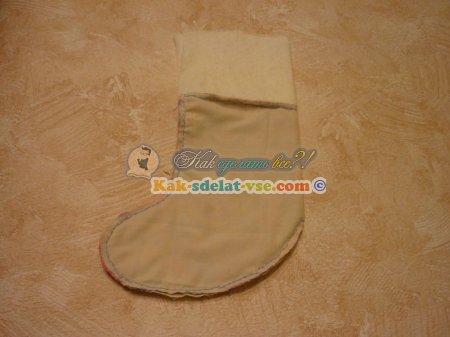
9 . Change the thread to white and sew the remaining edges.
10. Turn the boot inside out. We make a hem on the fleece (turn the edges inward) and pin it together.
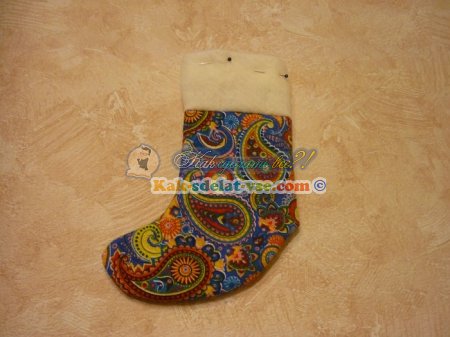
11. Flashing with inside.

12. We cut out a strip from the remains of a beautiful fabric. Pin it onto the fleece with tailor's pins. We cut off the excess fabric. Sew it on.

13. Cut a small strip from a blue satin ribbon and fold it in half. Melt the edges of the satin ribbon over the fire (so that they do not split). On the inside we sew a loop to the boot. Sew blue lace to the edges of the fleece strip.
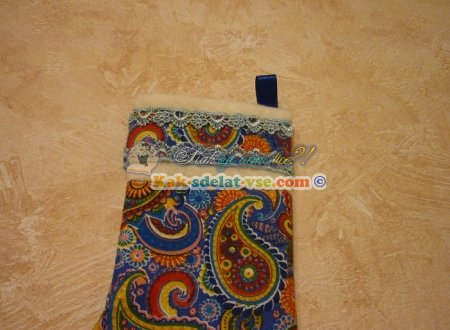
14. We sew orange beads into the “empty” lace flowers.
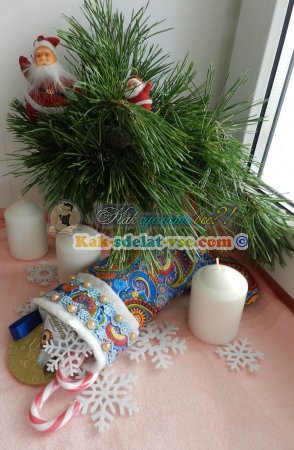
Your DIY boot is ready for the New Year!
You can make New Year's boots of different colors for the whole family. We put chocolates inside it, New Year's balls or a toy. Thanks to the loop, you can not only put it under the Christmas tree, but also hang it on the tree.
Our article will teach you how to properly make Christmas boots from fabric, yarn, felt and paper. You will also learn how to decorate this New Year's setting in an original way.
Festive tinsel helps us create the right New Year's atmosphere, Christmas decorations, and, of course, nice gifts. Most often, we package them beautifully and simply put them under the tree. And we do this, probably, only because this new year tradition brings back pleasant memories from our childhood.
When we leave a gift under the tree, we first of all think about the joy and interest with which our son or daughter will unpack it. But you can only give gifts to your relatives in New Year's Eve. This method is no longer suitable for celebrating Christmas. If you want a warm, festive atmosphere in your home until Christmas, then try leaving gifts in a New Year's stocking.
It can be a great alternative to standard wrapping paper, but most importantly, it will definitely help your children believe in Santa Claus, magic and miracles.
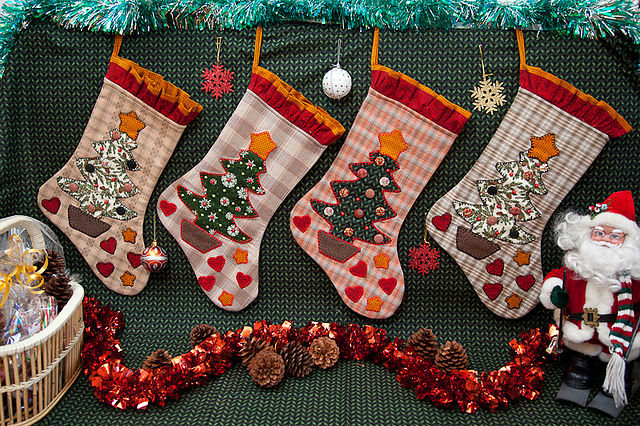
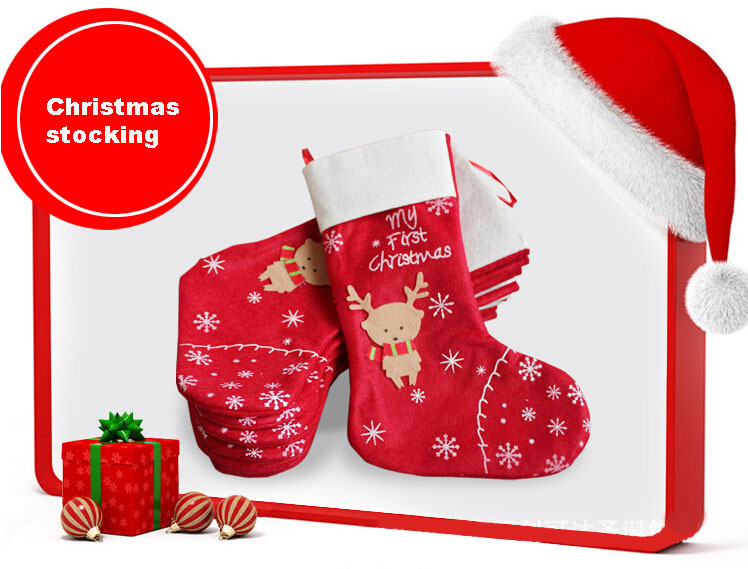
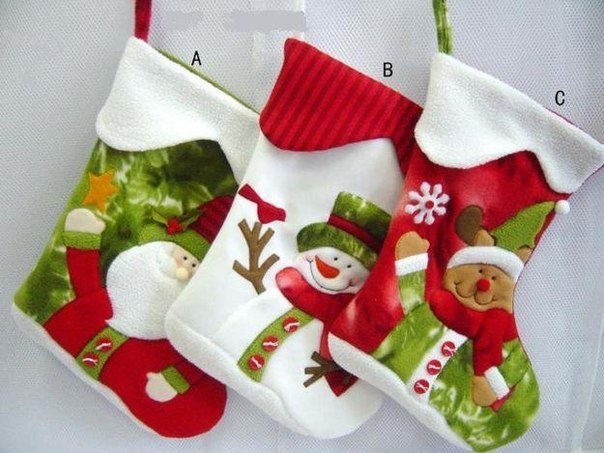
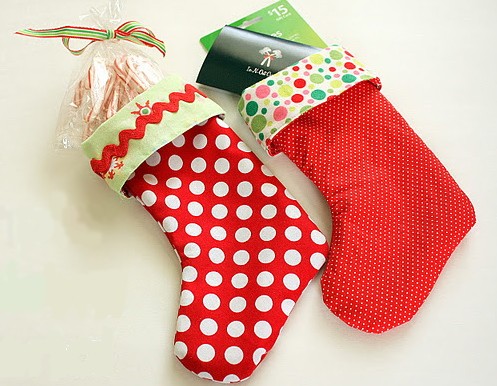
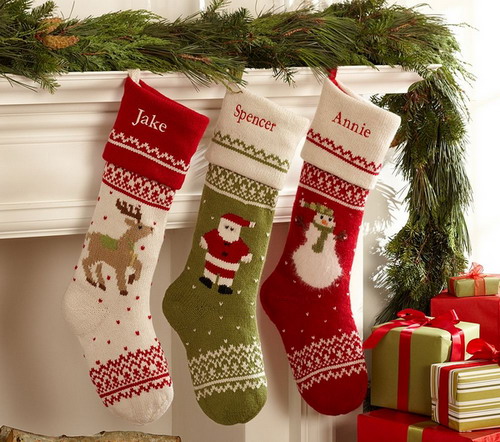
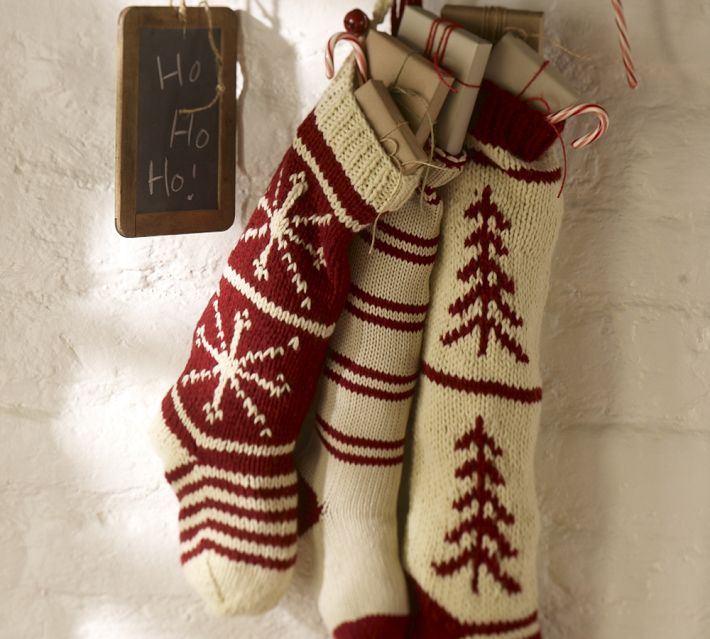
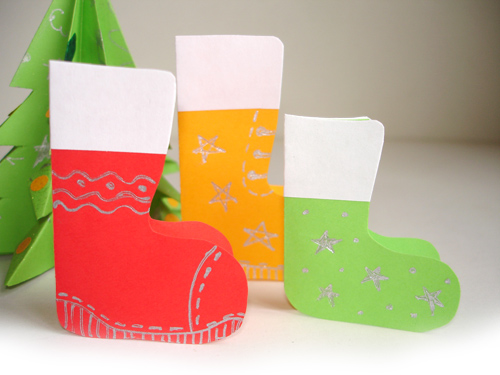
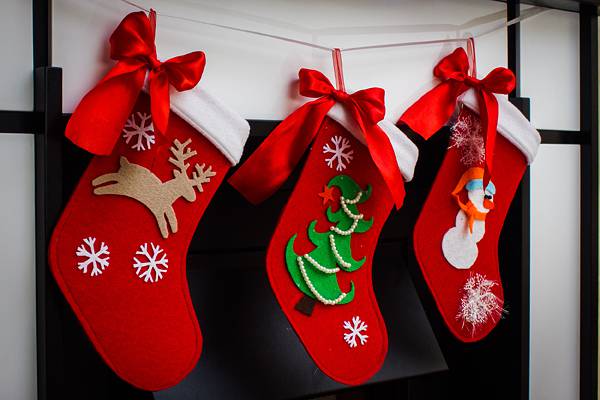
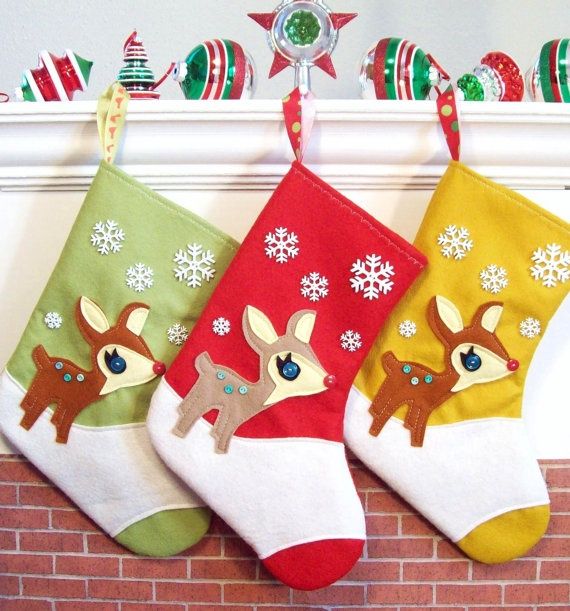
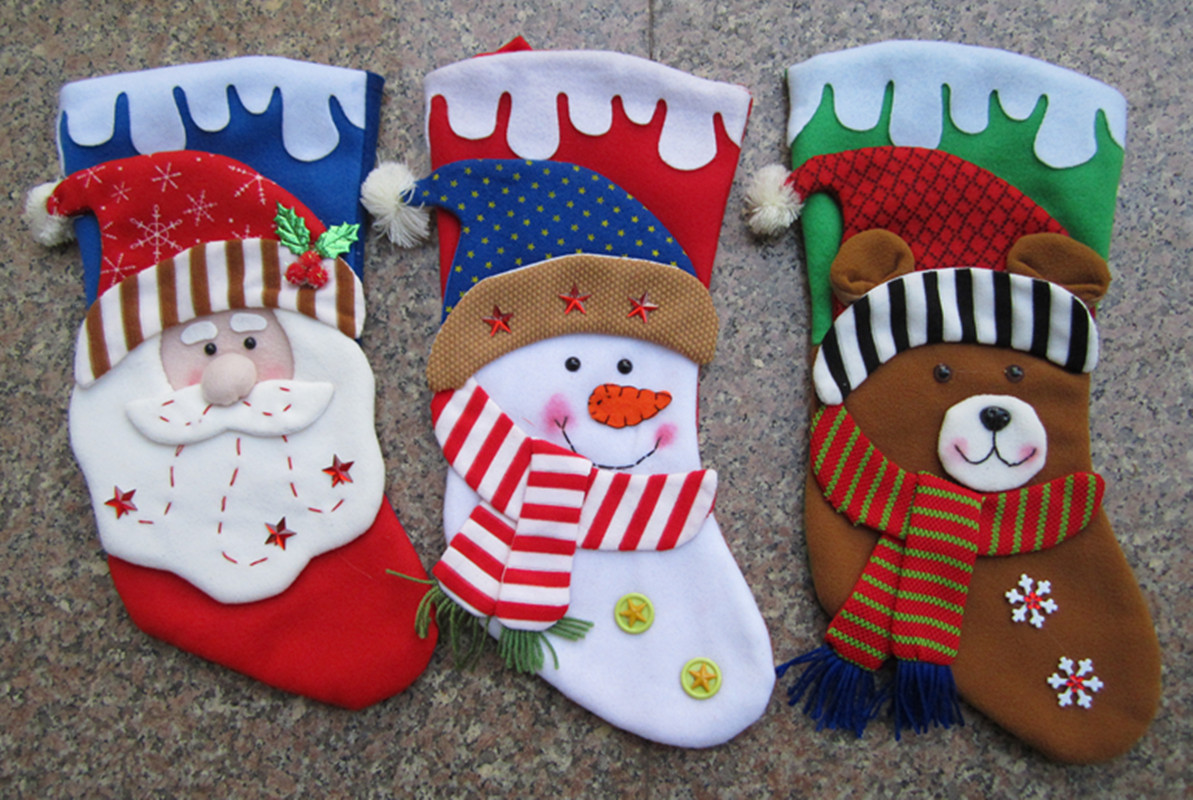
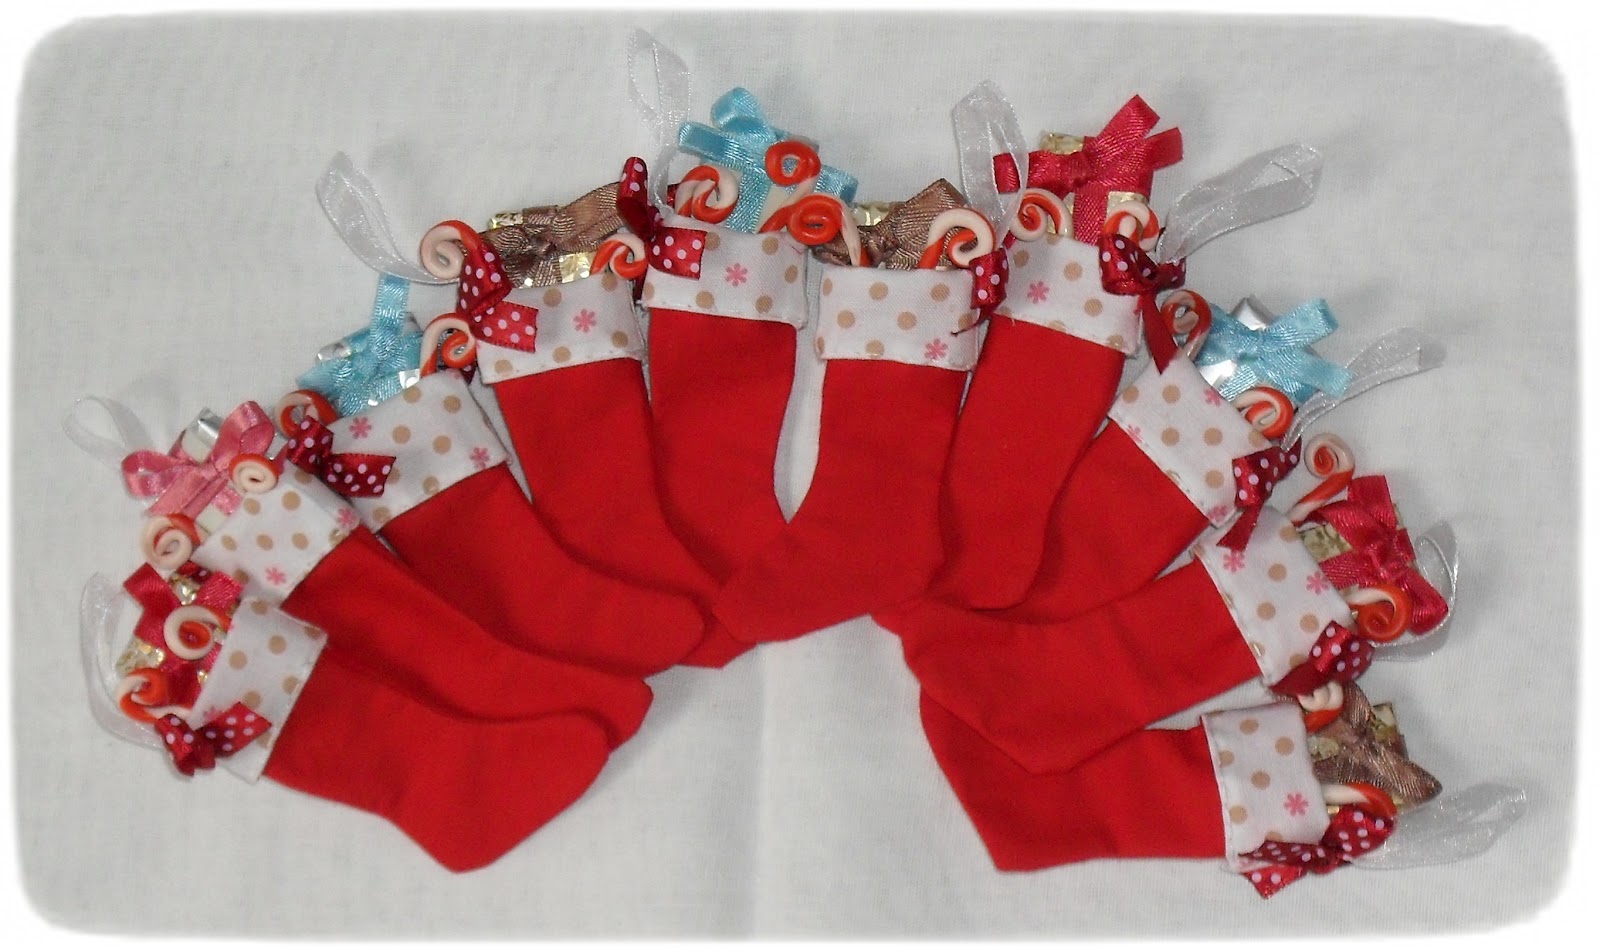
New Year's socks and Christmas socks for gifts: photos
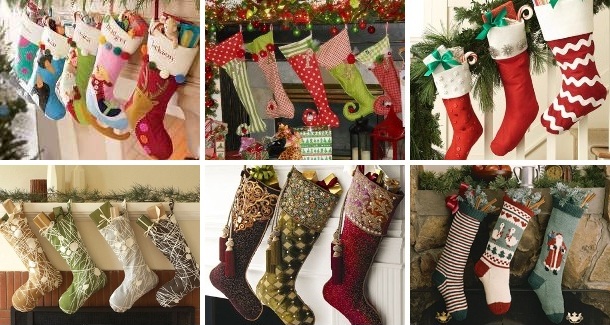
Photo of Christmas socks
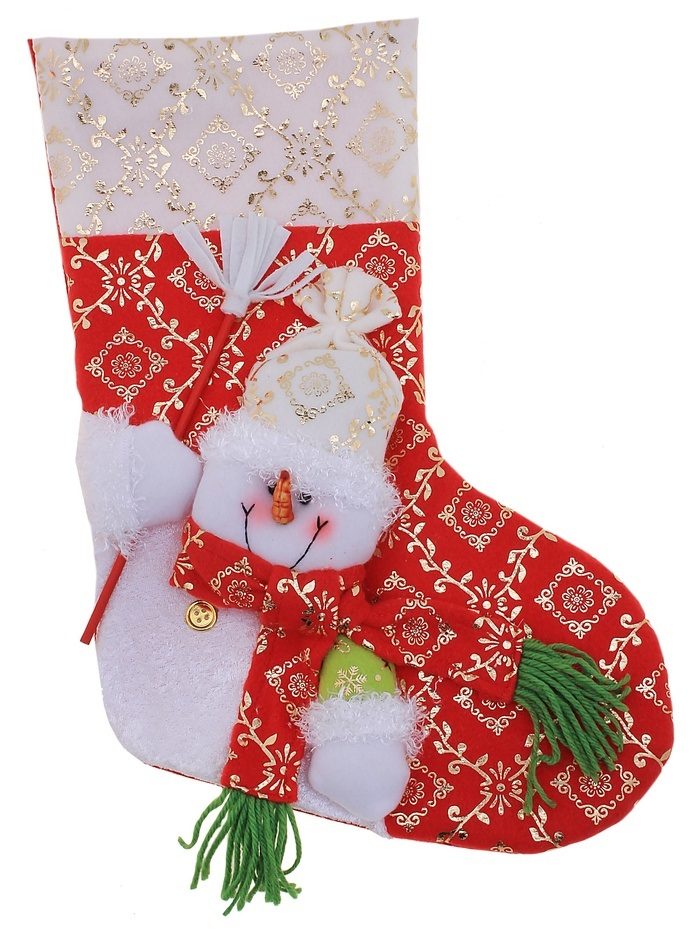
Gift sock Snowman with broom
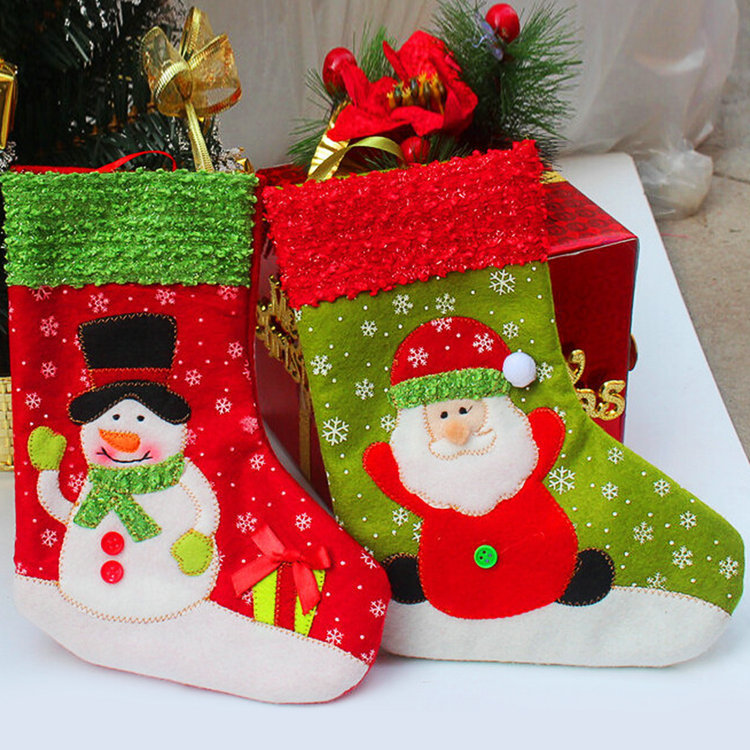
Christmas decorations
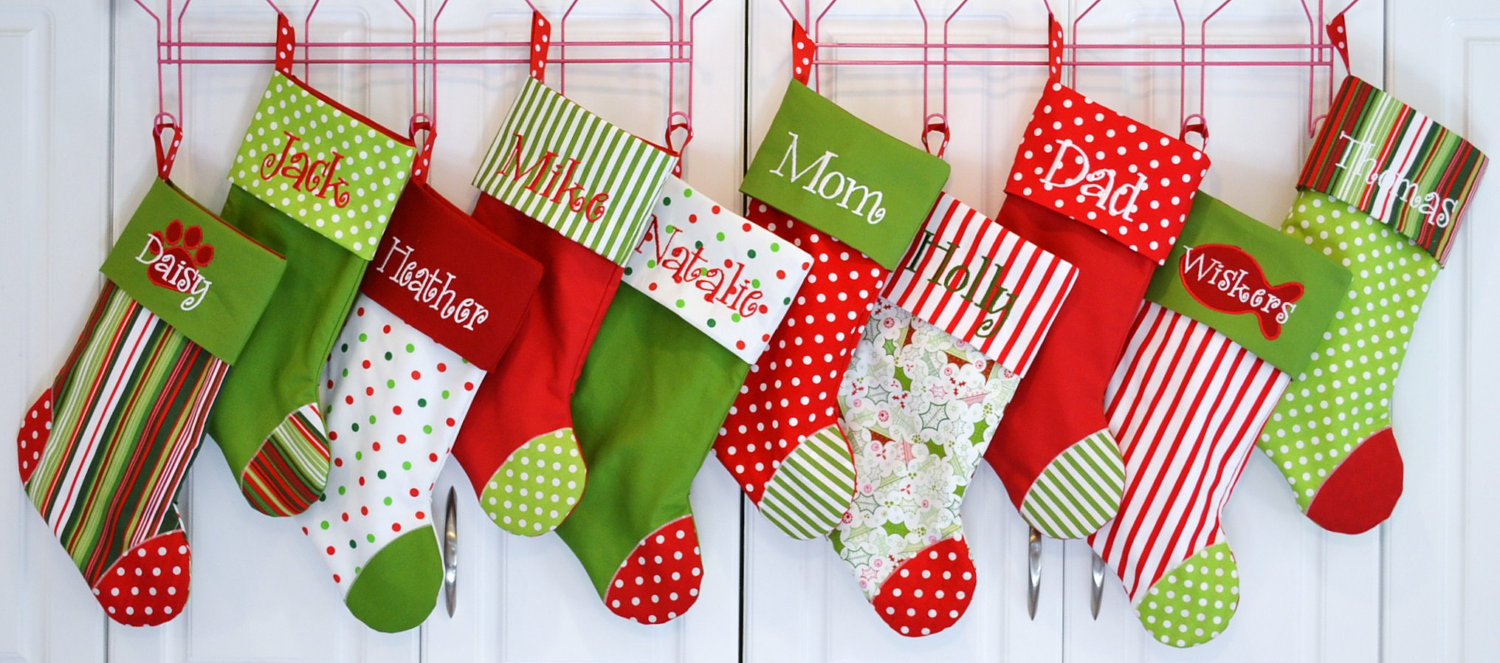
Personalized socks
New Year's socks
A Christmas stocking can be a wonderful decoration for a room. In the West, such New Year's surroundings are usually placed on the fireplace. People living in this territory believe that there should be exactly as many New Year's boots in a house as there are people living in it. A long-standing legend says that, once in a house, Saint Nicholas judges by the Christmas socks how many gifts he should leave here.
Therefore, if you hang fewer of them than necessary, then one of your family members may be left without a gift. Of course, this is just a legend, but if you want all your household members to sincerely enjoy the New Year and Christmas, then prepare the required number of holiday socks. Yes, and if your house doesn’t have a fireplace, then don’t worry too much. You can easily place this New Year’s decoration on any wall or even on the door. If you wish, you can take care and make your own personalized holiday stocking for each family member.
The name can be embroidered or laid out with shiny sequins and rhinestones. When it comes to the color of your Christmas stocking, it doesn't have to be red. You can make it blue, green or white and decorate it with fabric Christmas trees, snowflakes and snowmen. You can make this beautiful New Year's decoration from any fabric, yarn and even paper.
How to order and buy a New Year's stocking for gifts on Aliexpress?
Aliexpress is an international trading resource where you can buy almost all things necessary for a person for a comfortable life. Therefore, you will also find everything you need for a fun New Year celebration here. In order to quickly buy a New Year's stocking on the resource, find the Home and Garden category on the main page of the site and select the section in it called Goods for holidays and parties.
After a new page opens in front of you, carefully review the filters that are on the left side. Find the Christmas section and indicate that you are interested in Stockings and Gift Holders. As soon as you get to the page with the desired product, pay attention to the filters again. With their help, you can narrow your search to a minimum. In order not to waste your time, immediately indicate your preferred color and size, and after that you can safely start browsing the New Year's product.
But keep in mind that only registered users who have their own personal account can order and pay for goods. Therefore, if you are just planning to make your first order on Aliexpress, then first fill out a special registration form, activate your account, read all the instructions for beginners, and only after that add the item to the cart and select a payment method.
If you have any questions while choosing Christmas socks, do not hesitate and contact the seller through a special contact form. After all, if in the end you don’t get exactly what you wanted, then the New Year’s mood will be ruined for you and your family.
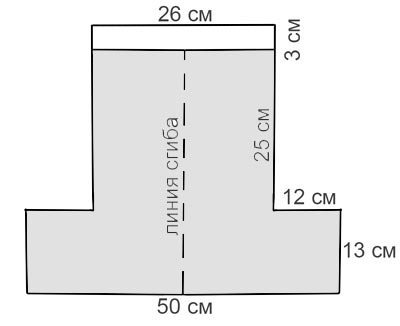
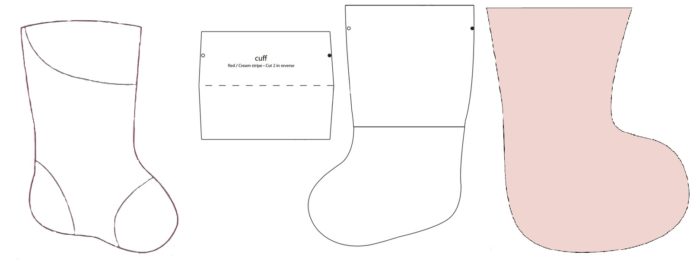
How to sew a New Year's sock from fabric: pattern
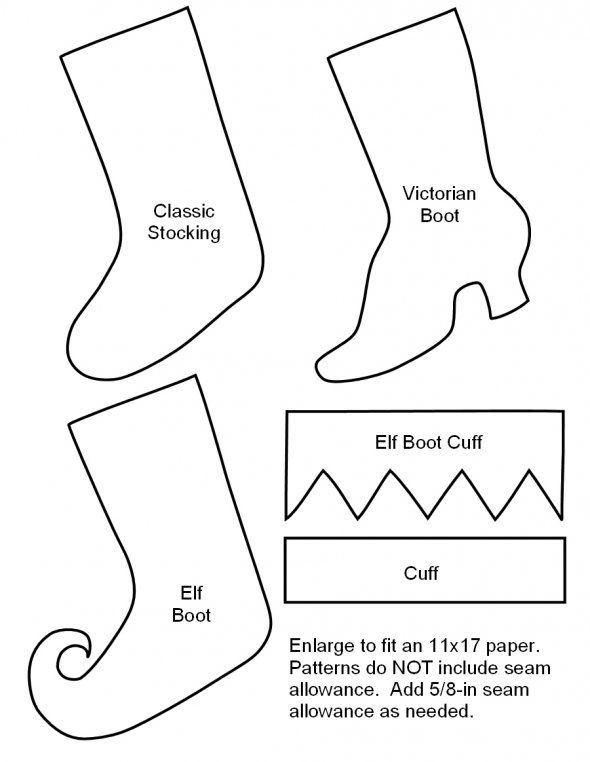
New Year's boot for gifts: pattern

Pattern for a tall product
Boot for gifts
Festive fabric products
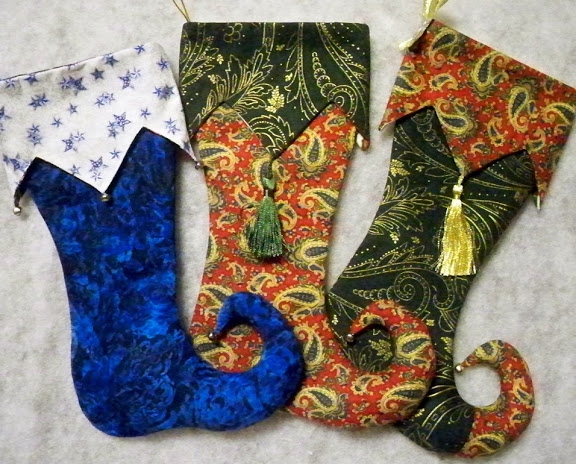
Fireplace decoration
Before you start making a New Year's stocking, you need to think about what you will put in it. If it is sweets and tangerines, then its size may not be very large. If, in addition to sweets and cookies, you also plan to put a rather large present in it, then make the product as large as possible.
Materials you will need to make a Christmas boot:
- Threads of the right color
- Thick fabric in several shades
- Scissors
- Thick paper
- Pencil
- School line
- Rhinestones
- Sequins
- Satin ribbons of different colors
- Faux fur
- Special glue
- The first thing you should do is use a ruler and pencil to mark what length and width your product will have. Once you understand these parameters, draw the outline of the stocking with clear lines and carefully cut it out.
- Lay out the fabric, previously folded in half, on a flat surface, and using pins, fix the template that you made earlier on it. In order for it to stick to the material as well as possible, fix it in 5-7 different places.
- Then take scissors and carefully cut out the blanks for sewing a New Year's sock. If you are afraid of ruining the fabric, then do not fold it in half, but simply lay it out, place the template on top, outline it with soap or the same pencil and cut out each piece separately.
- Next, we take the blanks and using a thread with a needle or sewing machine we sew them together, making a seam slightly away from the edge. Yes, and when sewing, be sure to take into account that the upper part of the product should be wide enough. This will allow you to easily put the biggest gift in your boot.
- After the blanks are sewn together, all you have to do is turn the product inside out, iron it thoroughly and sew a loop to it, from which you can hang it. It can be made of the same material as the sock itself, or you can use ordinary rope for these purposes.
- Decorate the finished product to your taste with sequins, rhinestones and ribbons. You can simply place them on the fabric in a chaotic manner or try to create interesting New Year appliqués from them.
Crochet New Year's socks: diagram
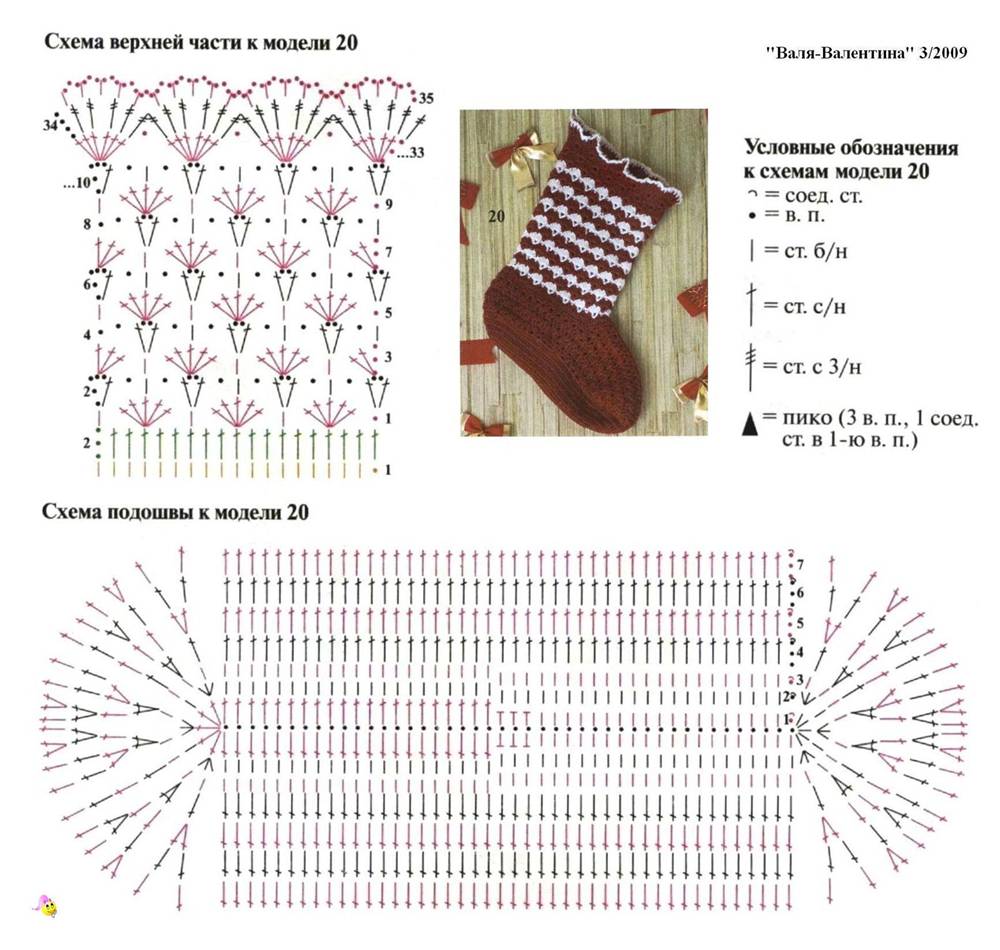
Crochet Christmas boot
Knitting ideas
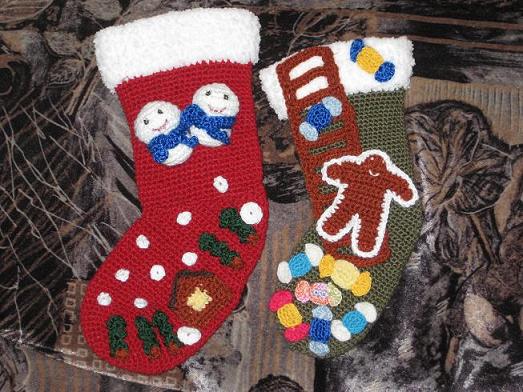
Decor ideas
If you like crocheting, then you can easily make this New Year’s element using it. The finished product will look no worse than a fabric one, but most importantly, it will turn out very beautiful. This product can be knitted in two ways. You can use the thinnest threads and hook, or give preference to thick yarn and a larger hook in diameter.
If you choose the first option, you will end up with a thick stocking that, even when stretched strongly, will not be see-through. If you choose the second knitting method, then finished product may have small holes through which you can clearly see what lies inside. Therefore, if you still want to maintain intrigue, then give preference to a thin hook.
Materials needed for work:
- Red, white and green yarn
- Hook of the required diameter
- Scissors
- You need to start knitting by casting on a certain number of loops. Depending on the size of the finished product, their number can vary from 20 to 50 pieces. The collected air loops must be closed in a ring, and then knitted with single crochets.
- We knit the loops in this way until the desired length of the upper part of the product is obtained. For a short sock, 8-10 centimeters will be enough, and for a longer product you will need to knit at least 15 centimeters.
- After the upper part is ready, proceed to knitting the heel and the protruding part of the product. This part of the sock is best knitted with amigura stitches, which do not leave holes.
- Once the sock is ready, you can proceed to decorating it. Using the same hook, make a three-dimensional snowflake or just some intricate ornament. The top of the sock can be decorated with white grass and small pom-poms.
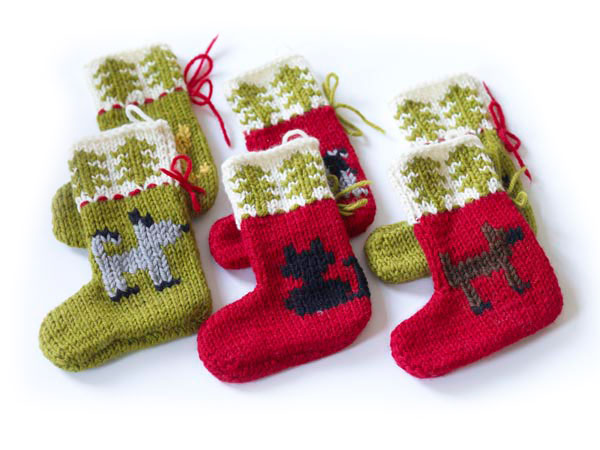
New Year's socks with knitting needles: diagram
Knitted New Year's socks

DIY boots
Socks for fireplace decoration
In principle, every needlewoman knows how to knit a standard sock. As a rule, to make such a thing, a representative of the fair sex only needs yarn of a certain color and, of course, knitting needles. After purchasing all these things, the woman will only have to choose the appropriate pattern and she can begin making her masterpiece.
You can knit a Christmas sock according to the same principle as a standard one, except that its upper part should be slightly higher and wider than usual. If you have never knitted such a product, then try to make this New Year's accessory more in a simple way. You can see the pattern of this product a little higher (diagram No. 2). You can knit it with any pattern, as long as you end up with a dense fabric. If you wish, you can knit the entire product with an ordinary elastic band, and then simply decorate it in an original way.
The finished piece will need to be folded tightly in half, and then carefully sewn from the inside. If you do everything correctly, you will end up with a Christmas shoe with a slightly rectangular bottom rather than a round one. If you want the finished product to look more familiar, then when sewing a knitted fabric, simply slightly round the right corners.
DIY New Year's paper sock
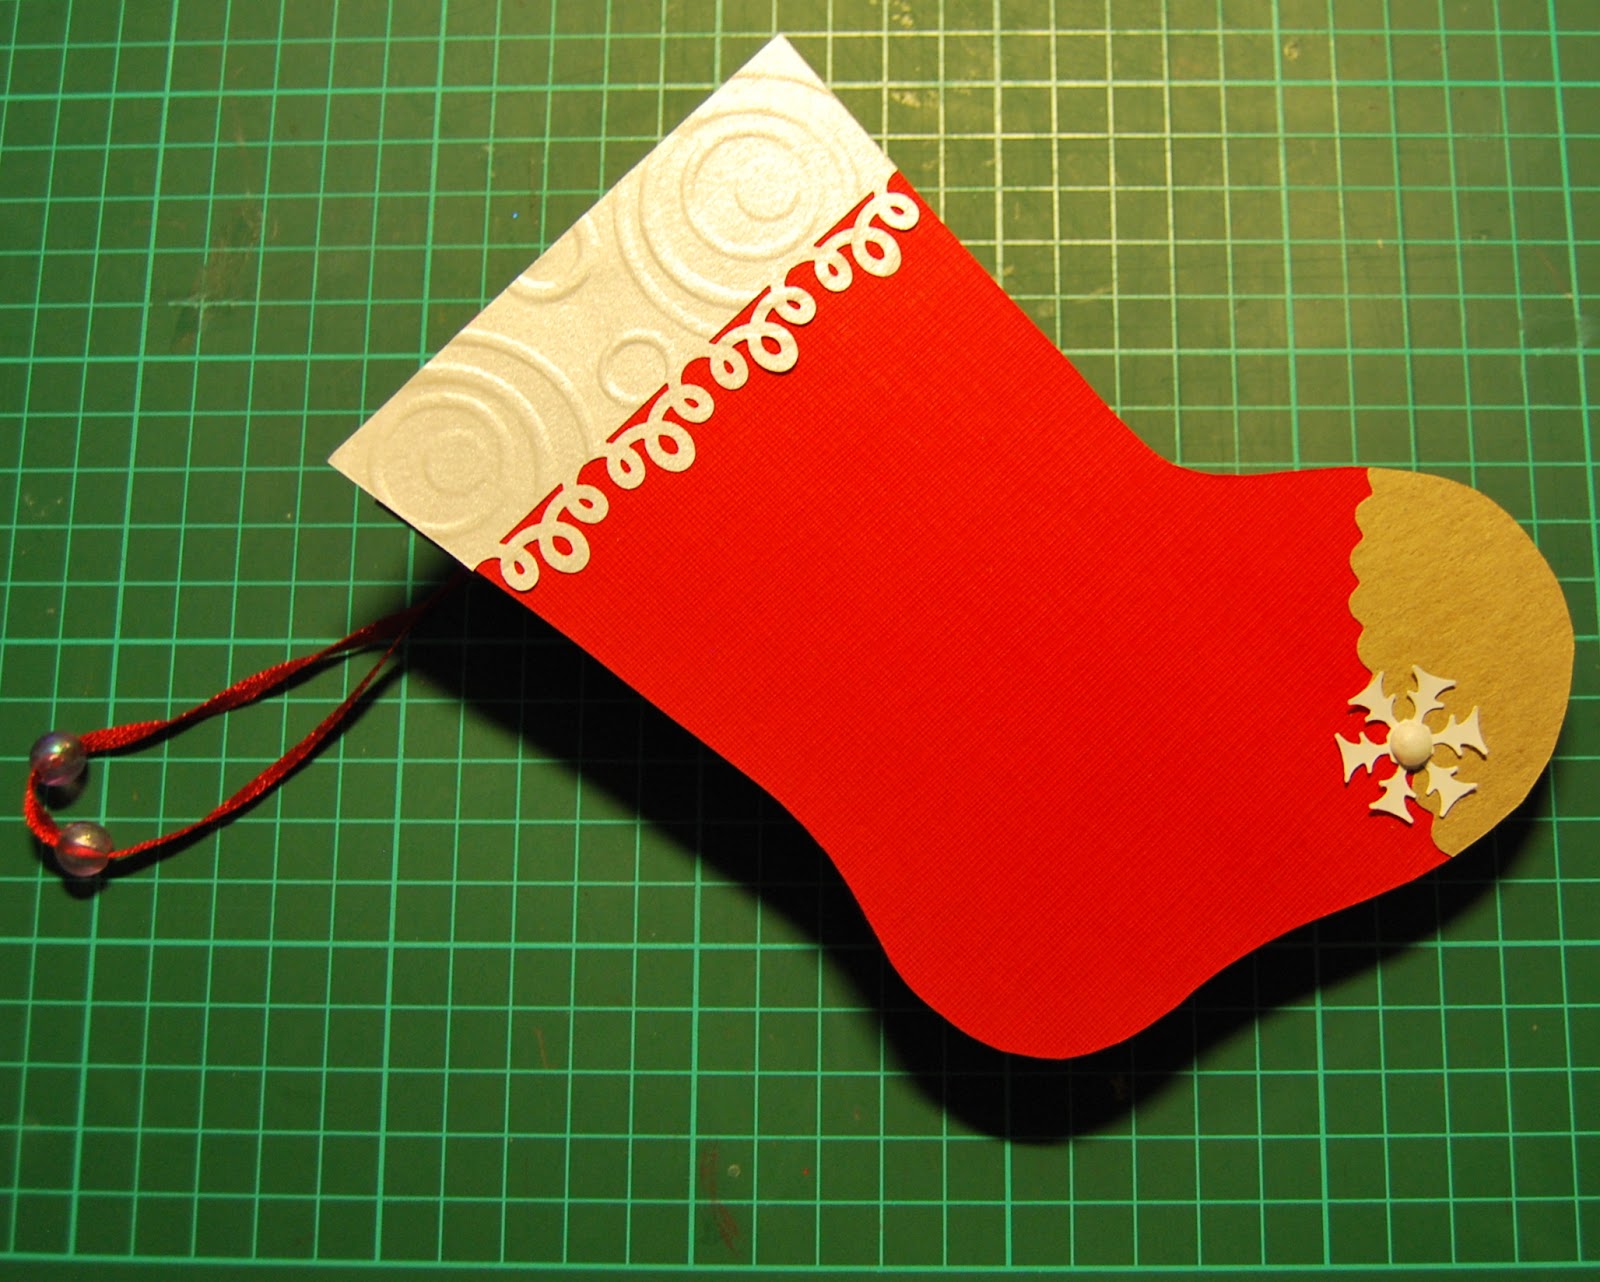
New Year's paper sock
Product for decorating the New Year's table
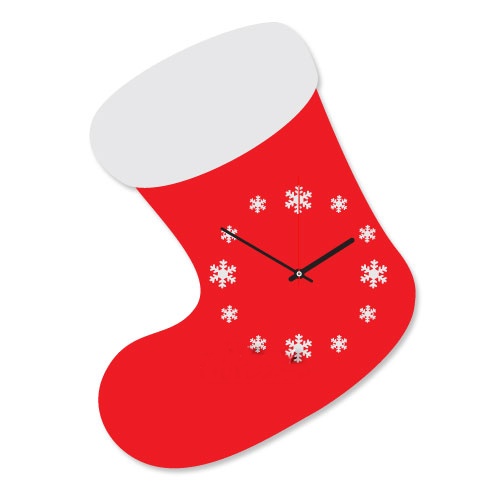
Festive paper shoe clock
If you don't know how to sew and knit, then try making New Year's sock from paper. Of course, you won’t put a gift in it, but beautiful decoration You will definitely succeed for the holiday.
To make a Christmas decoration you will need any thick paper (preferably embossed), scissors, glue and as many buttons, ribbons and beads of different sizes as possible.
- First of all, make a template that can later be used to cut out holiday shoes. If you have drawing skills, then simply draw a New Year's stocking as you see it, and then cut out the blank.
- Fold a sheet of paper several times, place a template on it, trace it with a pencil, and then carefully cut out the resulting pattern with scissors. If you choose not very thick paper, you can make 4-6 blanks at a time.
- Glue the resulting pieces together in pairs and let them dry completely. Before applying glue, be sure to place a loop of thread between the paper. To ensure that it fits well, lower it at least 3 centimeters.
- Decorate the finished products in any way convenient for you and simply hang them around the room. You can also make it out of socks if you wish. festive garland and place it on the Christmas tree.
From such paper crafts You can also make an original New Year's refrigerator magnet. If you can find a soft magnet and a small rectangular box, you will end up with a wonderful gift for your mom or sister. In this case, you will need to cut the shoe according to the template (you can use a napkin with New Year's drawing), and then simply glue it onto the cardboard box.
The sides of the product will also need to be carefully covered with colored paper. After this, all you have to do is fix the soft magnet on the opposite side and your gift will be ready. If you have chosen a fairly wide box for making a gift, you can try filling it with chocolate-covered nuts or any small candies.
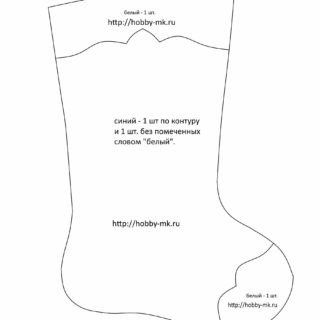
New Year's felt sock: pattern
Felt sock: pattern
Decor ideas
Gift socks made of felt
Felt boots
Christmas stocking
To make a New Year's sock from felt, you don't need to have any special skills. All you need in this case is a little patience and as much imagination as possible.
Therefore, stock up on felt of different colors, bright thick yarn, scissors and beads of various shapes and feel free to get to work.
So:
- Make paper template just like we taught you a little higher. If you don’t want to count and draw something, then find a suitable one on the Internet, print it and cut it out. In the case of felt, you need to take into account that this material stretches quite poorly, so if you plan to put not only sweets in the finished product, then make a large template.
- Fold the felt in several layers and carefully pin the resulting rectangle together with pins. Place it on the table, fix the template on it and outline it with soap or chalk. Take scissors and cut out the blanks.
- From the same felt, cut into circles and triangles of different sizes and place them on one part of the shoe to create a Christmas tree or a snowman. You can additionally decorate this applique with beads or simply carefully trim it along the contour.
- At the last stage, all you have to do is sew two identical pieces together. Moreover, in this case you do not have to make an internal seam. You can try sewing the product from the wrong side, making the same even stitches, stepping back 5 millimeters from the edge of the workpieces. If you use a contrasting thread for this, the Christmas stocking will turn out even more colorful.
New Year's stocking on the fireplace: how to decorate?

Socks with applique
![]()
Boots with tape

Decor of beads and snowflakes
- As you probably already understood, a New Year's stocking can be wonderful. holiday decoration. But in order for this product to really help create the right atmosphere, it must be properly decorated. For these purposes, you can use all available means. If it turns out that you don’t have beads, artificial spruce branches and bright ribbons on hand, then the only way out of this situation is to create an applique from pieces of fabric.
- You can cut out one three-dimensional figure and simply glue it, or think through the plot, prepare several blanks of different colors and shapes, and then make a festive applique from them. You can decorate it with ordinary New Year's rain. To do this, you will need to cut it as finely as possible with scissors, and then carefully pour it onto the fabric, onto which a small amount of special glue has previously been applied.
- After this, you will need to wait until everything sets, blow off the excess tinsel and the festive surroundings will be ready. If you do manage to look into a specialized store, then be sure to buy thin satin ribbons, multi-colored beads of different sizes, plastic snowflakes and the smallest decor that imitates fir branches, and make a miniature Christmas wreath from all this.
- It can be placed at the top of a holiday stocking, and the bottom of this product can be decorated with felt snowmen and buttons. If all the methods described above seem quite complicated to you, then purchase rhinestones and sequins and simply place them on glue.
We can already feel the approach of the fabulous New Year, which we have been waiting for all 12 months. When preparing for the celebration, don’t forget to make your own New Year’s boot templates. As you know, this tradition migrated to us from the West. However, Russians are happy to support this fad and happily hang these products in their homes.
The fact is that, according to the traditions of Western people, Santa Claus must leave gifts in this particular product, although if the gift is very large, then the Wizard can leave the gift nearby. But be that as it may, having entered the house, Santa Claus will look for the boot and if he does not find it, then the owners of the house may be left without New Year's gift. And in order to prevent such a situation, it is imperative to prepare for the arrival Good Wizard.
You can draw a New Year's boot template yourself, or you can take it from the Internet. When you have selected the necessary model, you should now prepare the right tool for work.
For this you will need:
- the material from which the product will be made;
- threads;
- a piece of fine soap or chalk;
- threads matched to the color of the material;
- scissors;
- accessories for decoration;
- thin rope for hanging the product.
New Year's boots are easy to make from felt. Multi-colored sheets of this material can be easily purchased in stores that sell goods for needlewomen. The size of one sheet will fit half a boot. After everything is prepared, you can start working.
Therefore, using the selected template, you need to make a pattern. Applying the stencil to the material, use chalk or soap to trace it, transferring the outline to the base. This will create the silhouette of a boot. If the material is folded in half and not moved from its place, it will be possible to cut out two parts at once. After which these parts need to be ground.
It turned out what we wanted. For beauty, the edges of the boots can be carefully trimmed with curly scissors. Surely many have seen when products have a beautiful outline, for example, in the form of small triangles. If this is not possible, then you can use a bright thread and a needle to overcast the edges, but so that the colors are contrasting. This is done for originality. Then fasten a loop from the rope and you can hang the finished product wherever you want.
On New Year's Day, of course, almost every mother is very busy with chores and, well, there is no time for needlework. Therefore, you can use the simplest option for making such a craft, that is, make it from paper. Moreover, to do this, you definitely need to call the children and transfer such an easy task to them.
But first you need to prepare required material and show you how to do it. So, for work, prepare paper of different colors. After that, make a template. To do this, draw your boot on a cardboard sheet with a simple pencil. You can depict it with the end rounded up. This is how anyone wants it.
After this, cut out a dense stencil using scissors and transfer it to colored paper, for example, red. The top and bells can be made from white paper. To do this, cut a wide strip white and glue it on top of the red boot.

Then make 3 small circles from the same white paper. 2 of which are glued to the side of the product in the form of cherries on the tail, and one is glued to the rounded toe of the product. The result is such a cute boot, which can additionally be decorated with sparkles to create a snowy effect.
To do this, draw thin lines of glue where you plan to apply the shiny base. For example, along the contours of the top and at the tip of the boot. Then use a brush to apply glitter until the glue dries. Thus, they will not crumble, and the products will look beautiful, shimmering with their “snowflakes” from the light.
Mini boots are made using fabric. Typically, such products can be given as a gift or to decorate your home and office. To do this, a stencil of the product is drawn with the size of a matchbox. Then it is transferred to the fabric. The edges of both halves are stitched. After which the product is turned inside out and framed.
For decoration you can use applique or embroidery. After all, the boot is small, so this is all done quite quickly. Also, using yarn, make several pom-poms that will decorate the product. You can attach a lace to which you can apply glitter.
Using an ordinary paper clip, make skate boots that will look original on this product. You can sew beads or buttons in a chaotic manner. It’s just as easy to glue other pieces of fabric in small squares. It is not uncommon for many masters to do such New Year decorations stick on the side beautiful snowflakes. The edges can be decorated with rhinestones, which will shimmer beautifully in the light.
Together with your children, you can cut out stencils of such decorations from paper and glue them onto the glass, and decorate them around with snowflakes, which seem to be performing a dance in anticipation of the appearance of the Good Wizard. In any case, no matter how you design these boots, they will still be there, by the way, for the upcoming holiday. The main thing is to try and devote at least a little time to it.
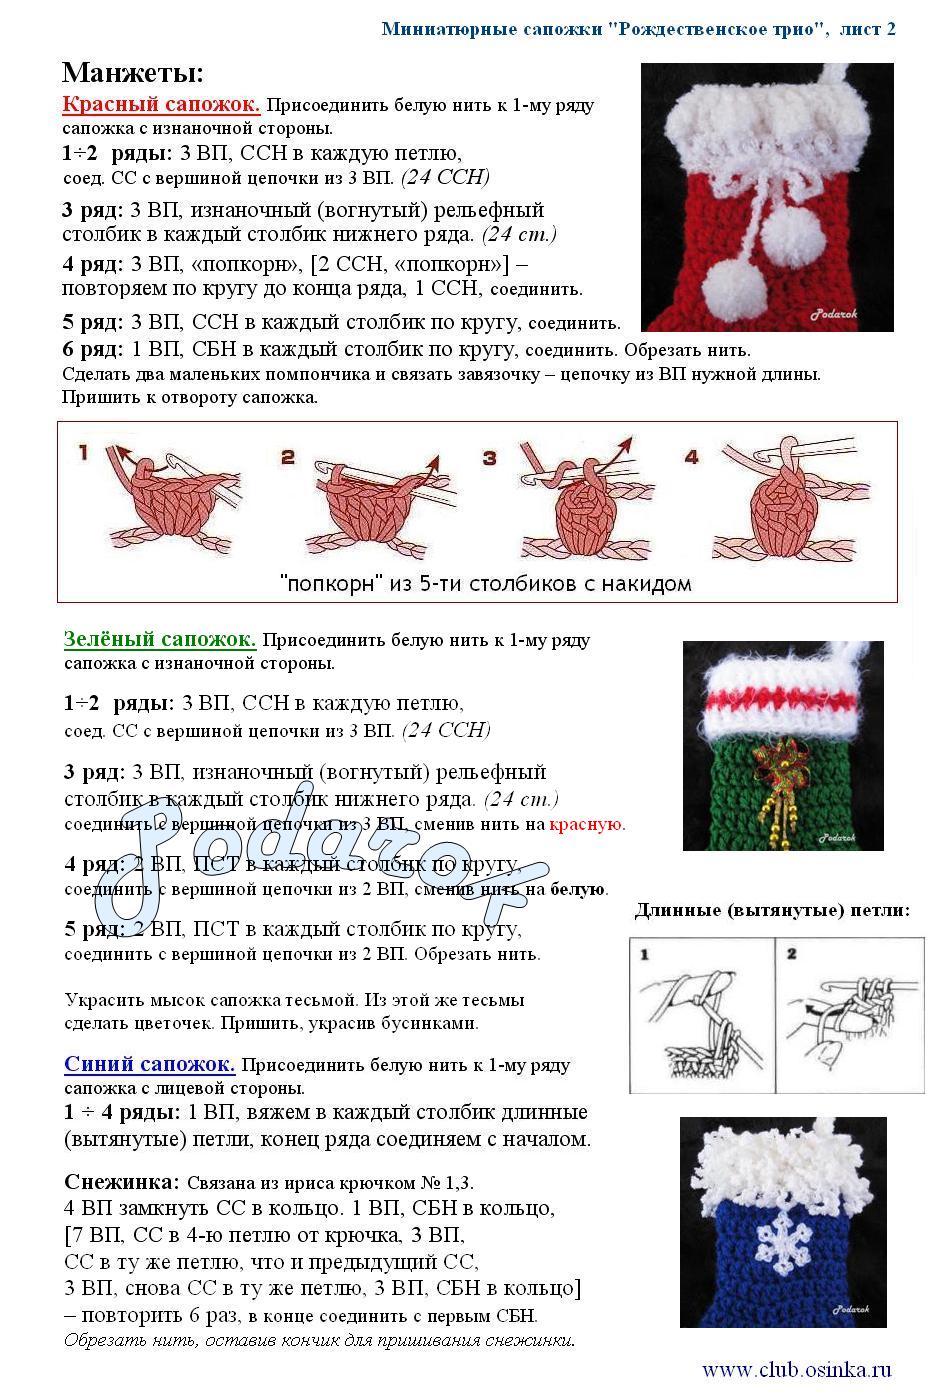
I made this felt boot for my daughter for Christmas. The idea for the drawing was taken from the Internet, but, as usual, I could not repeat everything exactly. Therefore, I offer you my modified version. It took me two whole days to complete the work because I embroider very slowly. At the same time, I was distracted only by cooking and homework with the child.
I am attaching the boot pattern in .jpg format. When printing, try to print each sheet with the same printer settings so that the details match. You need to print on A4 sheet in portrait format.
To work you will need:
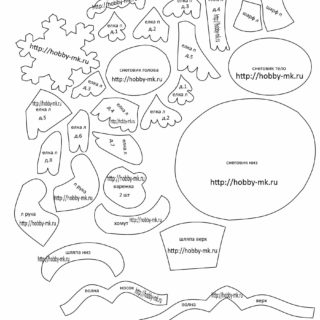
Pattern of New Year's boot made of felt - appliques
Pattern of a New Year's boot made of felt - the basis
- medium-hard felt (2 A4 sheets of blue and trimmings of white and blue);
- blue and silver sequins;
- small transparent and blue beads;
- large black beads - 2 pcs. for peepholes;
- black bead 5 mm for the spout;
- sewing and embroidery threads - white, blue, dark blue, black;
- a regular sewing needle and a beaded one (thin with a thin eye);
- padding polyester for stuffing;
- blue satin ribbon 5 mm wide - for hanging.
How to sew a New Year's boot from felt using my pattern:
- Print the boot pattern on two A4 sheets in a book layout.
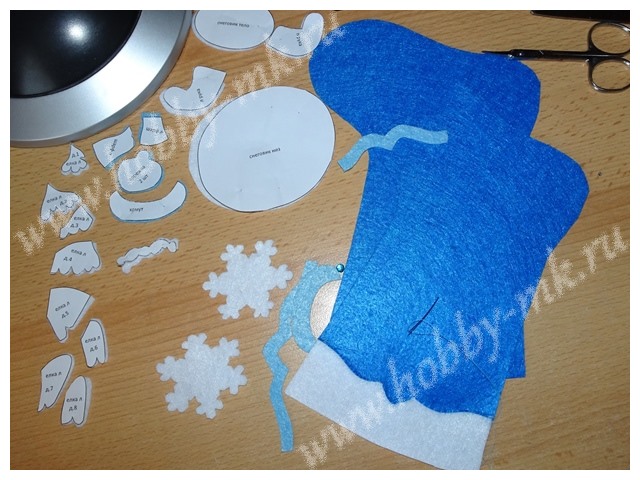
- Cut out a pattern for the boot from blue felt all the way around, including the toe and top edge.
- Divide the base template of the boot into 3 parts along the lines separating the toe and top.
- Cut out the central part of the boot from blue felt, and from white felt the sock, top of the boot, details of the Christmas trees, snowman and stripes of snow for the hat, as well as a snowflake.
- From blue felt we cut out 2 mittens, 3 scarf elements, 2 hat elements, two figured borders.
- Docking white sock with the blue central part of the boot and sew them end to end with oblique stitches. The stitches should be small and completely covered by a curly strip of blue felt placed on them.
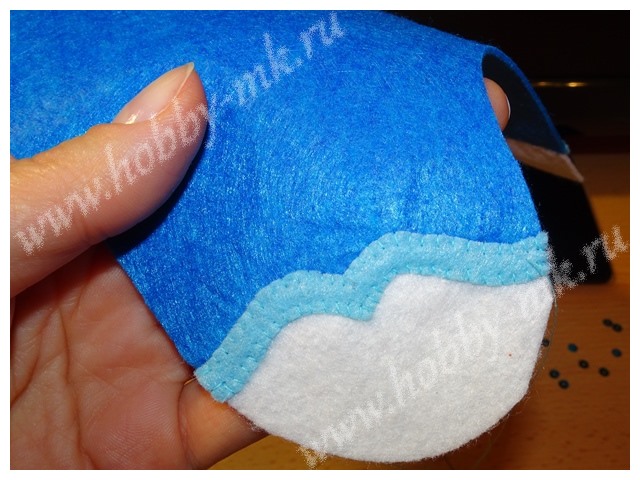
- Apply a blue curly stripe to the border between the white and blue parts. Sew with even stitches using matching thread.
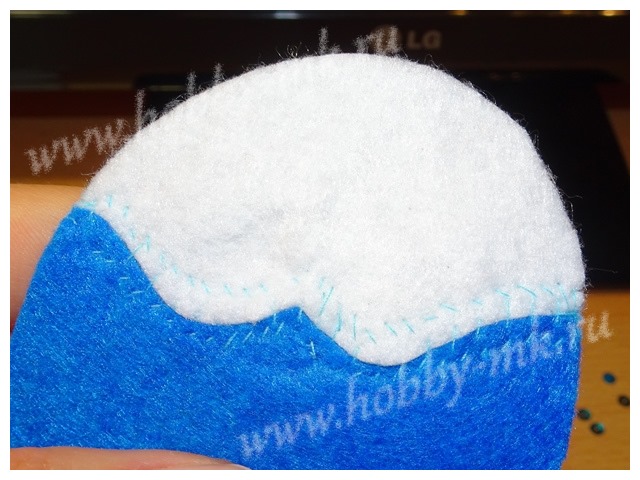
This is what a sewn sock looks like from the inside out
- We sew the top of the boot in the same way.

- Next we make the left and right Christmas trees alternately. We begin to sew them from the bottom up, since the upper parts partially overlap the lower ones. Don’t be too lazy to first lay out all the elements of the Christmas tree, clearly checking their location, and then only sew on one element.
- After the Christmas trees we sew on the snowman elements. The lower part should completely cover the gaps up to the Christmas trees. To make the snowman figure look prominent on the boot, do not forget to lay out a small layer of padding polyester under the applique and distribute it evenly.
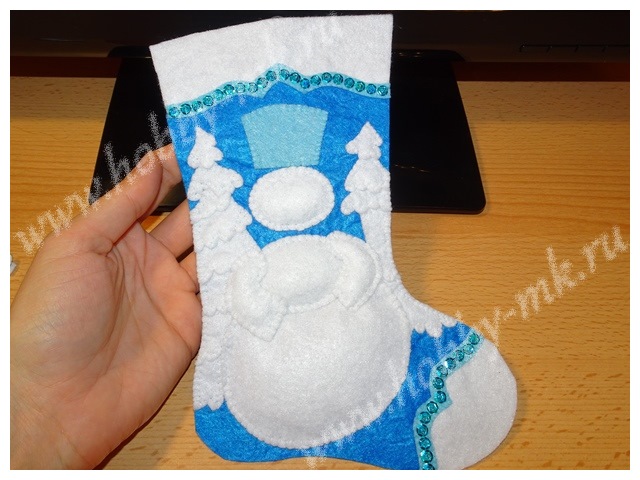
- Next we sew on the sleeves (they should also cover the free space up to the Christmas trees), and the cylinder of the hat. We stuff the sleeves with padding polyester, but not the hat.

- We sew on the brim of the hat, the scarf collar, the ends of the scarf and the mittens. Add a piece of padding polyester to the collar and mittens.
- Now let's start embroidery. To sew a sequin, use a bead needle to pierce the felt from the inside to the face, put the sequin on so that the bulge is on top (otherwise you can cut yourself on the sharp edges), string a bead to match the sequin, pierce the felt from the face to the inside through the center of the sequin and tighten the thread. This is how we decorate the edges of the Christmas tree tiers, the bottom ball and the left hand of the snowman, and a figured strip.
- We embroider a mouth on the face and sew a black bead instead of a nose. For the eyes, we take large black beads, place them on the fabric with the hole up and make 4 stitches from the center of the bead with black thread - short down and long up, up to the left and up to the right. This is how the eyelashes turned out.
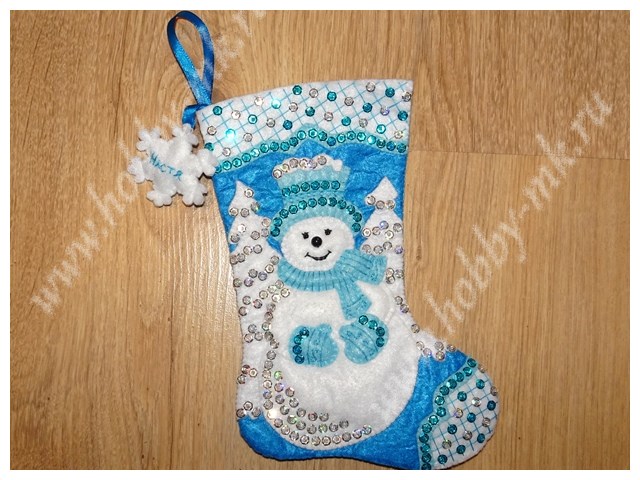
- We embroider random patterns on the mittens, hat and scarf.
- We decorate the toe and top of the boot with rhinestones on the mesh. To do this, we pull the parallel threads first in one direction, then across. It is convenient to check the distance between the threads using a strip of cardboard 6 mm wide. The stretched threads will sag, so we sew sequins at the crosshairs of the threads, alternating their colors in a checkerboard pattern. When sewing sequins, we make the first puncture on one side of the intersection of the two threads at a point, and the second on the opposite side of the first puncture. This way the threads will be drawn to the fabric with a single stitch.
- On one half of the snowflake we embroider the name of a loved one (in my case, the name of my daughter), and then we sew the two halves of the snowflake together, not forgetting to fill it with padding polyester in the process. We sew a satin ribbon to one of the rays.
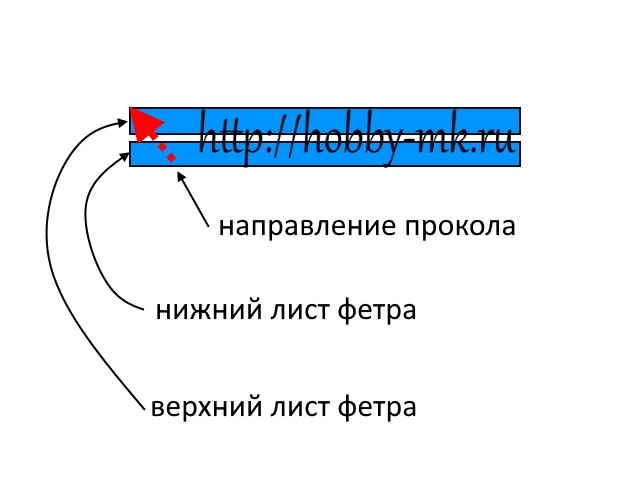
- Now the final stage - we put the two parts of the boot together facing outwards and sew them around the perimeter with overlock stitches (of course, without touching the top :)). I stitched it so that front side no stitches were visible. This can be achieved by inserting the needle diagonally (see diagram).
- Sew the other end satin ribbon, on which the snowflake will dangle, and a suspension. The work is ready!
Shared master class
Anastasia Kononenko


Popular
- Summary of the lesson on artistic creativity “New Year's toy
- Crochet for Beginners
- Work experience of an individual entrepreneur (IP, pboyul) Confirmation of work experience of an individual entrepreneur
- How to determine your color type of appearance test online Take a beauty test for girls
- DIY festive hairstyle
- Making charming baskets from newspaper tubes using a cardboard box
- Kiss tattoo for men. Kiss tattoo. The meaning of tattoos for men
- The safety of plastic toys
- Winter safety shoes: men's and women's, insulated
- Increased protein in urine: possible causes and treatment Quantitative methods of assessment