Fish braids with bangs for long hair. Weaving braids for long hair - beautiful, light and unusual options for weaving curls for girls and girls. Spit in a braid
Braiding is a process that requires experience and a full hand to get really beautiful and graceful hairstyles. However, having mastered just a few techniques, you will forever forget about the problem with styling long curls. For your convenience, this article provides descriptions of the most popular braids, as well as some tips to help make your hairstyle even better.
What is necessary
Despite the simplicity of the weaving process, it still requires some devices that will help make hairstyles better:
- Comb for separating strands and creating partings is a small comb with teeth on one side and a sharp-tipped handle on the other.
- Regular comb for combing hair. It can be absolutely anyone, so choose the one that is most convenient for you.
- Hairpins for fastening and separating the unwanted part of the hair.
- Hair bands. It is advisable to choose silicone and small in size, because they do not slip on the curls and hold your hair well.
- Depending on the complexity of your braid, you may you will also need ribbons for additional decoration.
- Studs or invisible for stronger fixing, as well as to create more complex hairstyles based on braiding.
- Hair wax so that the hairstyle looks perfectly smooth and nothing stands out from the general look of the styling.
- Strong hold varnish to fix the final result.
How to weave
- Before weaving, you should carefully comb the curls. If you have curly hair, then additionally process them with special straightening agents.
- Gather your curls into a high ponytail, avoiding the formation of "roosters" and irregularities.
- Next, the tail should be divided into three identical parts.
- Weaving begins with the strand that is on the right side. Take it in your hand and cross over the curl on top of the second, which is in the center. In this case, the right strand must be placed in such a way that it is in the center between the left and central strands.
- The process should be repeated on the left side. That is, the left curl must be shifted to the central one (which was originally on the right) and placed between it and the right strand.
- Then repeat all the steps again on the right side and so, alternating, weave to the end of the braid.
- Finally, the braid is secured with an elastic band. and, if desired, additionally decorated with ribbons or beautiful hairpins.

If you have curly hair, then additionally treat it with special straighteners.

Fish tail
- As with weaving a regular braid for the hairstyle "" the hair must be carefully combed.
- After that, a parting is done starting from the top of the head towards the neck.
- On the left side, a small strand is separated from the outer part, which is then shifted to the middle closer to the parting.
- Then, in the same way, separate the curl from the second part and shift to the middle overlap with the first strand.
- After that, strands are taken from one, then on the other side and shifting them to the middle.
- The final look of the hairstyle will depend on the thickness of the strand that you will take. The thinner the curls, the neater the braid will look, but it will also take longer and more carefully to weave it.
- Fasten at the end. If desired, you can slightly dissolve the braid and make it more voluminous.

The final look of the hairstyle will depend on the thickness of the strand that you will take.

- Separate part of the hair at the temple, carefully combing it before. Secure this part with a clip or elastic band.
- Divide the rest behind the ear into three strands. Braid the classic inside out towards the back of the head.
- Continue weaving towards another temple.
- When you braid your pigtail to the opposite temple, start weaving a classic braid without adding additional strands.
- Secure the remaining end with hairpins in that place. where you started your weave, creating a braid hoop in the process. Decorate the place of attachment with any to your taste.
- Fix hair with varnish.

Decorate the attachment point with any hair accessories of your choice

Greek style
- First of all, to create this hairstyle, you need to make a parting. It can be classic, side or oblique, it all depends on your desire.
- After that, separate three strands from the part of the hair near the right temple and secure the rest with a clip.
- From these curls weave classic spikelet.
- After you reach the opposite temple, secure the remaining hair with an elastic band. And from the remaining hair, make or curl them with a curling iron.
- Another option would be to continue weaving with the rest.
- It needs to be braided exactly the same as the first braid.
- When finished, braid the remaining hair from both braids together and form a bundle.
- Fix the resulting hairstyle with varnish and decorate it as you wish.

When finished, braid the remaining hair from both braids together and form a bun.

From 4 strands
- Comb the entire mass of hair towards the back of the head.
- Divide it into four equal parts.
- Grab one piece with your hand and place it on top of the other., these two strands must be held well in your hands so that they do not fall out. With your other hand, take the next strand and place it over the curl that is on the right side.
- Bring the remaining fourth strand under the first, which is located in the center of the weave.
- Bring the rest under the first, which, if done correctly, should be in the center. Place the second part on top of the third, and the fourth on top of the second.
- Now take the first strand and stretch it under the second, and throw the third on the fourth. After that, stretch the first strand to the third, and tighten the second under the third.

Take one part with your hand and put it on top of the other, these two strands must be held well in your hands so that they do not fall out

openwork
- To begin with, a piece of clean hair is taken and is divided into three equal curls.
- Making this hairstyle and is based on the classic braid.
- Having made the first couple of weaves, select individual small strands from the extreme curls, which are woven into the braid through one or two turns of the main strands.
- At the end of weaving, holding the end of the braid, gently pull the side strands.
- Fasten the end of the braid rubber band or ribbon.

Having made the first couple of weaves, select individual small strands from the extreme curls, which are woven into the braid through one or two turns of the main strands

little basket
- Hairstyle is divided to the center hole.
- Then a part is allocated above the ear, which should then be divided into three curls. An ordinary spikelet is woven from them.
- Once the braid is completed on one side, secure it with an elastic band. Then we begin to weave the second braid in the same way.
- Having received two braids, we alternately wind them in opposite directions along the circumference of the head, towards the forehead.
- After that, the two ends can be braided into one common braid or wrapped in an elegant cone.


- Do not overtighten the strands when weaving. This will not make the hair more neat, but will only harm the roots of the hair and can even cause a headache.
- You can give the braid a little sloppiness- it will make your look even more stylish and cute.
- Slightly stretch to add volume. side strands of hair.
- If you want to make a braid flower, then when twisting into a spiral, pull the strands only from its outer side.
- To fix hair with hairpins it is better to stab in the central part.
- Owners of curly or curly curls before braiding you will need to straighten your hair with special means.
- Before you start braiding your own braids, practice on your friends and acquaintances. in order to properly fill your hand.
Various weaves are a sign of good taste and allow you to give long strands a neat and well-groomed look. That is why do-it-yourself pigtails for long hair are a huge success not only among young teenagers, but also among young women. Do you want to learn how to braid beautiful braids? Read our master class more carefully and weave for all occasions!
Classic fishtail
To create this hairstyle, you will need a natural bristle massage brush, a hairpin or elastic, and water or a smoothing agent.
- We comb the hair and lightly moisten it with water or a special tool.
- We divide the hair into two equal parts.
- Separate a thin strand of hair from the right side and throw it to the left.
- On the left side, take a strand of the same thickness and throw it to the right.
- We continue weaving to the edge of the braid.
- We fix the tip of the tail with an elastic band or a hairpin.

A fishtail can be neat and smooth or messy and loose. If you wish, you can decorate it with flowers, ribbons or beautiful hairpins.
Snake all over the head
This long braid is a stylish combination of thin braids and a loose bun.
1. We divide the hair near the face into a clear side parting.

2. We make another parting from one ear to the other.
3. We collect the occipital part in a tight tail.

4. We divide the strands to the right of the parting into three identical parts and weave them into an ordinary three-row braid.
5. After a couple of centimeters, we begin to add thin strands to the braid. You need to take them only on the left. Weaving should be quite tight and dense.


7. We continue weaving, periodically adding strands on the left. We reach the end of the passage.

8. Again we make a loop in the form of a loop and return to the face.

9. You need to create three twists - you will get a retro hairstyle.

10. We fix the tip of the braid with an elastic band and connect it with the tail.
11. On the left side of the parting, we separate three equal strands and weave according to the same pattern. We also fix the tip with an elastic band and connect it with the tail.

12. Divide the tail itself into two parts and twist each of them into a magnificent tourniquet.

13. We lay out the finished harnesses in a circle around the base of the tail and fix it with the help of invisibility or hairpins.

Braid-crown for long strands
Do you want to feel like a real queen? A crown of your own strands will help you with this, as well as the following set of tools:
- Comb;
- Clip, hairpin or invisible;
- Elastic;
- Hairpins.
1. We comb the hair, separate the part from the temple to the ear and pin it with a clip.

2. Immediately behind the ear, we separate three thin strands and begin to weave a French braid from them in reverse, but add only the upper strands.

3. We move to the occipital zone and carefully make sure that the braid goes smoothly and does not crawl up or down. We weave our crown to the place indicated by the hairpin, and continue weaving over the forehead.

4. Having reached the place indicated by the invisibility, we continue the usual weaving of three strands.

5. We tie the tip of the braid with an elastic band and connect it to its base.
6. For reliability, we fix the crown with hairpins. And we decorate the junction with a flower.

Women's braids for long hair
Air feminine braids look best on long hair. If you have the desire and time, try this option for yourself.
Step 1. We comb the hair in a straight or slightly beveled parting.
Step 2. Separate three not very thick strands from the very face (on the right side).

3. We begin to weave a classic three-row braid from them, adding thin curls either at the top or at the bottom. Weaving should not be tight. Keep it airy and light. Only in this case, the hairstyle will turn out "with a bang."

4. We do the same on the left side. You will have two soft braids.

5. Gently give the weave even more volume - we disassemble both braids with our fingers along their entire length and draw out individual curls.

6. We cross the braids with each other and fix them with hairpins. We hide the tips inside and also fasten with a hairpin.

Pigtail on the edge of long hair
With this simple but original hairstyle, you can quickly tidy up even very long strands.

- Separate the strand at the back of the head and divide it into three identical sections.
- We twist the strands together as for a regular three-row braid.
- Now we start adding individual curls on the right. The hair on the left should not fall into the weave.
- We reach the end of the braid and tie the end with an elastic band.
- To give the braid airiness, gently stretch it with your hands.
Greek braid hairstyle
It will take literally minutes to complete this romantic and very beautiful braid for long hair, but the result will exceed all your expectations.
1. We collect the hair in a ponytail (tight), leaving only a few thin curls near the face.

2. The tail itself must be divided into four identical sections.

3. We take the first of them and divide it in half. Weave a fishtail braid.

4. We do the same with the three remaining sections.

5. We disassemble each braid with our fingers - this will make it lacy and free.

6. We lay the first braid from left to right around the head. Get a headband of hair. We fix it invisible.

7. We put the second braid under the first one from right to left and also fix it with hairpins or invisible ones.

8. Now we take on the third pigtail. We lay it in a circle from left to right.

9. Lay out the fourth braid in the central part of the head in the form of a flower. We fix everything with hairpins and invisible.

Four-row braid in folk style
Do-it-yourself braids for long hair cannot do without the original weaving of four strands. Such styling will make even very thin and sparse strands voluminous.
Step 1. We collect the hair in a ponytail (tight). Its location is up to you.

Step 2. Divide the tail into 4 sections.

Step 3. We impose 1 section on 2 and skip under 3.

 Step 4. We impose 1 section on 4.

Step 5. We start 4 under 1 (it should be in the center).
Step 7. 2 throw from above 3.
Step 8 Skip 4 over 2.

Step 9. Weave the pigtail to the end. We fix the end with an elastic band. To make the styling beautiful, do not make it very tight.

Wide braid for long hair
Unusual weaving in a folk style that will decorate any appearance.
1. We collect all the hair in a ponytail (tight).

2. We divide it into three sections.

3. We begin to weave a three-row braid, leaving thin strands on the sides.

4. We disassemble the braid with our fingers, giving it more volume.

5. Weave the outer braid from the remaining strands and also stretch it with our fingers.

Volumetric braid for long hair
- First, comb the strands with a comb and divide them into three equal parts.
- Weave an inverted French pigtail - skip the left strand under the middle one.
- We do the same with the right strand.
- We separate a thin curl from the general part of the hair on the left, attach it to the left strand and put it under the middle strand.
- We do the same on the right side of the weave.
- We continue the braid to the end.

Step 7. Gently stretch the loops with your fingers, this will add volume to the pigtail.
Step 8. We wrap the hair at the back of the head in the form of a snail. We fix the bundle with hairpins.

Romantic weaving for long-haired ladies
This styling is based on the same spikelet, but the side braid (one-sided) gives it originality.
- We comb the hair with a comb and divide it with a side part so that the left side is much larger.
- We braid the left section of hair into a spikelet.
- From the right side, we braid the pigtail along the very edge, picking up curls on only one side.
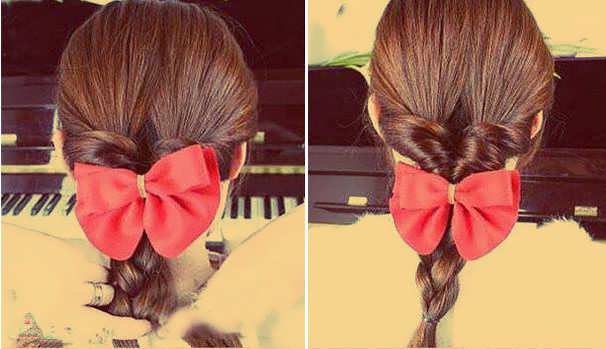
- We tie both braids at the base with an elastic band. We decorate it with a beautiful bow or hairpin.

elegant braid
Step 1. We comb the strands with a comb.
Step 2. Separate a thin strand of hair on the right and weave a one-sided French braid from it.

Step 3. We bring the weaving to the end and tie the tip with an elastic band.

Step 4. We braid the lower part into a spikelet and also tie it with an elastic band.

Step 5. We wrap the ends of the braids under the bottom and fix the bundle with hairpins.

Step 6. We decorate the hair with a bow or hairpin.
An inverted ponytail
Step 1. We collect the strands in a low tail, make a recess near the elastic band and turn all the hair through it. You can attach the bow immediately, or you can leave it for last. With a bow, twisting the hair is a little more difficult, but the result will be different.

Step 2. We form a pigtail from free hair and tie its tip with an elastic band.
With braids braided according to this lesson, you will look just wonderful! Get ready to receive compliments!
Owners of long hair can safely experiment with hairstyles, creating different looks for all occasions. Always up-to-date pigtails are now especially in fashion. long braid has always been considered an adornment of the ladies' image, besides, the variety of hairstyles with weaves is now simply huge. You can safely weave braids on your own. It can be both the simplest, classic hairstyles, and more complex weaving. Consider what braids for long hair can be, and how to weave them.
The classic three-strand braid is a hairstyle that will never go out of style. It can be done on both long and medium hair. In the time of our grandmothers, most of them wore braids, and the longer and thicker they were, the more beautiful a woman was considered.

This is a very simple and quick braid that anyone can learn to weave. The hair is simply divided into three equal parts and then weaved according to the scheme: the rightmost strand is shifted between the two remaining ones, after which the leftmost strand is also moved between two adjacent ones. Weaving continues to the ends of the hair, then secured with an elastic band. On the basis of ordinary braids, you can create a lot of other interesting hairstyles. You can also make braids more varied by weaving satin ribbons or other decorations into them.

French braid looks very beautiful on long hair. The advantage of this weaving is that it makes it possible to collect the hair tightly, and they will not fall out of the hairstyle and interfere with you. You can weave a braid straight or obliquely, you can braid two or more braids.

Weaving begins in three strands, as when creating a classic braid. But it starts from the top of the head. Separate three small strands and braid in the usual way, but the difference will be that, shifting each strand, you must each time grab a small strand of loose hair to it. You can adjust the thickness of the strands, determining what kind of braid it will be - with a small or large weave.

Such a pigtail is also often called a "dragon". The essence of weaving in this case is the same as with a regular French braid, but the extreme strands are not placed up, but down, under the neighboring strand.

Exists different variants weaving. You can make two symmetrical braids or braid one in a zigzag pattern. You can pull small loops from each weave of the finished braid, and you will get an attractive voluminous hairstyle suitable for publication.

The fishtail braid is fairly easy to do and in fact only requires two strands. That is, we divide the hair into two parts, pull out a small strand from one and transfer it to the next part. The same is done on the other side, and in this way we get a very stylish weaving, somewhat reminiscent of a fishtail or spikelet.

The hairstyle looks especially attractive and unusual on long hair. You can make a high ponytail at the crown and braid a fishtail braid out of it - you will get a very interesting styling.

An excellent option would be a combination of weaving and loose hair. Framing your hair with a pigtail will give it a neat and complete look. A waterfall braid can be chosen for some special occasion, going to the theater or a date - it looks very romantic.
Weaving is quite simple, and in many ways resembles the creation of a French braid. To get the effect of flowing hair, you need an additional strand that enters the braid, do not braid, but leave it hanging freely.

Pigtails, for the creation of which more than three strands are used, are more difficult to weave, but they look very beautiful and openwork. In the weaving process, the main thing is not to confuse the sequence. Having stuffed your hand in the future, you will understand that such, as it seems, complex braid, you can braid in a few minutes.

This braid will look amazing on long and thick hair. Go to weaving it if you have already mastered the previous options.

A gentle and romantic hairstyle that looks a little careless and allows you to add volume to your hair. Weaving a French braid is taken as the basis, but the difference is that, grabbing another strand from loose hair, you do not tighten it into weaving, but leave it relaxed. There are different variations of this hairstyle, and they all look very interesting.

Also a great hairstyle for long hair. It can be performed on the basis of any pigtail (regular, French, spikelet). In this case, it is the location of the braid that is important - it starts from one edge, then goes in a semicircle and twists like a shell. Also, to fix the hairstyle, you will need hairpins or invisible ones.

Braid around the head (crown)
Very beautiful and spectacular styling, which will suit the owners of the right oval shape face and beautiful features. It is also often called a basket. Weaving can be done in several ways. You can create a classic braid that will go around your head when finished, or you can make a French braid in a circular weave. When choosing the first option, keep in mind that your hair should be long enough - so that it is enough for a full girth of the head.

A bun is a hairstyle that never goes out of style, and by learning how to combine it beautifully with a braid, you will get stylish styling for any occasion. A low bun and a reverse French braid go well together - this combination looks quite interesting and inevitably attracts the attention of others. The fishtail braid also looks beautiful, smoothly framing the face and turning into a neat bun. You can also just make a bunch of braids - creating such a hairstyle is quite simple, but it looks very interesting.

Also a very interesting combination for long hair, but not with a bun, but with a tail. With him, the hairstyle will turn out to be very playful. You can combine these elements in different ways: weave a braid from the tail, create pigtails around the head, and collect the remaining hair in a loose tail, and so on.

Braid twist or "fake pigtail"
And in this version, you don’t even need weaving skills, since such an oblique hairstyle is considered only conditionally, but is actually done through ponytails and elastic bands. But the final version strongly resembles a braid, so it can be another great decoration for long hair.

It is also a simple and stylish option that can be done in two techniques: based on a French braid or tail. The hair must be divided into two parts, each of them twisted with a tourniquet in one direction, for example, clockwise. Then start twisting the strands together to get a spiral, but you need to twist it in the opposite direction - in our case, already counterclockwise. So the hairstyle will last for a long time.

Most often, such a hairstyle is made of two or three bundles. The technique for its implementation is quite simple, and involves the following steps:
- Gather your hair up with an elastic band and divide it into equal parts (two or three). If you want to braid four or more strands, you will need a little extra braiding skills to do this.
- Each strand is twisted with a tourniquet by rotating it around its axis.
- The finished tourniquet must be secured with an elastic band or a "crocodile".
- The second or third strand rotates in the same direction as the first.
- When the bundles are ready, they are intertwined. So that the braid does not unravel, you need to weave it in the opposite direction to twisting the bundles.
- Weave the braid to the ends and fix it.

There are many other hairstyles with braids for long hair. You can additionally decorate them with various decorative elements, such as braids, bows, beautiful hairpins and rubber bands, wreaths, headbands, natural and artificial flowers and so on. By learning how to do at least a few different braided hairstyles, you will be able to create stylish and appropriate looks for all occasions.
Braids for long hair: photos of stylish options


- The braid retains a beautiful and neat appearance for a long time. Weaving is not afraid of wind or humidity, does not wrinkle under a hat and is less electrified than loose ones.
- Beautiful braids are appropriate everywhere. On the beach, in the office or at a wedding, they will look equally good.
- Even if you master only one weave, you can create an infinite number of variations based on it. For example, braid two or three braids instead of one. Or decorate your hair with accessories. Ribbons, scarves can be woven into braids, decorative hairpins or hairpins can be added. Fresh flowers will look good in your hair in summer.
How to weave braids
- It's better to start with simple options. Do not rush to weave a complex braid from your hair right away, practice on ribbons or floss threads. Having mastered the principle, you can experiment with the location, number and complexity of braids.
- If you are braiding yourself, do not use a mirror, trust your feelings. It is quite difficult to navigate the mirror, it is very confusing in the process.
- To make it easier to work with hair, they need to be washed, dried and combed well. Mousse or styling gel will also come in handy: thanks to it, the hair will become obedient.
- When weaving braids, it is better to use wooden combs. Wood electrifies hair less than plastic, which means it will be easier for you to work with strands.
- Alternating strands according to the scheme, pull them evenly. With practice, you will master any weaving.
6 options for weaving braids
Two strand braid
A two-strand braid is a twisted, two-wire ponytail that will suit your hair. middle length. Weaving can be used for a French braid. A ribbon woven into a bundle will look beautiful.
- Divide your hair into two sections.
- Tie a ribbon to one of them.
- Twist each strand into a tourniquet clockwise.
- Twist the strands counterclockwise. The difference in directions will not allow the braid to fall apart.
- Secure the ends of your hair with a ribbon.
Fish tail
This braid captivates with its spectacularity, although it is woven quite simply. Suitable for shoulder length, but looks especially good on long ones.
A simple option is weaving from the back of the head.
- Divide your hair into two parts.
- Separate a thin strand from the left half from the side of the ear and throw it over the top to the right side.
- Then separate a thin strand near the right ear and throw it to the left.
- Repeat steps 2 and 3 until you reach the ends of your hair. Secure the braid with an elastic band or ribbon.
If you want to make the weaving more complicated, make a French braid that turns into a fishtail.
french braid
French braid goes well with a strict office suit. Weaved on the basis of a braid of three strands. Suitable for long hair and medium length hair.
- Divide your hair into three sections.
- Throw the far right to the center.
- Then send the extreme left there.
- Continue until you run out of hair.
For a change, you can weave a French braid only to the middle of the back of the head. Collect the remaining strands in a bun or, securing with an elastic band, leave in the form of a tail.
Waterfall
At the heart of the same braid of three parts. Unusual hairstyle give released strands. This braid is suitable even for chin-length hair. It weaves horizontally from the temple. You can collect hair in this way only on one side. Or you can make a symmetrical weave and wear it instead of a headband: styling collects hair and prevents it from getting into your eyes.
- Separate a strand of hair from the temple and divide it into three parts.
- The beginning is the same as in a regular three-strand braid. Throw the top strand to the center, then do the same with the bottom.
- Once again, send the top and then the bottom strands to the center.
- Add a strand of hair to the top.
- You don't need to add anything to the bottom. Instead, under the existing lower strand, collect another, separating it from the free ones. Release the old one. Move the new one to the center.
- Repeat steps 4 and 5 until you reach the middle of the head. Temporarily fix the braid.
- Make a symmetrical weave on the other side.
- Connect the ends of both braids together and secure with an elastic band or ribbon.
Four strand braid
The complexity of weaving will allow without embarrassment to apply this option not only to female hairstyle but also to a long beard.
First, try weaving a straight braid. When you master weaving, you can make braids from the back of the head or rim using this technique. In order not to get confused, remember that only the outer strands need to be moved.
- Divide your hair into four sections. Take two strands in your right and two in your left hand.
- Stretch the leftmost strand (we will consider it the first one) over the second and under the third. Now in your left hand you will have the second and third strands. The first and fourth will be in the right hand.
- Place the rightmost strand (fourth) under the first.
- Again, take the leftmost strand (second). Swipe it over the next (third) and under the fourth. In your left hand you will have the third and fourth strands. The first and second will be in the right hand.
- Stretch the rightmost strand under the next one.
- Place the leftmost one under the next one and over the next one, transfer it to the other hand.
- Bring the far right one under the neighboring one, which we just moved.
- Repeat steps 6 and 7 until you reach the end of the strands.
- Secure the weave with a ribbon or elastic band.
Five strand braid
Weaving is reminiscent of Irish knitted patterns arana. This option will require training, but braids from many strands look very unusual and bright.
Practice braiding a five-strand braid based on a high or low ponytail. The tail will hold the hair, and it will be more convenient to work. When you master this method, move on to a hairstyle without a tail or make a French braid with such a weave.
- Divide your hair into five equal sections.
- Take three middle strands. First, throw the left to the center, then the right - just like in a braid of three strands. Then take the outermost strands of the three middle strands, lift them above the weave and temporarily secure with a clip.
- You will be left with the middle strand and two side strands, which we have not touched yet. Of these three strands, throw the leftmost strand to the center. Then send the far right there.
- Fix the middle one with another clamp. This will keep the weave from falling apart.
- Release the strands that you lifted. Place them along the edges of the weave.
- Take the strands that you just worked with: now these are the second and fourth parts in the weave. Lift and secure them over the hair.
- Of the remaining three parts, first move the leftmost to the center, then the rightmost.
- Fix the middle strand with a clip.
- Lower the raised strands, placing them along the edges of the weave.
- Lift and fix the second and fourth strands.
- Repeat steps 7-10 until the end of the weave.
Today we have collected for you 7 hairstyles with braids for every day.
A hallmark of today's ideas and photo lessons with text step by step instructions to them will be their simple and quick execution. AND light weaving braids for short, medium and long hair will delight you with its elegance, versatility and original approach.
1 braid for every day in a ponytail
Easy weaving of a braid of the eight and your hairstyle with ponytail looks completely new and amazingly playful.

2 Braid for long hair for every day
Three simple braids for long and medium hair in one original hairstyle for every day. Video tips for weaving braids are included.


3 hairstyle with a braid for every day upside down
How to get out, so that it is both imperceptible and stylish, if the hair is not “first freshness”? Combine a braid and a bun in one hairstyle. For the beach and wet hair - also ideal.

4 French simple braid for every day
This hairstyle with a scythe is best suited for long hair. You can wear it both every day and on special occasions. As for the braids themselves, choose any of them, but we advise you to pay attention to the French one.


5 Easy braid for every day
Simple and quick braids for every day can turn into a great hairstyle, as if straight from the Game of Thrones series to ours. modern life. Weaving such braids is best for long hair.

6 hairstyle with a scythe for medium hair for every day
The undoubted plus of this hairstyle is that it is very simple, but refined. Done in minutes, weaving braids easy. Versatility at a high level - suitable for medium-short, medium and long hair.

- As always, the first stage begins with combing the hair. In the case of partly loose hair made in the style of "malvina", the hair at the back of the head should be slightly teased so that it appears more voluminous under the back rim of hair.
- On the right side, just above the temple, separate a not too thin part of the hair, twist it into a bundle up to the middle of the head. Do the same on the left. The degree of tightness, as well as the width of the strands, adjust at your discretion and taste.
- Connect both harnesses at the back in the center of the head and braid the braid.
- Curl the remaining loose hair into soft curls.
- To take this already elegant hairstyle to a new level, we suggest twisting the bundle on the right side to the length of the left, and fix it with an invisible hairpin. Over the right flagellum, let the left one overlap to cover the place of attachment, and hide its end and fix it already under the base of the right one. With this option, however, you will have to do without braids or replace the plaits with them in order to get a reverse half-crown of braids.
7 Braid-rim from regrown bangs
If you are growing bangs and don’t think about where else to put it so that it doesn’t interfere with your eyes, this braided hairstyle is your salvation option.


Popular
- Fashionable office clothes for women Business style clothes for women
- How to wear pink timberlands: fashion looks and tips from stylists Timberlands women's winter what to wear
- Read First: Style Guide
- Victorian style: romance of femininity and nobility
- Victorian clothing style 19th century
- A complete denim style guide to help you choose the perfect fit for any look.
- Hairstyles for every day: step by step photos, videos, interesting options
- Fashionable highlighting options
- Sulfate free hair shampoos
- Weaving braids for long hair