How to install a presser foot in a machine. How to remove crow's feet around the eyes - the most effective ways Standard machine stitch foot
Regular ski poles are used for roller skiing. The lengths of the poles for winter and summer are the same. Mostly roller skiers use light, hard top poles with a high carbon content. In Russia, the most popular poles are from One Way, Swix, and KV+. Sometimes you can find Leki, Exel, etc. Instead of winter “feet” in the summer you need to install tips for rollerballs, from now on we will call them “pins”. All ski pole manufacturers produce them.
Not all brands of pins have good characteristics. Some suffer from bad plastic that either breaks in half (and you are instantly left without a tip) or gradually deforms (and the metal tip falls out over time). Some have a soft alloy metal tip, causing it to become dull almost immediately after you start training. I tried all the models that are present on the Russian market, and selected only two for myself: Leki and Vauhti. They are available with mounting diameters of 8 and 10 mm. For my One Way poles (9 mm) the “ten” is suitable.
How to install a pin on a stick?
I suggest step by step instructions. The whole process takes 15 minutes.
- Pour into a small saucepan hot water from the tap (to save time on heating it), put it on the stove. We immediately connect the heat gun to the network:

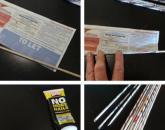
A heat gun can be bought at a hardware store (200-300 rubles). A hot-melt adhesive rod is inserted into the hot-melt gun. Such rods are usually sold in sets in the same store as the heat gun:

It is necessary that the diameter of the hot-melt glue rod matches the diameter of the hole in the hot-melt gun. The most common diameter on sale is 11 mm.
- After a few minutes, the water boils, you need to lower the ends of both poles with a ski foot (or with an old pin that you want to replace with a new one) and two new pins that you want to put on. In order for the paw/pin to expand and the hot glue inside to soften, you need to keep it in boiling water for 30-60 seconds.
- Take one stick out of the pan and remove the foot/pin with your hands (wearing a glove or using a rag so as not to get burned). Use a dry rag to wipe off any excess old hot-melt glue from the shaft of the stick. If the glue is difficult to remove, place the rod in boiling water again for 20 seconds and wipe the glue off with a rag again.
- Make sure the heat gun is hot. This usually takes 8-10 minutes after the device is connected to the network. To do this, pull the trigger and check that the glue begins to be squeezed out of the nozzle of the hot-melt gun.
Important: the following steps need to be done very quickly, you have only a few seconds:
- Take a regular table fork and use its tip to fish out one pin. Pour water out of the pin. Next, take it in your hand and blow it strongly with your mouth once to remove the droplets of water that are present inside the pin.
- Apply hot glue to the end of the stick shaft (1.5-2 cm) around the entire circumference. You need to apply in sufficient quantities, the excess will still be squeezed out later. It is undesirable for voids to remain inside the pin. This will impair the reliability of the rod fastening.
- Place the pin on the rod in such a way that the pin is at least approximately aligned with the handle of the stick. The metal tip should point forward (if we are talking about the direction of movement of the athlete with these poles).
- Carefully, holding the pin with your hand so that it remains in a stationary position, wipe off the excess glue with a rag with your other hand to make it aesthetically pleasing.
- Take the stick in your hands with the tip facing you and look at the light along the stick, checking the alignment of the pin relative to the handle of the stick. If necessary, slightly tighten the pin around the axis to ensure perfect alignment.
- Do the same steps with the second stick.
The above applies to poles with a high carbon fiber content. Cheap (not top-end) sticks basically have a lot of paper and using boiling water can render them unusable. In this case, it is preferable to use an oven or hair dryer. As a last resort, if there is nothing other than boiling water, you need to place the stick with the pin in a sealed container before lowering it into boiling water. plastic bag. But the warm-up time, for obvious reasons, will not be as short as without the package.
Alternatively, instead of a heat gun, you can use a hair dryer, as shown in this video:
If you have a stick that is too long and you need to adjust it to your height, then you have to cut off a piece of the rod that is located under the handle of the stick. Under no circumstances cut off the bottom of the rod! In this case, you will be left with a rod of such a large diameter that not a single paw or pin will fit on it.
If the handle of your poles contains a cork, then to remove the handles, use boiling water to place them in a bag. But the most effective is to use an oven (150-200 degrees) or a hair dryer. It is very important not to melt the plastic parts of the handle (especially where the trap is inserted and secured). Therefore, do not rush to increase the oven temperature. Start at 150 degrees.
Important: Before using an oven or hair dryer, be sure to remove the trap, as it contains synthetic materials that will inevitably melt! Also, do not leave the wedge-shaped plastic peg in the handle that secures the trap.
Hold the stick in your hands so that it does not touch the hot metal surfaces of the oven. The oven door will be half open. It may take several minutes for the handle to warm up. Periodically remove it from the oven and try to pull off the handle (naturally, using a glove or rag so as not to get burned).
After removing the handle, cut off the extra centimeters of the stick shaft with a hacksaw. Lightly sand the sharp edges of the rod with sandpaper or a file. Before placing the handle onto the stick shaft, reheat the handle in the oven. Next, apply hot melt glue as indicated above.
Important: You need to work with a hair dryer with extreme caution! He gives out very high temperature, and the handle is very easy to damage (melt).
I strongly do not recommend using materials such as electrical tape or adhesive tape to attach handles, paws, and pins. There have been many times when the tab/pin with this type of fastening has slipped off the rod very easily during training/race. I also do not recommend using glue, which will then prevent you from removing the tab/pin (epoxy, poxypol, supermoment, etc.). I know that some pole manufacturers, after complaints from racing skiers, began to use some serious adhesives that made it very difficult to remove the feet. Personally, I have a negative attitude towards this. I think hot melt adhesive is a reliable and convenient tool. It has never let me down.
How to sharpen pins?
Pins and claws are sold unsharpened. Many athletes only think that they are imprisoned. But that's not true. They have a so-called “platform”. With such a platform, grip on asphalt will not be ideal. But if no additional manipulations need to be done with the paws for skiing, then the pins for asphalt need to be sharpened, even if they are straight from the store.
The working angle of the tip should be quite sharp. Take a look at the picture. For convenience (so as not to clutter the picture), the corners on the outside of the tip are marked on it. But we are interested in internal angles. From your school geometry course, you should remember that the angles between two straight lines on both sides are congruent. Now compare angles 1 – 3:

Angle 1 – new tip with a platform (from the store).
Angle 2 – the tip is sharpened with a sharpener.
Angle 3 – the tip is very angled, and this angle does not allow it to reliably cling to the asphalt at the moment of impact.
Why is there no need for a platform? Why does it need to be grinded down right away?
There was once a debate on this topic on the Internet. Some users believed that the platform was needed. They just couldn’t explain why. And they even recommended sharpening the tips in such a way that this area would be recreated each time. The following picture shows that their position is untenable:

Let’s simulate the tip grinding down on the asphalt during training and draw a line with a pink marker. Outside this line there will be what is worn off on the asphalt. Now let’s see what area of contact with asphalt will be obtained in three cases. Obviously, the largest area is on the rightmost picture. Next - on the very left (where there was a tip with a platform). The smallest area is in the central figure. This tip (of the three available) will cling to the asphalt the best.
Thus, the sharpening angle of the tip is key factor for reliable grip on the pavement throughout your workout or race. To maintain this angle, you need to sharpen the pins before each workout. The main tool is a sharpener with a diamond wheel:

The working surface, literally a few mm wide, is located on the outside of the circle (at the very edge). Our industry does not produce such ready-made sharpeners. But there are craftsmen who make such a useful device from some 12-volt engine removed from a car.
An additional tool is a diamond-coated file:

It is also possible to use a diamond-coated needle file, but I do not recommend it, because due to its small size, it is inconvenient to work with: the file constantly jumps off the tip.
Before one workout I use a sharpener, and before one or two subsequent workouts I just sharpen it a little with a file. Why? Because after one or two sharpenings with a file, the angle of the tip is no longer optimal. It is difficult to get the correct angle with a file, but a sharpener can do this easily.
You need to sharpen the tip on both sides - on the inside and on the outside (in the direction of movement). Why? Because sometimes, due to accidental scraping of sticks on the asphalt (at the moment of placing the sticks), chips appear on the metal on the inside. Inner side it is necessary to level it, and then re-expose the acute angle from the outside.
I do not recommend using a sharpener without diamond coating. You won’t really sharpen the pobedite alloy of the tip, and the tip and plastic will overheat, which will lead to damage to the pin.
And change the pins in a timely manner! Here is the extreme level of pin wear:

Treat pins as consumables, not as something that lasts forever. Do not try to stretch the use of one pair of pins over several seasons. I have one pair in best case scenario enough for 1 month. That's why I immediately buy several pairs before the season.
In conclusion, here is a photo of well-sharpened tips. I note that these specimens are not new and have survived more than one sharpening:


When you sew a multi-layered fabric on a sewing machine, the layers of fabric often move relative to each other and creases form. Why does this happen? The lower layer of fabric moves the lower conveyor, which is located below the needle plate, while the upper layer moves by inertia and its speed is lower. At the same time, excess fabric on the top layer leads to creases. To avoid this, you need to move all layers at the same speed. The upper conveyor can help with this.
Every car, even the oldest one, has a conveyor. It moves the fabric, adjusting the stitch length. If the fabric is very thin and slippery (silk, viscose for example), its layers usually shift. Because of this offset, it is especially difficult to sew fabrics with large patterns, since it is not always possible to accurately match the pattern. The upper fabric conveyor helps to avoid displacement. It is designed in such a way that, being fixed instead of the upper foot, it is able to move the fabric from above. Since the layers of material in this case move at the same speed, no shear occurs.
Conveyors are divided into two types. Built-in (or active) conveyor Can be used with any foot. It is installed on sewing machines Pfaff, which have an Integrated Dual Transporter system, and on Janome Memory Craft 6600 machines. Using this conveyor is quite convenient, so these machines are in great demand.

Other sewing machines have removable (passive) conveyor, which is placed instead of a presser foot, and is therefore called a walking foot. Quilting guides are available for machines with a horizontal hook (Janome type).
How to install the walking foot?
To see the seam better, you need to use the left or right stitching guide.
1.Remove the presser foot and standard holder from the machine.
2.Place the double feed foot on the rod. If the needle fastening screw fits into the fork on the presser foot, secure the presser foot with the screw.
3.Raise the teeth of the fabric feeder and set the presser foot pressure to 2.5.
4. Select a straight stitch for sewing. It's best to test different seams on a piece of fabric first. With the dual feed foot open, you can create a variety of decorative stitches, including ones that look like handmade stitches.

Double feed foot with right and left guide.
The guide on the presser foot should be positioned parallel to the seam or fold.
1.Mark and sew the first seam.
2. Move the left or right guide in the recess on the double feed foot. If the seam is to the right of the needle, use the left guide; if on the left - the right guide. The next seam must be sewn so that the guide is parallel to the first seam.
kairina5454(Kayumova Irina Fedorovna)
Any sewing machine is sold with a certain set of sewing feet, and the more expensive the model, the more feet are included with the sewing machine. However, as a rule, it is enough to have in your arsenal the necessary set of basic paws that you can use constantly. It is these paws that will be discussed in our review.
Standard machine stitch foot
Begin the stitching carefully, pulling lightly on the auxiliary threads, making sure the edge folds evenly. Fold the edge of the fabric as shown in the photo. Folded edge in finished form shown in Fig. 4.
Foot for knitted fabrics
When sewing products from knitted fabrics, many tailors are faced with the problem of skipped stitches. This problem can be solved by replacing the needle with a knitting needle with a rounded tip, as well as using such a foot. The presser foot securely presses the fabric, due to the narrow round hole for the needle, and the stitching will be perfect.

Rice. Knitting foot
Button sewing foot
This foot is used for sewing flat buttons of different sizes. To perform this sewing operation, set the stitch width to the width of the button holes, and set the stitch length to zero. Place the button under the foot, insert the needle into the right hole, carefully lower the foot, and press the button. Sew 3-4 horizontal stitches and raise the needle.

Rice. 1. Button foot

Rice. 2. Button foot
Move the button up, sew the button along the bottom pair of holes. Fasten the ends of the threads and cut them.

Rice. 3. Button foot
Denim foot
Using the denim foot, you can sew items from thick, dense fabrics such as denim. When working with the foot, pay attention to the fact that the needle position should be in the middle, set the stitch length depending on the required task, and set the stitch width to zero. Use a 100 gauge needle.

Rice. Denim foot
The sewing machine feed dog can only work normally in a horizontal position. If there are seals in certain areas of the seams, for example on denim, the machine may not operate properly. In order to avoid this, it is recommended to use special plates. Place the plate under the foot and start stitching. When the thick section has been passed, the foot should be raised, the plate removed and then work continued.

Rice. 1. Plates for denim stitching

Rice. 2. Using plates when sewing jeans
To hem seam allowances on items made from thick and medium-weight fabrics, use a blind stitch foot. Stitches made with this foot are not visible from the front side (with the exception of thin fabrics, on which small stitches may appear). To perform stitching on automated sewing machines, a special stitch is installed; on machines that do not provide this, you can install a zig-zag seam with a stitch length of 3 mm and a width of 4 mm.

Rice. 1. Blind stitch foot

Rice. 2. Blind stitch foot
Advice! Before hemming the product, be sure to try it on an unnecessary piece of fabric.
IMPORTANT! If the fabric is loose, before hemming the seam allowances, it is necessary to overcast them along the edge.
Fold the seam allowances along the bottom, then fold them over to the front side of the product as shown in Fig. 1-2 and complete the line. The foot has a guide edge along which it is very convenient to move the fabric.
Using the presser foot is also very convenient for stitching details and hems of the product along the edge.

Rice. 3. Blind stitch foot
Foot for making and sewing edging, cords, beaded cords
Edging is a trim, release, trim along a seam, edging. The foot has a special groove on the bottom side, which allows you to insert various cords, edgings, beaded cords into it and sew them to the product. To make the piping, use a suitable cord and bias tape of the required width. But such a foot can handle even thick cords - see our example below.
Wrap the cord with a bias stitch, place it under the foot, and set the needle to the right position. Sew along the edge of the cord. Then, when the edging is ready, stitch it to the part of the product, place the second part with the front side facing front side and stitch both parts and the edging between them. Such edgings are usually used when sewing decorative pillows, curtains, and decorating clothes.

When you buy a new sewing machine, you will always find extra sewing feet in the tool and accessories box. Moreover, depending on the class and cost of the machine, their number also depends. The “cooler” the model of the machine, the more capabilities it has, and therefore the more special sewing feet.
Of course, a Chaika sewing machine or a Podolsk manual sewing machine has a limited set of feet, unlike modern sewing machines from any manufacturer such as Janome, Brother, Astralux, Pfaff, Bernina and others. Usually included large number paws that definitely need to be used.
However, most often the additional legs are used extremely rarely. Mainly used are a regular universal foot, an overlock foot and a buttonhole foot.
. Other types of paws most often lie in a box for years without use. And the reason for this is simple ignorance of their purpose, unwillingness to understand how to use it and for what operation it is required.
We decided to help you with this and briefly post a photo of each paw during the recommended operation.
There are other articles about sewing feet on our website:
Sewing machine feet,
Presser feet for sewing machine Chaika, Podolsk,
Foot for household overlocker.
Standard set of sewing feet

Most often, a standard set of sewing feet contains no more than three to five feet. Universal foot, zipper foot, zigzag foot and buttonhole foot (semi-automatic). For expensive models, the set of paws consists of 10-15 paws, and on the body of the machine there is a special compartment for storing them, as in this photo. However, you should know that you can always buy additional feet if you wish. True, provided that they are made by the same manufacturer as sewing machine and are suitable for this model.
To change the presser foot you only need to replace the sole

With modern machines, you do not need to unscrew the screw securing the foot with a screwdriver to replace it. By lightly pressing the lever (behind the foot), the sole of the foot is detached. The new sole is fixed by lowering the presser foot rod into the sole socket. You should hear a characteristic click, but just in case, lift the presser foot lever up. If the sole is fastened securely, it will rise up too.

The most “popular” foot is the zigzag foot. With the help of this foot, many seamstresses perform almost all operations and even sew buttonholes automatically. Such skill is commendable, but the use of special paws will not only make your work easier, but will also increase its quality and the speed of the operation.
Below we post photos of presser feet designed for Janome sewing machines. The photo clearly shows the purpose of each foot and the sewing operation for which it is intended.
Photos of the paws and their descriptions were taken from the site Elfort.ru.

Satin stitch foot, designed for working with figured stitches.

With this foot you can sew on beads quickly and accurately.

Bouclé foot. The formation of bouclé on the surface of the fabric is ensured by the structure of the foot itself.


Hemming foot 2mm.

The foot is for sewing on flat buttons only, please pay attention to this. Buttons with stems are sewn on by hand.
See How to sew on a button correctly.

With this foot you can make gathers on fabric or adjust braid with a gathered effect.


Foot for sewing several cords at the same time.

With this foot you can do embroidery (by moving the fabric with your hands), as well as figure stitching and basting.


Overlock foot wide (C). It is intended for processing cuts and for decorative finishing of product cuts.


See also Hidden zipper foot.

The blindstitch foot is used only for loose and thick fabrics. On thin fabrics the stitch mark will be visible.


A Teflon foot is indispensable when sewing leather, suede, nubuck, etc.

Machine embroidery foot.
Photos of feet intended for Janome sewing machines were taken from the Elfort.ru website in the article Janome sewing feet.
To work with genuine leather you need special tools, devices for installing fittings, adhesives and other applied materials.
If the overlocker does not cut the fabric well, then you need to sharpen its knives. How to remove and install overlock knives and whether you can sharpen them yourself.
What is the difference between a round knife for cutting fabric and tailor's scissors? How to use OLFA circular knives, sharpen the blade, etc.


Popular
- Kiss tattoo for men. Kiss tattoo. The meaning of tattoos for men
- The safety of plastic toys
- Winter safety shoes: men's and women's, insulated
- Increased protein in urine: possible causes and treatment Quantitative methods of assessment
- We knit booties with knitting needles: elegant and casual patterns, patterns with descriptions and recommendations
- How is World Heart Day celebrated?
- Knitted children's pullover with cat applique
- You need to know this: how to get a ticket to kindergarten - step-by-step instructions for parents
- Birthday card for grandma from her grandson or granddaughter
- Making three-dimensional numbers and letters with your own hands Make the number 7 from a diaper