How to make paintings from shells. Decoupage on eggshells. Master class. Decorate a box or vase with shells
Master class on making mosaics from eggshells. Pansies
Pansies using crackle technique
Moiseeva Natalya Valentinovna, teacher of Gymnasium No. 1503 in MoscowMany centuries ago, Chinese and Vietnamese lacquer painters began using egg shells to create their miniatures. They noticed that when pressure is applied to the shell, a beautiful drawing from the finest cracks, making the workpieces look like the surface of a cracked rock or an ancient wall. The shells began to be used in lacquer painting to depict various buildings and crowns of flowering trees. The masters of the East managed to turn the main drawback of eggshells - fragility - into its main artistic advantage.
In general, decorating the background with a mesh of cracks is used not only in eggshell mosaics, but also in other decorative crafts. This pattern can be seen on pottery coated with a special glaze, or on hand-painted fabric. Regardless of the material on which they are made, such cracks are always called craquelure, and the technique of creating a pattern of cracks that creates an antique effect is called CRACKLE.
Unlike eggshell toys, crackle mosaics made from the same material are strong and durable. If you work carefully and carefully finish even small parts of a mosaic set, you can learn how to make crafts that are in no way inferior to purchased souvenirs. Eggshell ornaments are used to decorate not only flat objects - all kinds of boxes and wall panels, but also blanks turned on a lathe - vases, pencil holders, decorative dishes and plates.
Let's try to make a mosaic picture of PANSY flowers from eggshells.
Target:
Creating a mosaic from eggshells.
Tasks:
Teach children to work with eggshells and master the crackle technique.
Generate interest in this technique.
Develop imagination and creativity.
Make a picture of pansy flowers.
Purpose:
The material is designed for children 6-7 years old.
Purpose:
The picture can be presented as a gift, or you can decorate the interior.
Preliminary work:
Rinse the shells of raw eggs thoroughly with warm running water, remove the films from inside. Dry the shell.
Materials:
A sketchbook sheet, a simple pencil, a marker or felt-tip pen, PVA glue or stationery glue, prepared eggshells, watercolor paints and a brush, a jar of water and a wooden stick.
Work progress
Violet tricolor, or Pansy, is a popular garden plant, common in temperate regions of Asia and Europe. The flower is characteristically colored: the upper petals are dark blue-violet, the two middle petals are lighter or yellow, the lower petal is yellowish-white or yellow, with bluish spur.
We draw flowers on a landscape sheet, in our case Pansies.

Cover the petal with glue

Carefully place the egg shell on the glue. We take a large shell and, starting from the edge, press the shell with our finger so that it covers the glued surface. You need to make sure that the shell fragments are not very large and not very small.

You can help yourself with a wooden stick or tweezers so that the shell lays more evenly.

We outline the shell-covered petals with a black felt-tip pen so that the borders of the petals do not merge.

Apply glue to the next petals and place the shells in the same way.

There are 5 petals in a Pansy flower, we cover the entire flower and outline it.

In this way we mosaic the entire pattern.


Now mash the egg shell finely in a saucer.

We cover the entire pattern laid with the shell with glue. Sprinkle small shells on top of the glue to fill the empty spaces between the shells.

Let's take gouache paints and start painting our flowers.

We paint one flower with yellow paint.


We paint another flower with purple paint.


When the yellow flower is dry, you can apply shades to the flower.

We color the leaves and buds with green.

The result is a mosaic like this.

And a flock of pansies
Velvety keeps the silhouette -
These are butterflies flying away
They left their portrait.
Anna Akhmatova
If your child is a creative person and loves to create different kinds of crafts from improvised materials, invite him to make a mosaic from eggshells. This lesson develops fine motor skills and develops in children the habit of being diligent, which is undoubtedly a huge plus for young schoolchildren. Creating mosaics will be interesting not only for girls, but also for boys, if you choose the right picture.
In order to do this shell craft, you will need the simplest materials:
Shells from raw eggs.
PVA glue.
Any drawing.
Acrylic paints.

Fig.1 Eggshell mosaic
Eggshell mosaics there are two types:
1. The first simplest and most suitable for little craft lovers is when the eggshell, after gluing it onto the main drawing, is painted in different colors using acrylic paints. Or when the shell is painted before gluing it to the surface. This way the main background of the image can be preserved.

Fig.2 Eggshell mosaic
2. The second method is more complex and is suitable for older children. In this case, shells of different natural shades are taken. This creates a mosaic of eggshells in pastel colors. It turns out very beautiful.

Fig.3 Eggshell mosaic in natural colors
Instructions for making a mosaic from eggshells.
1. First you need to prepare the shell.
1.1. Carefully break the raw eggs into two parts and immerse them in cold water for 10-15 minutes.
1.2. Then we remove the film from the inside of the shell, after which we dry it well.
As mentioned earlier, you can paint the shell at the very end, after gluing it onto the images.
2. When the egg shells are prepared, you can start choosing a design. It is recommended to select images with large details and clear outlines. It is much more convenient for children to glue over fragments with clearly visible edges.

Fig.4 Eggshell mosaic in the shape of a butterfly
3. After the drawing is selected, it needs to be pasted onto a cardboard surface or transferred using carbon paper. This is done so that the surface on which it will be glued eggshell mosaic did not swell or deform.
4. When the drawing and eggshell are prepared for work, you can proceed directly to gluing the mosaic. To do this, apply PVA glue to a small fragment of the image.
5. Then take a large piece of egg shell and gently crush it on a flat surface. This way the mosaic details will be most suitable for each other. They should be glued with a slight indentation from each other (about 1 millimeter). For convenience, it is recommended to use tweezers and a thin wooden stick. With their help it is much easier to pick up and move fragments eggshell mosaics.
You can learn to make complex, beautiful mosaic paintings yourself. For the first experiments, eggshells can replace expensive smalt; fortunately, there are plenty of colored shells left after Easter.
The shell mosaics were inspired by the paintings of contemporary French impressionist Jean-Marc Janiaczyk. He paints using a palette knife technique. Thanks to a palette knife (artistic tool), paints are applied to the canvas in large, dense, uniform strokes, the color gradations are obvious and clear. Paintings made using the palette knife technique seem to be created in order to be embodied in a mosaic.
Jean-Marc's paintings are full of light, sun, and, no matter what time of year he paints, they always feel a joyful mood. Here are some examples of his works:

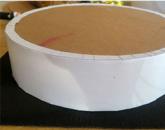
Print your favorite image of the painting on a printer in A3 format. When printing, some details of the picture may be cut off. But this can be fixed by stitching the image together.
MATERIALS
- foam board
- eggshells of different colors
- printout of the painting
- felt-tip pens
- PVA glue
TOOLS
- tassel
- toothpick
Step 1

Using a felt-tip pen, highlight the color spots in the drawing. When working with a black and white printout, you will always have to check the color image. Apply glue in several places around the perimeter of the printout with reverse side pattern and stick it onto the foam board with the pattern facing up.
Step 2

The technique for creating a mosaic is extremely simple: select a shell that matches the color of the fragment on the printout. Apply glue to the desired fragment with a size corresponding to the size of the shell.
Step 3

Place a piece of shell on the glue and crush it with your finger.
Step 4

Evgenia Fedorova
Hello, dear colleagues, I bring to your attention master class on creating a painting from eggshells.
We'll need: raw egg shells, PVA glue, brushes (for glue and for paint, gouache, clear varnish, photo frame.

First you need to clean shells eggs from the inside films: for this, from the edge of the half shells carefully tear off the film. If you can’t tear it off in one piece, you can wash it shell under a thin stream of water, cleaning out all excess with your fingers, it is important to do this right away - for now the egg shell is not dry.

Apply the resulting mixture evenly onto the base. I applied the paint in two layers.

In the same way we apply color to egg shells.

We leave all the preparations to dry.
In the meantime, we are preparing a template for the future paintings. Make a sketch on a piece of paper and cut it out.

We attach ready-made template on a tinted base, draw the contours with black paint.

The preparatory work is completed, and now you can proceed directly to laying out paintings. This must be done one element at a time. Apply a large amount of glue to the base

and put out small pieces shells helping yourself back side matches.

Don't worry about the large amount of glue - it will definitely be absorbed. Also, you should not apply glue to the entire panel element, since this work is quite painstaking and the glue may simply dry out. Thus, we lay out all picture. Leave at room temperature until excess glue is completely dry.

We cover the work with varnish (it is advisable to use spray varnish) and put it in the frame.
I did this kind of work for the first time (for a competition of works for parents in my son’s group, so a fairly simple drawing was chosen.
Having tried to do this with my own hands, I can confidently say that such work is exciting.
Creative success to all!

Popular
- Presentation on the topic “when did clothes appear?” This knowledge may be useful in
- Master class on knitting polypropylene bags Crochet polypropylene
- Irregular contractions Abdominal prolapse before childbirth
- Why do children develop aggressive behavior?
- Useful properties of Vaseline that you didn’t know about What is Vaseline and why is it needed?
- The right choice of hand cream against cracks and dryness
- How to prepare facial milk at home and use it correctly?
- Crochet toys with descriptions and patterns for beginners, patterns, professional amigurumi knitting
- Calculation of old age pension, or counting your pension yourself
- How I brought my husband back to the family