Knitted loops. How to knit and purl stitches (garter and stockinette stitches)
Knitting starts with the basics. Of course, a creative needlewoman has a lot of ideas in her head that she wants to turn into reality as quickly as possible. But if skill is lacking, disappointment quickly sets in. What to do if, for example, the following questions can lead you to a dead end: how to knit a knit stitch tilted to the left or what? Then you want to quit this difficult task and never pick up knitting needles. That is why you need to start from the very beginning, with the basics. Having mastered simple things, you can start knitting entire products without fear of making mistakes.
Knitting is based on knitting stitches and alternating them creates beautiful fabrics. That’s where we’ll start and find out, knit and purl stitches.
Where to start?
Any knitted product knitting begins with a set of loops. This is a separate topic, since there are a great variety of dialing methods for different types knitting: for elastic, for purl, for tight edges or, conversely, for loose and elastic. If you are reading about knitting and purl loops, which means you are already familiar with the set.
Before we understand how to knit knit stitches, let's talk a little about knitting density. First you need to choose the right tools. The size of the knitting needles affects a lot. It happens that due to incorrectly chosen knitting needles, the loops do not “fit” into the fabric, the pattern looks either too tight, or loose and shapeless. Much depends on how tightly the craftsman knits. Everyone has their own individual style: some people like thick fabric and knit quite tightly, while others are more comfortable knitting more loosely. When choosing knitting needles this individual feature also needs to be taken into account. If the craftswoman knits tightly, and the knitting needles are also one size smaller than those recommended for the chosen yarn, then the product will turn out to be tight, stiff and unpleasant to wear. And if the needlewoman works freely, when knitting with even thicker knitting needles, the product will not hold its shape at all, and after washing it will completely stretch.
![]()
Basic loops
In order to learn, it is not enough to know how to knit facial loops. In addition to just knit and purl stitches, there are several other types whose names you need to know. All of them are derivatives of the basic ones.
- Edges. These are the loops that begin and end the fabric rectangular shape. Thanks to them, the product does not stretch on the sides. At the beginning of each row it is removed undone, and at the end it is always knitted purl.
- Crossed. Such loops are often found in Asian patterns. The product, knitted with crossed facial loops, looks original, and the structure is dense and elastic.
- Decreasing. These are the stitches that are created by knitting two or three stitches together to make the fabric narrower. This will be useful when knitting raglan sleeves, sweaters, dresses and other products.
- Surplus. These may be capes that participate in openwork patterns, or loops that are needed to add width to the fabric. They are knitted in several ways, for example, from the broach of the previous row or by knitting two loops from one.
- Elongated. This is a type of removed loops. They are used for knitting original and warm products.
- English. These loops are knitted using a special English method, when the knitting needle is inserted not into the loop located on the knitting needle, but into its middle. A product made in this way turns out to be very airy, and the canvas is embossed.

Face loop
How to knit facial loops? To answer this question, you need to know how the loops are arranged. They all have a front and a back wall. The front one is the one located in front of the spoke, the rear one is behind it. Below there is a broach between them.
The front loop is knitted relative to which wall the previous one is facing us. To knit behind the front wall, insert the knitting needle from left to right, pull out the thread and lower the loop from the knitting needle.
To knit behind the back wall, insert the knitting needle from right to left and pull out the working thread in the same way.
Facial crossed
How to knit correctly As described earlier, this method is very popular among Asian craftswomen; they are often found in patterns in Japanese and Chinese needlework magazines. What is the essence of the crossed loop? Its base is crossed, as if it was turned the other way.
To knit a crossed stitch, insert the needle behind the back wall from right to left. If the next row is knitted with a crossed purl, then in the next front row the knitting needle will need to be inserted behind the front wall from left to right.
Purl loop
Purl stitches in stockinette stitch make up all even rows. We hold the working thread in front of the working fabric. We insert the knitting needle from right to left, grab the yarn and pull it away from us.
The purl loops are also crossed. In order to knit them, you also need to place the yarn in front of the working fabric, and insert the knitting needle from left to right, grab the thread in a top-down motion and pull it out.

Two facial ones with a slope
How to knit a knit stitch slanted to the left? And why might this be needed? In some products, you need to reduce the loops in such a way that a beautiful, neat braid is formed, tilted in one direction or another. This is also necessary for many openwork ornaments. In them, yarn overs alternate with two loops knitted together.
The tilt can be to the right or to the left. Tilt to the left side is also called broaching. In some diagrams it is designated as such. How to knit a knit stitch with a broach?
To do this you need to remove the first loop on right knitting needle unknitted, knit the second one, and now using the left knitting needle, put the removed loop on the knitted one. There is another way: turn the first loop over so that the back wall becomes the front, and now knit both loops behind the back wall.

And if the slope should be to the right, then you need to insert the knitting needle from left to right, first into the second, then into the first loop and knit them together behind the front wall.
Now that you know how to knit stitches together, you can safely take on simple openwork patterns.
Three loops together
Often in patterns there is such a designation as “knit three knits together.” Most often, to make the fabric look beautiful, three knit stitches need to be knitted so that the middle one is on top. How to knit 3 facial loops? 3 loops will lie beautifully if you first swap the first and second places (to do this, remove them to the right knitting needle, inserting it first into the second, then into the first loop, and in this twisted position return it back to the left knitting needle). Now let’s knit all three stitches behind the back wall.

Now that you know how to knit knit and purl stitches correctly, you can start working on simple but interesting projects.
Things from ancient times self made were highly valued and in high demand. Everyone sought to learn some kind of handicraft in order to provide themselves and their family and friends with exclusive clothing, fakes or original interior items.
Hand knitting is one of the most common types of needlework. Possessing such skill, you can look stylish and fashionable without any special financial expenses. Scientists say that this is not its only advantage: while knitting, a person calms down, relaxes and is distracted from disturbing thoughts.
This article contains sequential lessons that describe in detail how to learn to knit. For beginning needlewomen, it will be a real help.
Lesson #1: Where to start?
For those who are just beginning to master the knitting technique, it is necessary to familiarize themselves with the tools with which the process is directly carried out.
The first thing to start knitting any knitted product is a set of loops with knitting needles. In order to know how to choose the right ones for a certain type of mating, you need to understand the main types.
Standard (ordinary) knitting needles
This type is used for all types of knitting, except circular. They are made from lightweight materials such as plastic, metal, aluminum, wood. They differ in thickness, from 1 mm to 25.5 mm, and in length. They have one working edge, and on the other there is a tip that acts as a limiter. 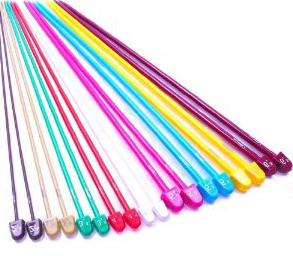
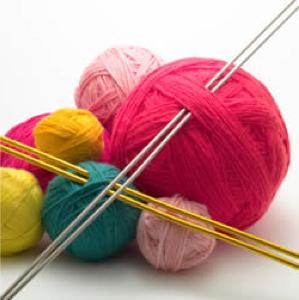
Stocking needles
Used for circular knitting, in particular socks, since it is not recommended to knit them with 2 knitting needles. They are sold in a set of 5 pieces. They have two working edges. The knitting process is carried out as follows: the product is placed in an equal number of loops on 4 knitting needles, and subsequent rows are knitted with the 5th. ![]()
Knitting needles for braid and braid patterns
Due to the bend in the middle of the knitting needle, their use greatly simplifies the process of crossing stitches. Their diameter can be 2-4 mm, selected according to the thickness of the yarn. 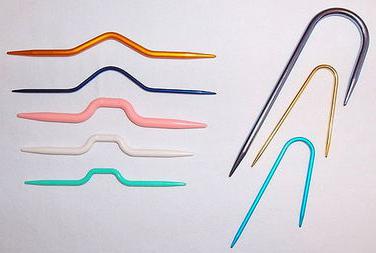
Marking paper clip
It is used to control the number of loops or mark a specific place on the product.
Circular knitting needles
They consist of 2 working tips connected by a metal or silicone line. They are used for certain designs, circular knitting or in the case when the canvas has a sufficiently large width. 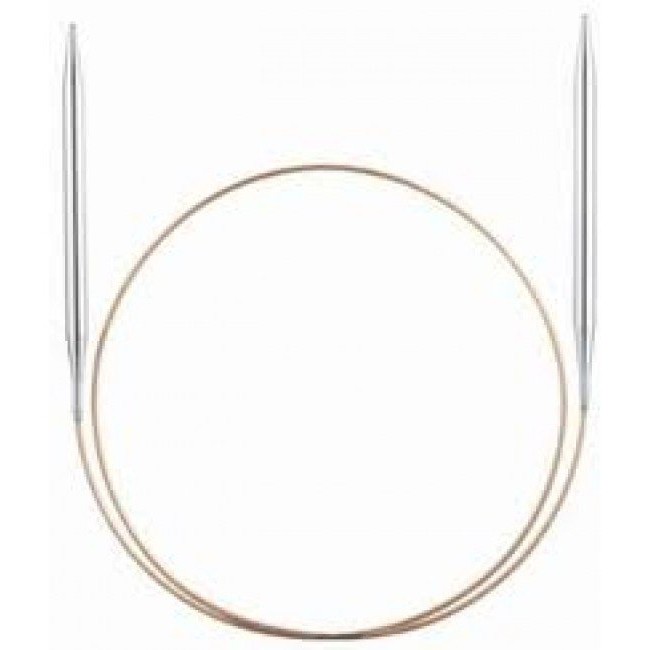
Pin
It is used to remove loops that at a certain stage do not need to be knitted. The dimensions of such a device can be different (10-15 cm). 
Lesson No. 2. Introduction to types of yarn
Opening fashion magazines, you can see that clothes, depending on the seasonal purpose, are knitted from different types yarn. Seeing such beautiful things, every second person asks the question: “How to learn to knit?” For beginner knitters, a lot of information has been published with detailed step by step description. However, in order to create a truly beautiful and original item, you will need to choose the right yarn for it.
Wool thread
Refers to natural types. For its production it is used fleece. Features a wide selection color range. It is mainly used to knit winter items and is suitable for any type of pattern.
Cotton yarn
Ideal for any type of knitting. It is pleasant to the touch and does not cause allergies. A product made from this thread has a chic look.
Melange yarn
It consists of a percentage of synthetic and natural threads. Thanks to its texture, the products are lush and airy. Looks great on three-dimensional drawings.
Mohair
Designed for knitting warm clothes. This thread is very fluffy, so it is not recommended to use it for those things that are directly adjacent to the body. Large drawings are most relevant for her.
Fancy yarn
It is made by following a certain technology, which consists of combining threads of different texture, color and quality.
Lesson No. 3. Casting the first row
When starting to knit any fabric, you will need to make a set of loops with knitting needles. To do this, make a loop of yarn, which is thrown over thumb. One end of the thread passes through the index, and the other simply goes down. After this, both threads are fixed with the remaining three fingers. Having thus secured the yarn, loops are made using a knitting needle, from which the fabric will be knitted directly.
1st step 
2nd step 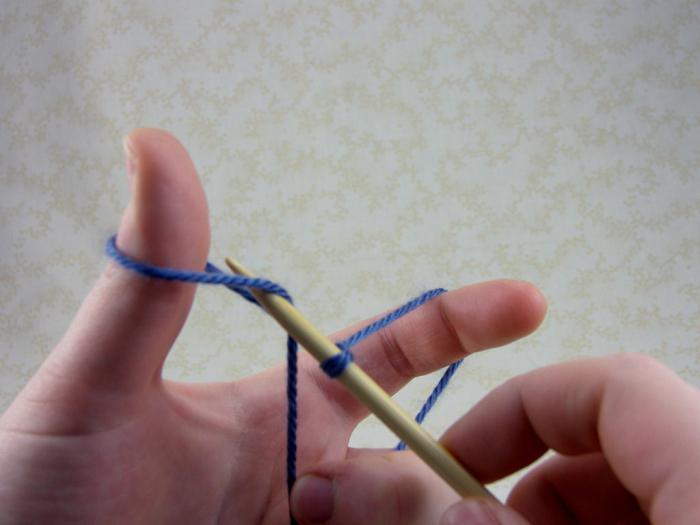
3rd step 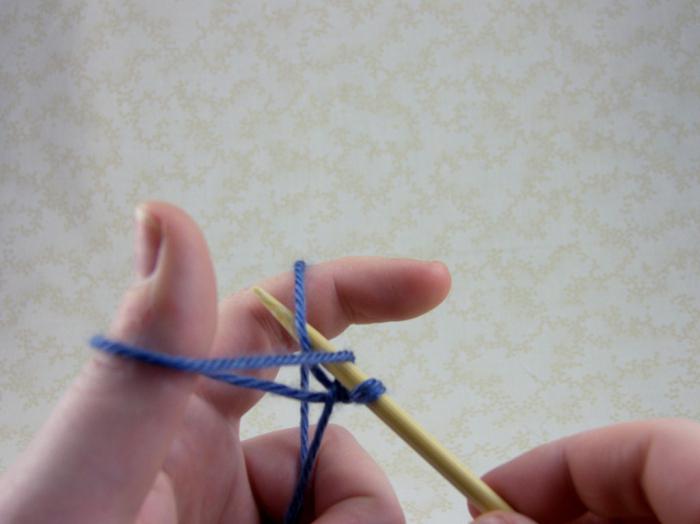
4th step 
5th step 
Lesson No. 4. Knit loop
Having learned how to cast on the first row, you can proceed to the main type of knitting - facial loops. They are fundamental to any drawing. In order to make a front loop, the thread is knitted with knitting needles in a certain way. To do this, you need to hook the loop onto the back wall with a free knitting needle and pull the working thread through it. If the drawing indicates the method of knitting behind the front wall, then a similar manipulation is performed, only the upper part of the loop is grabbed with a knitting needle.
Lesson No. 5. Purl loop
The next stage in mastering knitting techniques is purl stitches with knitting needles. They can be knitted in two ways - behind the front and back wall. The more common type is considered classic. To do this, the working thread is thrown over the fabric, the front part of the loop is grabbed with a knitting needle, through which the thread is pulled, which forms a new purl loop. 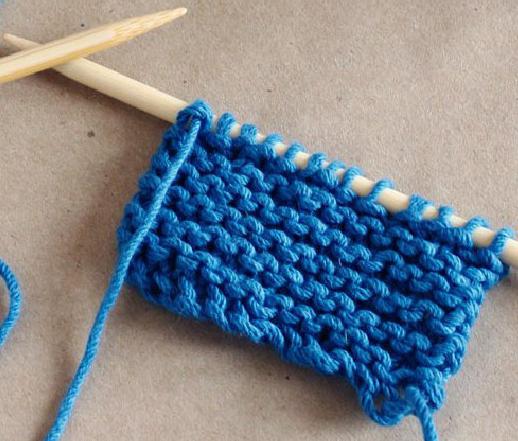
Lesson No. 6. Yarn over
Yarn over - air loop. It is formed by throwing on a working thread, holding it with a finger, and the subsequent knit stitch is knitted with knitting needles as usual. On the side where the purl loops are, knit a yarn over with knitting needles without twisting, so that a hole is formed. This knitting technique is used to create a product with an openwork pattern.
Lesson No. 7. Edge and edge loops
When knitting any fabric, you need to pay attention to the first and last loops. They occupy the main place in the manufacture of quality products. Thanks to a certain technique, the canvas has smooth and unstretched edges. Edge and edge loops are knitted in the following order. At the beginning of the row, the first one is removed without knitting, and at the end the last one is knitted with a knit stitch.
Lesson No. 8. How to knit elastic with knitting needles? Types and description
There are many in various ways for knitting elastic bands. As a rule, almost any product begins with it, so it is very important to learn how to knit it correctly and beautifully. The main condition for it is not to stretch the loops in order to maintain good density. 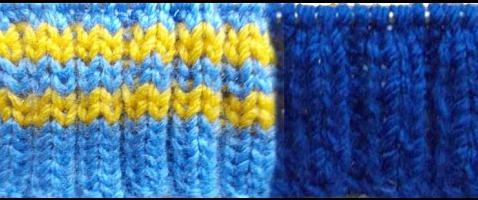
So, how to knit an elastic band with knitting needles, let's look at simple options.
Elastic band 1 x 1
The simplest type. First row: alternate 1 knit stitch and 1 purl stitch. Subsequent rows are knitted according to the pattern.
Elastic band 2 x 2
It is knitted like the first option, only the row consists of 2 purl loops and 2 knit stitches.
Double elastic band is hollow
In order to knit it, you need to sequentially alternate 1 knit stitch, remove 1 loop without knitting. Knit like this on both sides of the product.
English gum 1 x 1
This option is more difficult for a beginner, but you can try.
An even number of loops are cast on the knitting needle. Next it is knitted as follows.
1st row: Knit 1, yarn over the next stitch and slip onto a working needle, alternating like this.
2nd row: a loop with a crochet is knitted, and the next one is yarn over and removed, repeat until the end.
3 throw: from the beginning of the pattern.
Lesson No. 9. How to learn to knit? For beginners: knitting a scarf
Having learned the basics of knitting, it’s time to try your hand at making a small accessory. You can already decide to knit a scarf for yourself or your family. Such a gift will be the most desirable for them. Any knitting patterns are suitable for it. Width is an individual value: if for a child, then 10-20 cm, for adults - from 15 cm. The length can vary from 1 m or more.
For a scarf, you can use threads of various thicknesses and colors, the main thing is that it is in harmony with the rest of your clothes.
Those that do not have a reverse side are better suited as a design. 
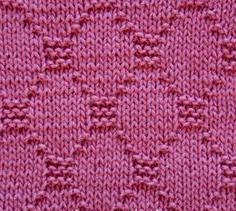
An example of a simple scarf with a checkerboard pattern is given below.
Description:
The number of loops should be a multiple of 5, plus 2 edge loops.
1st row: 5 persons. p., 5 p., alternate to the end of the row, knit the last one.
2nd row and all even: according to the drawing.
3rd row: alternate knit 5, purl 5, edge knit.
5th row: knitted like the 3rd.
7th row: 5 purl, knit 5, copied to the end of the row, the last edge.
9th, 11th rows: knit as 7th.
13th row: play from the 1st row.
| 13 | . | ■ | ■ | ■ | ■ | ■ | □ | □ | □ | □ | □ | . |
| 11 | . | □ | □ | □ | □ | □ | ■ | ■ | ■ | ■ | ■ | . |
| 9 | . | □ | □ | □ | □ | □ | ■ | ■ | ■ | ■ | ■ | . |
| 7 | . | □ | □ | □ | □ | □ | ■ | ■ | ■ | ■ | ■ | . |
| 5 | . | ■ | ■ | ■ | ■ | ■ | □ | □ | □ | □ | □ | . |
| 3 | . | ■ | ■ | ■ | ■ | ■ | □ | □ | □ | □ | □ | . |
| 1 | . | ■ | ■ | ■ | ■ | ■ | □ | □ | □ | □ | □ | . |
Lesson No. 10. Diagrams and symbols
Any knitting patterns can have a description or diagram that tells you exactly how to knit this pattern. From the previous lesson you can see examples of descriptions and diagrams. However, in order to understand what is written, you need to familiarize yourself with the symbols and learn to read the diagrams correctly. At first glance, they seem incomprehensible, with some kind of squares, diamonds, arrows, triangles.

However, this complexity is deceptive; standard abbreviations are not difficult to understand. In any edition of a magazine or book there is always a “Conventions” item; as a rule, it deciphers all the abbreviations in the text and the symbols used.
For example, the main ones are:
- persons - front loop;
- purl - purl loop.
Looking at the diagram under the pattern you like, you need to look for symbols. They may be printed at the end of the book or just below the diagram.
For example, it looks like this:
.
- edge;
□ -
purl loop;
■
- front loop;
▲
- 3 loops together;
Ώ
- yarnover
Lesson No. 11. Patterns, diagrams and descriptions
We will describe simple patterns that need to be knitted; we will place the diagrams side by side for better perception. When trying to connect the proposed drawings, you need to try to understand as much as possible symbols, since the quality of the entire product will depend on this.
Pattern "Diamonds"
| 19 | ■ | □ | □ | □ | □ | ■ | □ | □ |
| 17 | □ | ■ | □ | □ | ■ | □ | □ | □ |
| 15 | □ | □ | ■ | ■ | □ | □ | □ | □ |
| 13 | □ | □ | ■ | ■ | □ | □ | □ | □ |
| 11 | □ | □ | ■ | ■ | □ | □ | □ | □ |
| 9 | □ | ■ | □ | ■ | ■ | □ | □ | □ |
| 7 | ■ | □ | □ | □ | □ | ■ | □ | □ |
| 5 | □ | □ | □ | □ | □ | □ | ■ | ■ |
| 3 | □ | □ | □ | □ | □ | □ | ■ | ■ |
| 1 | □ | □ | □ | □ | □ | □ | ■ | ■ |
Description:
1st, 3rd, 5th rows: 6 p., 2 knits.
2-20th rows: according to the drawing.
7th row: k2, p4, k2, p2
9th row: P2, k1, p2, k2, p3
11th, 13th, 15th rows: 2 p., 2 knit., 4 p.
17th row: P1, k1, p2, k1, p3
19th row: k1, p4, k1, p2
21st row: repeat from the beginning.
For symbols for the diagrams, see lesson No. 10.
Star pattern
Description:
1st row: from 3 loops, knit 3 facial loops *, 1 knit.
2nd, 4th rows: out.
3rd row: 2 knits, from 3 loops 3 knits, 1 knit.
5th row: like 1st row.
*3 out of 3 loops - k1, yarn over, k1.
Pattern "Putanka"

| 3 | □ | ■ | □ | ■ |
| 2 | ■ | □ | ■ | □ |
| 1 | □ | ■ | □ | ■ |
Description:
1st row: P1, k1, duplicate to the end.
2nd row: K1, P1, alternate opposite to the previous row.
3rd row: repeat from the 1st row.
Now a frequently asked question is “How to learn to knit?” for beginners it will no longer be so scary and incomprehensible. If you follow the lessons provided exactly, you will have the opportunity to learn how to create original knitted masterpieces in a fairly short time.
Hello, dear readers and visitors of my blog!
Knit and purl stitches It’s no longer a secret for many of you. But there are those who would really like to know How Right knit knit and purl loops, and this post is for you, dears!
Having mastered knitting just these loops and having thoroughly trained your hand, you can become an ace in knitting: there are many patterns consisting of only knit and purl loops! Stocking stitch (with front and back stitch) socks, mittens, and larger items are often knitted. also in honor of many. And having mastered the technique of jacquard (multicolor) knitting, you will become a master in great demand!
Well, did you persuade me? on knitting needles (after all, you already know how to do this?) and let’s start learning, only
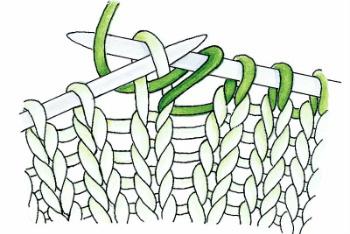
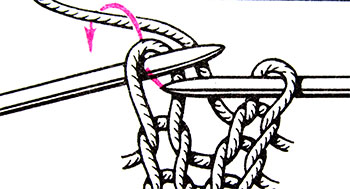
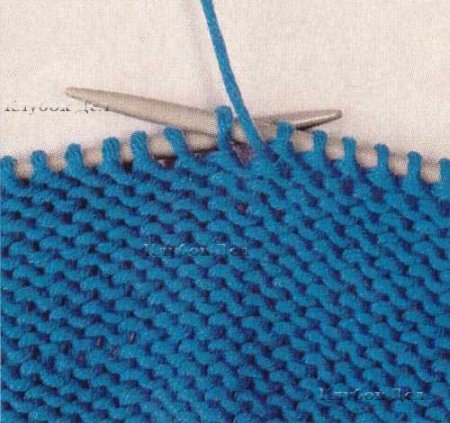
- Before starting to knit each row, do not forget to slip the first loop (edge) from the left knitting needle to the right one, without knitting (as in the figure below).
We'll talk about this in more detail in the next knitting lesson.
How to knit facial loops
Depending on how to knit facial loops, they are called classic (first method) and “grandmother’s” (second method). The classic knit stitch is always knitted behind the front wall,

How to knit a classic knit stitch (behind the front wall)
"grandmother's" front - behind the back.
How to knit a “grandmother’s” knit stitch (behind the back wall)
That's the whole difference! By knitting only knit stitches (either classic or “grandmother’s” stitches, but in no case mixing them), we will get shawl stitch.
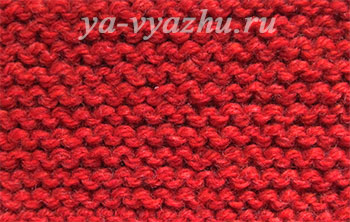
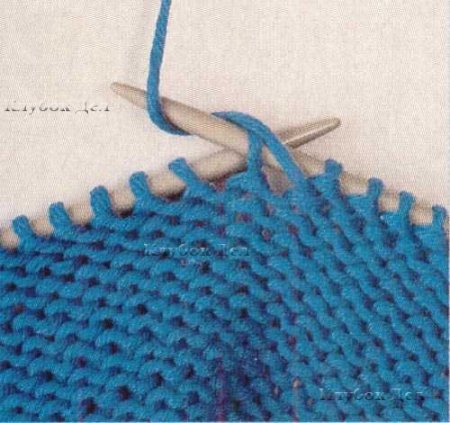
Garter stitch , or garter knitting in the old days was called “reps”, “grouse”, “rope”, “beds”. In Russia they knitted scarves - hence the name "garter stitch" .
Garter stitch, made with classic knit stitches (behind the front wall), is most often used in knitting.
But if you need to get more tight knitting, "grandmother's" facial loops are knitted (behind the back wall). Although in this case it is not very convenient to knit them.

Garter stitch with granny stitches
And also garter stitch can be done with only purl loops, only the structure of the fabric with this knitting method will become looser and wider, no matter how tightly we knit it. And it’s much more convenient to knit with knit stitches.
Garter knitting is double-sided (it looks the same on both the front side and the back), so it is often used when knitting scarves, belts, trims, collars, and simply for knitting an entire product.
Garter stitch made from colored stripes looks very nice. It is obtained by knitting two rows of each color of yarn - front and back. True, the pattern we have is one-sided; the photo shows its front side.

If garter stitch done with thin threads on thick knitting needles, we will get a loose, almost openwork fabric. This technique can be used when knitting summer clothes, shawls.
How to knit purl stitches
Purl stitches? Also in two ways: classic
and "grandmother's".
How to knit a granny purl stitch
But it is IMPORTANT to remember:
- a purl loop made in the classical way corresponds to a classic knit stitch;
- The purl loop made in the “grandmother’s” way corresponds to the “grandmother’s” front loop.
Otherwise, we risk getting crossed loops, which are also used in knitting, but not so often, and which I will also talk about, but a little later. For now, let's focus on STOCKING STITCH.
Stockinet
If you knit one side of the product with knit stitches and the other with purl stitches, we get stockinette stitch , or stocking knitting.
Although stockinet came to us from ancient times, it never goes out of fashion. Knitting is universal, as it is suitable for almost all products, both men's, women's, and children's.
The smooth surface of stocking stitch allows it to be used as a background for openwork and convex patterns, for ornaments and embroidery.
Stocking knitting is one-sided, that is, it has a front and back side. Face Stocking stitch is called KIT STAIN STITCH.

Wrong side - RURAL STAIN STITCH, which resembles garter stitch, but looks smoother and smaller.

USEFUL TIPS:
- if when knitting a product you will use only the front and back stitch, choose stocking stitch with granny stitches - the fabric will become a little denser and will look more even and beautiful;
- if you start knitting immediately with stockinette stitch, the edge of the fabric will curl (this property can be used when doing rolls), so it is best to start the bottom edge from some double-sided pattern, For example,, but not English.
That's all for today, in a nutshell, how to knit knit and purl stitches, and also
U knitting there is one undeniable advantage over crocheting: it uses only two main types of loops - knit and purl. All other loops are their variations.
Knit and purl stitches
The main fabric of the product is formed by knitting knit and purl stitches in different combinations.
It can be knit stitch, purl stitch, ribbed stitch or garter stitch.
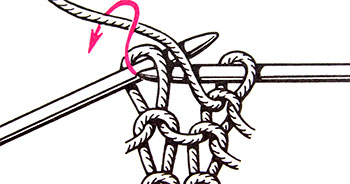
To make a knit stitch, insert the right needle into the front wall of the loop (that is, the half of the loop that is closest to you), pick up the thread behind the work, and pull it through the loop on the left needle. Lower the knitted loop from the left knitting needle.
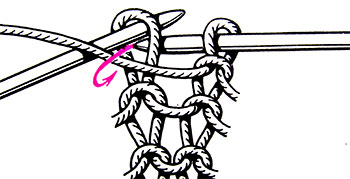
To perform a purl loop, place the thread in front of the work, insert the right knitting needle from right to left behind the front wall of the knitting needle, pick up the working thread and pull out the loop. Lower the knitted loop from the left knitting needle.
There is a unique type of knit and purl stitches - crossed stitches. It is believed that fabric knitted with such loops stretches less and retains its appearance longer.
Crossed knit and purl stitches
For knitting knit crossed loop Place the thread behind the work. Insert the right needle behind the back wall of the loop and, picking up the thread, pull it out.
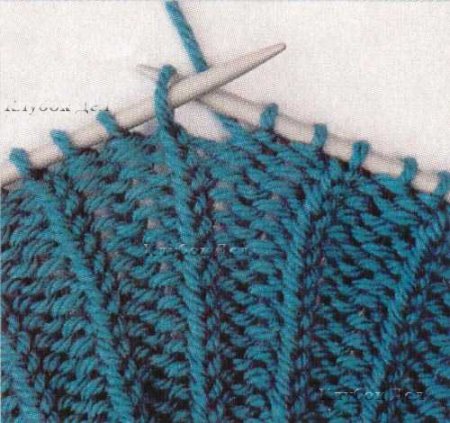
To perform purl loop Place the working thread in front, insert the knitting needle behind the front wall from right to left and pull the thread out.
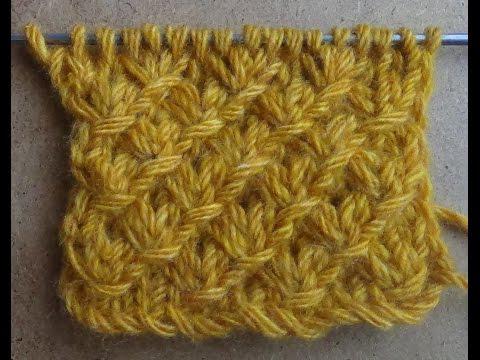
In this pattern, in the front rows they knitted through 2 purl loops along the 1st knit stitch crossed, in the purl rows these loops were knitted purl crossed.

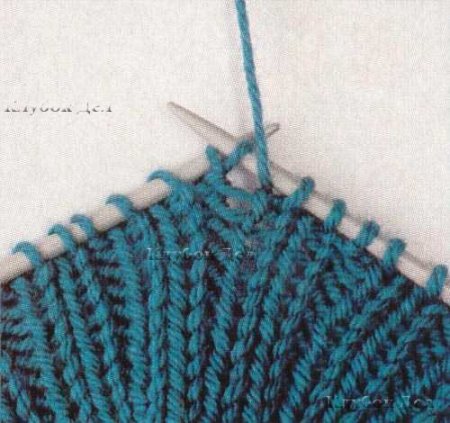
Typically, crossed stitches are used to knit mitten cuffs and sock elastic bands.
Edge loops
When knitting in straight and reverse rows, 2 additional loops are always added to the required number of loops on the knitting needles - these are the edge loops, the first and last stitch row. Edge loops are needed to ensure that the fabric is smooth and does not warp when moving to the next row.
Edge loops can be knitted in different ways depending on which edge of the product you would like to get. The edges of the canvas are smooth and knotty.
To obtain a smooth edge (in a chain) of the fabric, knit the first loop of the knit row, and transfer the last stitch to the right knitting needle without knitting.


Popular
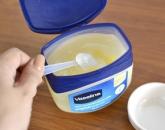
- How to prepare facial milk at home and use it correctly?
- Crochet toys with descriptions and patterns for beginners, patterns, professional amigurumi knitting
- Calculation of old age pension, or counting your pension yourself
- How I brought my husband back to the family
- DIY hairstyles for shoulder-length hair
- Uterine tone during pregnancy: symptoms, increased cervical tone Prevention of uterine hypertonicity
- Fashionable New Year's hairstyles for girls
- How to sew a hair tie (detailed master class) Do-it-yourself elegant hair bands
- Summary of the lesson on artistic creativity “New Year's toy
- Crochet for Beginners