What does it mean to close the loops with knitting needles? Cast off the last row of stitches. Close the edge one loop at a time
The pattern description says that I should bind off the stitches on the wrong side, knitting them with knit stitches. What does this mean?
Knit a row of stitches on the right side as usual. At the end of the row, turn the knitting over so that the wrong side is facing you. Now cast off the stitches as usual, knitting each stitch, pulling the previous stitch through, and slipping the cast-off stitch from the needle. If you want to purl stitches, knit the stitches purl rather than knit; you will get a characteristic chain along the edge on the opposite side from you.
The model description says that you need to close the loops with an elastic band. How can I do this?
When closing the loops, knit them with an elastic band, knitting the knit stitches with the knit stitches and the purl loops with the purl stitches. For example, for a 1x1 rib, knit the first stitch, purl the next stitch, then pull the knit stitch through the purl stitch. The next stitch on the left needle is a knit stitch, so knit it, then pull it through purl loop through the front. Continue casting off stitches along the entire row. If you close the loops with an elastic band, then the chain of closed loops will be located along the edge of the fabric, and not lie in relief along the front side.
I don't like the chain that forms along the edge of the knitted fabric after I've secured the stitches. Is it possible to get rid of it?
If you close the loops in a standard way, then a chain will always form, but it does not have to be located on the front side. You can purl the stitches (or on the other side of the fabric), and then the chain will form at the back. Or you can cover the loops with an elastic band, which creates a chain along the edge rather than right side. You can also use other techniques, such as securing the stitches with a needle or sewing an edge.
Which side should I bind off the stitches on - knit or purl?
It depends on how you want the closed edge to look. If, when casting off the stitches, you knit them, the chain of closed stitches will end up on the side facing you. If you want the chain to be on the front side, then bind off the loops so that the front side is facing you. If you prefer the chain to be on the wrong side, then bind off the stitches by turning the knitting wrong side towards you. Remember that if the edge goes into a seam or becomes the base of a border, it will be hidden and the type of closed edge does not matter.
What should I do with the cut yarn tail after securing the stitches?
If you will be sewing a seam in this area, leave a long tail and use it to sew the seam. In other cases, after closing the edge, hide the ends of the threads on the wrong side of the knitting.
Is it possible to undo the last closed row?
Yes. Using the tip of a knitting needle, pull the cut thread through the last stitch. Pull the tail and the closed edge will unravel. If the yarn is a little felted (tangled) and does not unravel freely, use sharp scissors to carefully trim only the tangled fibers.
When I pin the last row, the edge is too tight. What should I do?
This is because the stitches should lie sideways along the edge of the fabric, but the width of the knit stitches is greater than their height, so the bound stitches are naturally a little tighter compared to the stitches under the bound row. Here are some tips that may help you.
Use larger number needles (or crochet hook) to bind off stitches. This automatically makes the loops a little larger, so they stretch more along the edge. Be sure to form each stitch on the straight side of the needle, not the tip.
Close the loops looser. Each time you cast off a stitch, lift the right needle slightly, straighten the loop, and then knit the next stitch. If you are knitting tightly when casting off a row, resist the urge to tighten each stitch.
Try a different way to secure the loops. Casting on double crochet stitches, pinning off stitches with a needle, or casting off hollow knit stitches is much looser and more elastic than the basic method of casting off stitches.
What is the best way to secure the last row of openwork or lace?
To get a regular, but very loose row of closed loops, fasten the loops with a crochet. If you crochet, you can close the loops with the same crochet hook. You can close one loop at a time, or you can work with a group of loops and decorative binding.
Which type of loop fastening stretches the most?
Fastening hollow knit stitches if you do it loosely, although often such fastening leads to loss of shape of the product. Fastening loops with double crochet is elastic and retains its shape better.
Is it possible to make sure that the last closed row matches the cast-on edge?
Securing stitches with a needle works best with a cast-on edge, and you can control the tension by making the edge looser or tighter.
I knitted a pattern with braids. How can I secure the last row so that the edge does not wrinkle or protrude?
Braids significantly retract the fabric. To prevent the closed edge from fanning out, decrease one or two loops at the top of each braid. This can be done either while you are casting off the stitches or on the previous row. You can experiment with decreasing stitches as you cast off the pattern.
Can I knit a selvedge covering the last row?
Yes. Work in stockinette stitch to the edge of the piece. To ensure that the piece folds neatly, simply continue knitting in stockinette stitch. To create a straight, flat fold, work one or two rows in purl stitch (two rows create a more textured edge). To get a jagged edge, the entire row should be knitted on the fold in the following repeating pattern: 1 yarn over, knit 2 stitches together. Then knit again in stockinette stitch until the length of the fabric above the fold is equal to the length of the fabric below the fold. Cut the thread, leaving a tail that will be convenient for sewing the hem. To join two layers of fabric, fold the edge inward. Thread the yarn through the needle and insert it into each stitch on the needle and into each stitch knitted details. You can also close the edge of the fabric very loosely and then sew it to the edge, but then the edge will be more voluminous.
For a less bulky selvedge, knit the inner selvedge layer with a finer yarn, use fewer stitches, or switch to a smaller needle size.
I knitted a pattern with increasing and decreasing stitches. How should I pin the last row to make it look nice?
You must close “in a pattern.” As you knit a row, you should not knit the stitches, but knit them exactly according to the pattern. For example, if you are knitting in ribbing, continue knitting and purling stitches to complete the row. At the same time, you can continue to do partial or complete decreasing and increasing stitches.
Let's take for example openwork pattern"net". On the wrong side, you purl all the stitches. On the right side, your pattern consists of yarn overs and decs. Every time you're on right knitting needle there are two loops, pull the right loop through the left even if the left loop is a yarn over. When you need to decrease a stitch, for example, knit 2 stitches together, make a decrease, then pull the right loop through the decreased loop. Although the difference between casting stitches in a pattern and casting off regular stitches is almost indistinguishable, the stitches warp less when you cast them in a pattern.
How do I get rid of the "ladder" when I bind off stitches on multiple rows?
When you knit armholes, shoulders and necklines, you often have to bind off the loops in groups, as a result the beveled edge goes like a ladder (Fig. 14). On the other hand, if you create a smooth diagonal edge, it is easier to stitch and cast on stitches along it.
You can even out the edge by slipping the first stitch of each group and then casting it off. To do this, bind off the first set of stitches as usual. When it's time to cast off the next set of stitches, slip the first stitch as you would in stockinette knitting. Knit the next stitch. Pull the slipped stitch through the knit stitch and then slip it off the needle. Continue casting off the remaining stitches as usual (Figure 15).

Most often, knitting a part ends with the loops being closed, otherwise the knitted fabric will unravel. There are several ways to close loops.
Closing one loop at a time
1. Slip the edge stitch onto the right needle. Knit the next stitch. There are 2 loops on the right needle.
2. Insert the left needle into the edge stitch and pull the first knitted stitch through it.
3. There will be one loop left on the right needle. Thus, close all the loops to the end of the row.
4. Then cut the thread, leaving a small piece. Insert the remaining piece into the loop and pull it off. Try to keep the tension of the loops of the closed row the same as the loops of the knitted fabric.
Closing with two loops
1. Knit the edge and first loops together behind the back walls of the front stitch.
2. Transfer the new loop from the right needle to the left and knit it with the next loop in the same way as the first two. Thus, close all the loops to the end of the row.
3. Then cut the thread, leaving a small piece. Insert the remaining piece into the last stitch and pull it off.
Closing loops at the sleeve armhole or neckline
This method is used when closing loops in the armhole of a sleeve or neck. Cast off the required number of stitches on the first row. Knit the purl row without changes. On the next row slip the first stitch. Knit the 2nd loop and pull the first loop through it. With this method of closing loops, the edge is smooth, without sudden changes.
Closing 2 x 2 elastic loops without using a needle
1. In the front row, knit 2 front loops. There were 2 knit stitches on the right needle.
2. Insert the left needle into the first knit stitch and pull the second knitted stitch through it. There will be one loop left on the right needle.
3. Purl the next stitch. Insert the left needle into the loop on the right needle and pull the knitted purl stitch through it.


Evgenia Smirnova
To send light into the depths of the human heart - this is the purpose of the artist
Hand-knitted items are unique, beautiful products. They contain work and a piece of the craftswoman’s soul, care and love for loved ones. Threads, knitting needles, a plan for the finished item, painstaking work of many hours - this is how a hand-made masterpiece is created. When everything is connected, it's time to finish the job. To do this, it is not enough to simply cut the thread - an edge that is not knitted correctly will unravel. The final step is required - closing the loops with knitting needles. There are several techniques to do this reliably and firmly.
Methods for closing loops with knitting needles
The choice of the appropriate method depends on what is being knitted and what requirements there are for the edge in terms of beauty, functionality and other parameters. Some techniques will be suitable for smooth knitting, while others will finish the elastic firmly and elastically, without preventing it from stretching and returning to its original position without deformation. There are methods that will make the bottom beautiful and airy, like lace. The main techniques include:
- closing loops two at a time;
- without thread, with a knitting needle on a fishing line;
- on an elastic band using a needle;
- elastic closure;
- with narrowing of the canvas;
- decorative way.
How to bind off loops by knitting 2 together
This technique for completing knitting is simple, and a novice needlewoman can do it. It is worth considering that it is not suitable for all things. It is not applicable for finishing a knitted elastic band - the edge will quickly stretch and become sloppy. The method of closing loops two at a time is suitable for things that will not stretch when worn: scarves, blankets, dress bottoms, shawls. Used for bevelling the shoulder seam, which will later be sewn with a textile seam. A neatly formed braid will securely tighten the end of the yarn. There are two main types of this method: knit or purl.
Knit loops
This technique of finishing knitting creates a border that is visible from the front of the item. It won't take much time to learn it. Execution order:
- A regular knit stitch is made, two loops are knitted at the same time.
- The loop obtained on the left is transferred to the right knitting needle.
- The first step is repeated, from two loops: old and new.
- The new loop must be placed on the right needle.
- The steps are repeated until the last loop remains.
- The thread is cut, the length of the tail is approximately 8 centimeters.
- The end of the thread is pulled through the loop and firmly fixed.

Purl stitch
The method is similar to that described above, except that it is done purl. The edge is formed with reverse side canvases. Execution steps:
- Two loops are knitted together in a purl stitch.
- The resulting loop on the right needle is transferred to the left.
- Step 1 is repeated.
- The transfer is carried out as in step 2.
- The stages alternate until all the edging is done.
- The yarn is cut at a distance of 5-8 centimeters from the product.
- The tip is inserted into the last loop and tied tightly.
There is also a combination of these two techniques. The principle is to alternate knitting methods (purl and knit). In this option, the edging braid will be strictly in the middle of the knitted fabric, and not shifted to one of the sides.
Closing stitches without thread on knitting needles with fishing line
This technology requires a special tool: knitting needles connected to each other with a strong fishing line or thin cord. No thread is used - knitting is done with ready-made loops. The seam has elasticity, is able to stretch and come back, and holds its shape well. Suitable for finishing hems with stretchable parts: hats, socks, leg warmers, sweaters, mitts. Execution steps:
- We move the finished elastic band from one knitting needle towards the other along the fishing line between them - so that the ball of thread is on the other side of the knitted part.
- We place the item in the left hand. On the right there is a free knitting needle.
- The first loop is removed onto the knitting needle.
- The one following it stretches through it, and the previous one turns out to be already closed.
- The technique is repeated until all the loops are knitted.
- The ball of yarn is cut off, the tail is passed through the last loop, and tightened tightly.
- You can perform this technique using a hook, replacing it with a knitting device with fishing line.
- This method also includes closing a row of circular knitted elements with knitting needles, regardless of the diameter.

On an elastic band with a needle
Another common method for finishing knitting, which is applicable for places where there is a stretch part. These are rolled sleeves, hosiery, high raglan neck, and other clothing details. The edge turns out elastic, rounded, looks like a factory one. The names used for it are: back needle method, tubular closure and buttonhole stitch. You will need a thick needle with a large eye and a blunt end. Stages of work:
- The thread threaded into the needle is pulled through the first two loops (front and edge).
- The first loop is transferred to the needle.
- The needle is inserted into the second loop, tightening the already knitted first one.
- The resulting loop is placed on the needle.
- Having skipped the purl loop, the needle and thread are pulled into the next knit stitch.
- The purl loop is removed.
- The next knit stitch is skipped, the thread is pulled into the purl stitch, tightly clasping the previous loop.
- The knitting needle is removed from the knitting needle, which is already tied with thread, which will prevent it from unraveling.
- The sequence is repeated until the last two loops remain.
- The needle passes through both at once, a loop is formed from the yarn, which pulls them tightly, securing the edge. Yarn edge trim is ready.
Elastic loop closure
This is a simple method used to bind off stitches using knitting needles on fabric made in stockinette stitch or with a pattern. It is universal and applicable to both seamlessly connected simple products- shawls, scarves, - as well as things of a more complex style, for example, items of clothing and their parts. During the work, it is important to pay attention to the tension of the wool. The yarn overs should be even and not too loose. Knitting steps:
- The first loop is transferred to the right knitting needle and a yarn over is made.
- The next stitch is knitted according to the pattern.
- The removed loop returns to the left, along with the yarn over.
- The right needle knits a loop through them following the yarn pattern.
- You need to alternate steps one by one until complete completion.
With narrowing of the canvas
Closing the neck loops with knitting needles is often made narrower. This reduces the diameter of the outer part, preventing stretching and deformation during wearing and washing. Suitable when you need to knit a sleeve or wrap it, it will look good on children's clothes with sleeves in the shape of a lantern. Convenient for raglan knitting from bottom to top. Stages of work:
- First, the first two stitches are worked together in knit stitch.
- You need to pull the fourth loop through the third.
- The next two are knitted together again with knit stitch - repeat step 1.
- Repeat step 2.
- Actions are performed one by one until the end of the canvas.
- In the new row, two loops are tied into one using the purl technique.
- The third (last) row is made two stitches together, but with the resulting one returned to the original knitting needle.

Beautifully closing loops with knitting needles - a decorative way
Woolen items are not only warm and comfortable, but also beautiful. Unique appearance give little things and nice details. Eat different options with decorative design. They are suitable for knitting bottoms, round necks, and collars, but they are not suitable where strength is needed above all (shoulder and other seams). There are several methods that give openwork and decorative details: five loops (using a hook), picot, flowers and others. Closing loops with knitting needles according to the stages of execution:
- Using a hook (the thickness is selected according to the thickness of the knitting needles), you need to pull five loops up from the first outer loop.
- The next 4 loops should be threaded and knitted together.
- Alternate steps 1 and 2 until the end of the edge.
- At the end, cut the yarn and fasten firmly.
Video
Found an error in the text? Select it, press Ctrl + Enter and we will fix everything!
There are many in various ways securing loops in a knitted product. Let's consider one of the most common and convenient methods. This is the closing of loops by pulling each subsequent loop through the previous loop.
So let's begin.
1. Remove one edge loop in the same way as you made edge stitches in the product.

2. Knit the next loop according to the picture. We now have two loops on the right needle.

3. Insert the left needle into the edge loop from left to right and pull it slightly towards you.

Using the right needle, pull the second stitch through the edge stitch.

Lower the edge loop from the knitting needle. Thus, there is only one loop left on the knitting needle.

4. Knit the next loop according to the picture. On the right needle we again have two loops.

5. Insert the end of the left knitting needle into the first loop from left to right and pull it towards you. Pull the second loop through the first with the right needle. Lower the first loop from the knitting needle. Thus, on the right needle we again have one loop.

6. Repeat steps 4 and 5 until you have closed all the loops. There should be one last stitch left on the right needle. The left knitting needle is free.

7. Cut the thread, leaving the end of the thread approximately 6 - 8 cm long. Pull the end of the thread through the loop, tightening it tightly.
We examined in detail the method of securing loops by pulling the next loop through the previous one. If you have any questions or want to discuss something, be sure to leave a comment.
You might be interested to see:
 |
Closing the loops of the last row of a knitted product
At the end of knitting the loop details last row close using a knitting needle or a needle with a large eye. There are several ways to close loops, the choice of which depends on the knitting pattern.1st method: Closed loops represent straight braid, which can be done tightly or loosely, it depends on the thickness and looseness of the yarn.
The edge of a part closed in this way does not stretch. Apply this method of closing to any pattern, to any detail.
This method looks like sequentially pulling one loop through another.
Knit together edge And first loops facial viscous for rear the walls of the loop, resulting in one loop. The resulting loop is transferred from the right knitting needle back to the left and knitted together with the next knitting stitch behind the back walls of the loops. Knit like this until the end of the row.
When there is only one loop left on the knitting needle, the thread is broken, leaving 3-4 cm, inserted into the loop and tightened. When performing this method, it is necessary to ensure that the edge of the canvas is not pulled together.
I'm performing such a closure very often I use a short hook. Since it does not allow the loops to be tightened, and the speed of crocheting is much faster than when you close the loops with knitting needles.
When closing details completed purl stitch The edge and next loop are knitted purlwise, then the 1st loop is knitted through the 2nd loop. Next, knit only 1 loop and pull the previous one through each received loop. Repeat this technique until all the loops are secured. Cut the thread and pull the end of the thread through the last loop.
 2nd method: Edge of the part, closed in this way represents stretch braid.
It can be applied to any pattern, but most often this method is used to close an elastic band with any number of knits and purl loops, as well as for relief patterns.
The first (edge) loop is removed onto the right knitting needle, the second is knitted according to the pattern (knit or purl), resulting in two loops on the right knitting needle. Then the left knitting needle is inserted into the removed loop, it is slightly pulled out and the second knitted loop is pulled through it. Next, knit the 3rd loop and pull it into the loop on the right knitting needle. Knit like this until the end of the row. When one loop remains on the left knitting needle, break the thread, leaving 3-4 cm, insert it into the loop and tighten.
3rd method: or closing the loops with a needle. This method is used to close 1x1 or 2x2 elastic loops. In this case, the edge of the part lies naturally and stretches freely.
Closing perform By open hinges. So that they are even and do not unravel, finish knitting the parts with several (3-10) rows connected with an additional thread (the main thread is cut off, leaving an end equal to three lengths of the row being closed). Remove the knitting needle from the stitches and iron the edge of the piece through a damp cloth. Unravel the rows connected with an additional thread.
Thread the main thread remaining from knitting into a needle with a large eye and sew a seam along the open loops, holding the product with the front side facing you.
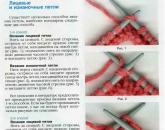
For elastic band 1x1
- WITH front side insert a needle into first(edge) and second loop(Fig. 1a).
- Bend the part towards you, from the wrong side - in the first and third loops(Fig. 1b).
- Then with front side- in second And fourth loops (Fig. 1c).
- And with wrong side- V third And fifth loops (Fig. 1d).


Fig.1a Fig.1b


Fig.1c Fig.1d
For elastic band 2x2
- WITH front side insert a needle into first(edge) and second loops (Fig. 2a).
- Bend the part towards you, with purl sides- V first And third loops (Fig. 2b).
- Then with front side- in second And fifth loops (Fig. 2c)
- And with wrong side- V third And fourth loops (Fig. 2d).
- WITH front side- again in fifth And sixth loops, etc.


Fig.2a Fig.2b


Fig.2c Fig.2d
4th method: Closing the loops with a needle on the last row of any pattern.  Given method is used in the case when necessary get good stretch edge details, such as round neck loops.
The loops of the last row are left on the knitting needle. Break off the working thread, leaving end, equal three lengths the row being closed, and thread it into the needle.
- The needle is inserted first loop with facial sides, pull the thread through it and remove from a knitting needle.
- Second loop with purl sides miss, leaving her on a knitting needle,
- A igloo introduce V third loop from the wrong side and pull the thread through it.
- Next igloo introduce in second loop from the front sides, and withdraw V fourth loop from the wrong side etc.
 When fastening the loops, cast off the required number of loops in the first row by pulling one loop through the other. In the second and subsequent rows, do not knit the 1st loop, but remove it, as in purl knitting. Then knit the 2nd loop and pull the removed loop through it. The edge contour with loops closed in this way will be smooth.


Popular
- Presentation on the topic “when did clothes appear?” This knowledge may be useful in
- Master class on knitting polypropylene bags Crochet polypropylene
- Irregular contractions Abdominal prolapse before childbirth
- Why do children develop aggressive behavior?
- Useful properties of Vaseline that you didn’t know about What is Vaseline and why is it needed?
- The right choice of hand cream against cracks and dryness
- How to prepare facial milk at home and use it correctly?
- Crochet toys with descriptions and patterns for beginners, patterns, professional amigurumi knitting
- Calculation of old age pension, or counting your pension yourself
- How I brought my husband back to the family